Home || 500CMX || History || Technical Info || Support || Contacts
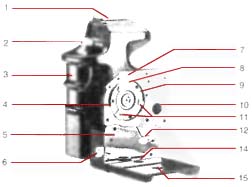
1. Flash shoe
2. Shutter release button
3. Motor drive body / grip
4. Guide ring on attachment plate 5
5. Attachment plate
6. Shutter release L-lever
7. Index on attachment plate 5
8. Index on drive coupler 9
9. Drive coupler
10. Hole of attachment plate 5
11. Drive studs on drive coupler 9
12. Connecting key for camera pre-release
13. PMD base plate
14. 3/8 tripod socket
15. Securing screw hole
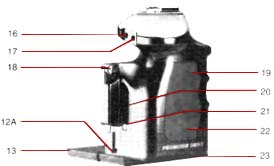
16. Winding Red LED
17. Power 'ON" Green LED
18. Strap lug
19. Motor drive PVC
20. ON / OFF power switch
21. Over-ride switch
22. Battery compartment
23. Battery cover
In consideration of product improvement, design and specifications are subject to change without prior notice
Thank you for having the interest in the APCAM Professional Motor Drive 500cmx. The Pro Motor Drive (PMD) is specially designed and developed for the HASSELBLAD 500C, 500C/M & 503CX cameras even though the Hasselblads originally did not have intended provision to accept a Motor Drive (and therefore:-)
This content of this site can be used as a general info for anyone interested in the Arcam's products, as for the current users, this site can be your updated info site on the latest development of the product.
Though the instructions here may sound complicated, the real life experience of attachment and immediate usage of the Apcam's Motor Winder is of breezing experience to you - that we can assured you this.
The contents provided here are merely for detailed briefing based on a fresh user experience that might confused in certain area in his/her First Time usage.
These useful guides are based on data accumulated from more than thousand first time users (after all, until 1996, Hasselblad have no motor or winder available) and Apcam is more than cautious to protect your investment by publishing the all detailed info for your reference here.
GENERAL INSTRUCTIONS
IMPORTANT
The owner must read the instruction manual that come with your Apcam Pro Motor winder very carefully and properly understand the precise procedures and precautions before using the Pro Motor Drive in order to obtain the best possible performance.
A. The power switch SHOULD be turned to the OFF position;
1. when not using the Motor Drive
2. when loading or replacing new batteries
3. when attaching * the Motor Drive to the camera
4. when detaching * the Motor Drive from the cameraB.
1. The Hasselblad camera should be fully tensioned / cocked and the winding knob or crank removed before attaching the Pro Motor Drive 500cmx.
2. Important: Never attempt to attach the Pro Motor Drive to a partly tensioned i cocked camera. The camera must be fully tensioned / cocked.
3. The camera t me exposure catch lever should always be set at O position and never at T position
4. The neck strap removedFailure to observe the above may result in mechanical damage to the Motor drive and / or camera which cannot be warranted against.
INSTALLING BATTERIES
6AA size batteries are required to power the Pro Motor Drive.
1. Remove the battery cover (23) from the base of the Motor Drive body / grip by pressing upward and simultaneously sliding it outward.
2. The battery holder case should then slide out; otherwise lift it out.
3. Insert 6AA size batteries following the polarity marking (+) and (-) correctly; and slide the loaded holder back into the Motor Drive.
4. Replace the battery cover by sliding inward until it locks with a click.CHECK AND SET THE PRO MOTOR DRIVE BEFORE ATTACHING
The Pro Motor Drive must be checked and set correctly as the Fig 1.
Fig 1
Always check and set just before attachment.
SETTING
use the following procedures
l .Turn power switch (20) to ON position
2. If the drive coupler (9) does not turn. then follow step 4.
3. If the drive coupler (9) does turn and after one full rotation. index (8) would stop at about 7 50 counter-clockwise away from index (7) Fig. 2. Please note that this is not suitable for attachment .
4. With fingers positioned against the studs (1 l ), gently and slowly rotate the drive coupler (9) in the opposite direction of winding (clockwise) by about 10° until it stops at the mechanical block as in Fig. 1.Once set, the Pro Motor Drive is ready for attachment.
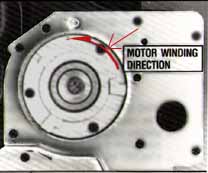
Fig. 2. NOT SUITABLE FOR ATTACHMENT
Turn power switch OFF. Attach the Pro Motor Drive Immediately.
DO NOT PRESS PRO MOTOR DRIVE shutter release button (2) or shutter release L-lever (6) after being set, between and during attachment.
THE HASSELBLAD 500C, 500C/M & 503CX
The Hasselblad camera must be ready for attachment as well via:
1. Fully tensioned / cocked with the winding knob or crank removed.
2. After fully tensioned, the U-indent index on the 3-claw winding plate of camera should be at the l 2 o clock position or within 26 on either side. Cameras with larger angle variation may not be suitable for motor drive operation. Have camera adjusted.
3. The neck strap end removed from the strap lug on the side of winding. A substitute lug is provided on the Motor Drive.
4. The camera time exposure catch lever should always be set at O position and never at T position.
5. Do not operate the Motor Drive with the camera body only; preferably the camera body should be fitted with lens.
Fig. 3.
Fig . 4.
ATTACHING THE PRO MOTOR DRIVE
1. Support the camera on the accessory rail side on stable surface. Fig. 5.
2 Position the Pro Motor Drive above the camera and engage the guide ring(4) into the camera opening; the small hole (10) cupping over the strap lug.
3. Fig. 5 shows the Pro Motor Drive in an engaged position with the camera
4. The coupler plates of both the camera and motor drive should be properly aligned. Though it may not be possible to see the engagement, however the 3-block studs (11) on the drive coupler (9) of Motor Drive should be positioned rotatable against the 3-claw configuration on the camera winding plate.
Fig. 6
5. The Pro Motor Drive Attachment plate (5) should rest flush against the camera and the PMD base plate correctly aligned to the camera base.
6. Shimming between camera base and PRO MOTOR DRIVE base plate may be necessary; use the provided shimming material polyester film t=0.25 mm. Stick the film to the camera base.
7 Position the 1/4 securing screw through the threads of PMD base into the camera tripod socket and tighten securely (3/8 to 1/4 adaptor provided).
8 The Pro Motor Drive is now attached to the Hasselblad camera.NOTE 1* AFTER MOTOR DRIVE OPERATION, EVERY DETACHMENT OF THE PRO MOTOR DRIVE SHOULD ALWAYS BE FOLLOWED BY A CHECK AND SET BEFORE RE ATTACHING AGAIN.
STANDARD CLEARANCE
The standard clearance between the camera chrome shutter button tip and the Motor Drive L-lever (6) should be:
0.3~0.5mm for 1981 and older 500C/M and 500C
1.4-1.5mm for 1982 and newer 500C/M and
503CX Fig. 7
The clearance ought to be checked with the Motor Drive and camera as a set with the lens position pointed vertically downwards. Fig 7
USING THE PRO MOTOR DRIVE AND CAMERA
1. Turn the power switch (20) on. Green LED lights up. See Precautions 1.
2. Press fully - TRIGGER FIRMLY the PMD release button (2) until the camera's release cycle heard or felt to make an exposure. Red LED lights up indicating the winding cycle or ready to wind. See Precautions 2.
3. Let the camera lens shutter firing complete depending on the shutter speed being selected and release the PMD shutter button (2) fully and quickly. See Precautions 3 & 4.
4. The Motor Drive will automatically advance the film, tension / cock the shutter and lower the mirror simultaneously at a speed of about 1 frame per second.
5. The Pro Motor Drive and camera is again ready for the next exposure.
PRECAUTIONS
1. ) If there should be a slip SOUND "zzzzz...." usually for about 3 seconds, then followed by:
a continuous buzzing noise, or a "cher" cut-oft latching sound;
in both cases, the winding stalls and the Red LED remains lighted.
Immediately turn power switch (20) OFF.Causes: The camera is probably not triggered - a visual check at the lens shutter! and the PRO MOTOR DRIVE is probably not correctly set or unintentionally triggered - ready to wind.
THE PRO MOTOR DRIVE CANNOT WIND-UP A NOT TRIGGERED CAMERA!
Remedy: Trigger the camera via the Pro Motor Drive shutter button again.
Turn power switch (20) ON. Winding should follow.
After this, the Pro Motor Drive and camera should operate normally.2.) The PMD shutter release button (2) is blocked and cannot be triggered - DO NOT FORCE !
If the magazine dark slide is not removed: the camera shutter release mechanism is blocked After the last frame on a roll has been exposed and wound-on; the camera shutter release mechanism is also blocked.
If the PRO MOTOR DRIVE stops in mid-cycle. See Precautions 4a - e.3.) Note that light pressure on the PMD shutter button (2) during the winding cycle could cause the winding to slow to a stall therefore avoid pressure contact on the shutter release button (2) during the winding cycle. Always let winding complete.
4.) If after full shutter rel ease. the Red LED tail to light-up and therefore no winding: CONTINUOUSLY press the over-ride switch (21 ) for about 2 seconds or longer until the winding cycle completes.
Should in any winding operation, if the Pro Motor Drive stops/stalls in mid-cycle; would not wind-up the camera or cannot be re-started via the reset switch (21):
Turn power switch (20) OFF.
Detach Motor Drive from camera.
Trigger the Motor Drive to check its winding.
Repeat the procedures of check and set both the Pro Motor Drive and the Hasselblad camera complete the winding cycle on camera manually.
Re-attach for use.And if it is necessary to operate this over-ride switch (21 ) very often after normal full shutter release, then the Pro Motor Drive probably needs adjustment to the Shutter Release L-lever (6). The Shutter release L-lever (6) on the Pro Motor Drive can be adjusted for the below-mentioned CORRECT SYNCHRONISATION:- using a pair of pliers to bend the lever OUTWARDS or inwards; whichever is proper.
5.) The correct synchronisation of the triggering for the APCAM PRO MOTOR DRIVE 500cmx and the HASSELBLAD camera is as follows:
During shutter trigger, view from the rear of the motor drive unit and Hasselblad camera without the film magazine when the winding Red LED lights up; the camera should also be triggered at the same time i.e. the opening of the auxiliary shutters.
6.) Protect the PMD shutter release L-lever (6) from being bent or distorted from the standard configuration; adjust accordingly if and when necessary.
7.) If winding slows appreciably, change to new batteries immediately.
DETACHING THE PRO MOTOR DRIVE
Turn the power switch (20) OFF.
Place the camera on its accessory rail side on stable surface. Fig. 5 or hold by hand as in Fig. 8.
Use coin to loosen the securing screw and unscrew completely, removing it from the camera.
Store securing screw carefully.
Lift and remove the Pro Motor Drive from the camera.
Note*2* After detaching the Pro Motor Drive, check it the camera is fully tensioned/cocked. If partly tensioned, complete camera tensioning manually. It also means that the batteries are weak even though winding is still possible to a limited extent. Replace batteries immediately.
CONNECTING KEY (l 2) & LEVER (12A}
For Camera Pre-release-Mirror-up
Push upward firmly the connecting key lever (1 2A) until the camera pre-release function - mirror-up is triggered. Normal shutter release should follow.THE OVER-RIDE SWITCH (21)
DO NOT USE under normal problem-free winding operations. Use only when recommended; See precautions 4.
OTHER USEFUL SUGGESTIONS
1) Always use the camera and Pro Motor Drive set with neck strap; it is one of the best way to carry the set around ready for use. Also if adjusted to the optimum, it could enhance waist to chest level shooting.
2) Always use both hands to hold the camera and Pro Motor Drive set for a better steady grip thereby improving picture sharpness in hand-held photography.
3) Use long focal heavy lenses preferably mounted on a tripod.
4) Detach the Motor Drive from the camera when stored in transit.
5) Adopt any useful suggestion that could minimise the chances of damages.
6) Observe all sound battery care practices.

ALPHOTO PRECISION CAMERA ACCESSORY MANUFACTURER
ALPHOTO PRECISION SDN BHDHead Office:
26, Jalan Angsana, Taman P.Ramlee, 53000 Kuala Lumpur, MALAYSIA.
Email: apcam@tm.net.my Tel/Fax: 603-444 8088, 603-422 9023US's Office:
No.2, Elizabeth Street, New York, N.Y. 10013, United States of America.
Tel: (212) 732 3828 Fax: (212) 732 3588
Home || 500CMX || History || Technical Info || Support || Contacts
Check here for the respective Hasselblad models
Home - Photography in Malaysia

[Left Brain][Right brain][Home-MIR]
[Invention][Art & Design][Newsdesk][Collectibles][Clubs]
[Portfolios][Camera Shops][Suppliers][On assignments]
[Pix of the week][Trading room][Knowledge & Resources]
[Free-trade-zone][Thoughts & opinions][Links]
Copyright © 1996 leofoo [member of the MIR Web Design Team.]
All Rights Reserved. Created with a Power Macintosh.