Detailed Operation of the AE-1
A silicon photocell is used as the photosensitive element in the camera. If you compare
the silicon photocell (SPC) with other existing photo-sensitive elements, you will
find it covers a greater range of lighting situations and allows for greater accuracy.
In order to provide the AE-1 with the best possible magnetic release system, Canon
developed a special circuit for instantaneous light metering, Due to this innovation,
even in place as dark as EV1 (at ISO 100, f/1.4, 1 sec.), metering can be performed
in only 0.04 second.
 |
Viewfinder Information |
Meter Sensitivity Pattern
 |
In a great variety of lighting situations, the carefully designed Central Emphasis Metering system simplifies problems to ensure that the subject is correctly exposed. |
Metering Range
TTL metering is possible with a f/1.4 lens at ISO 100 from EV 1 (1 sec., f/1.4) to EV 18 (1/1000 sec.. f/16).
|
ASA Film Speed |
Coupling Range |
|
25..50 |
2 to 1/1000 sec |
|
..100 |
1 to 1/1000 sec |
|
..200 |
1/2 to 1/1000 sec |
|
..400 |
1/4 to 1/1000 sec |
|
..800 |
1/8 to 1/1000 sec |
|
..1600 |
1/15 to 1/1000 sec |
|
..3200 |
1/30 to 1/1000 sec |
Shutter Speed and AE Coupling Range The shutter speed and AE coupling range are indicated in the table. If any combination outside the coupling range is made, the coupling range warning lamp will blink, as it does when warning of underexposure. Since the lamp serves a dual function, check that the shutter speed IS within the coupling range before assuming that the light level is too low.
Overexposure Warning Mark When the lighting of the subject is too bright, the meter needle will rise into the red zones of the aperture scale. The red area is divided into two parts. The top part is a warning for use with a lens having a minimum aperture of f/22, while the bottom part is for use with a f/16 minimum aperture lens. When the meter needle enters the red area, incease the shutter speed and correct the exposure.
Note: With some specific lenses like the FD 100mm f/4 Macro lens, which offers a minimum aperture of f/32, if you want to photograph at its minimum aperture of f/32 and the meter needle points to the red area, do the following: Increase the shutter speed until the meter needle indicates f/22 and then decrease the shutter speed by one gradation so that the exposure will be correct.
Underexposure and Coupling Range Warning LED Lamp This lamp blinks on and off as a warning of incorrect exposure. If you reduce the shutter speed by turning the shutter speed dial so the underexposure warning lamp will stop blinking, the correct exposure will also be obtained. Under dim light with a slow speed lens, there is a case when the meter needle will point at the aperture scale inside the viewfinder although it will exceed the maximum aperture of the lens. In this case, turn the shutter speed dial to a slower setting so that the underexposure warning lamp stops blinking.
For example, when you use an f/2.8 lens and the meter needle exceeds the aperture scale of f/2.8 inside the viewfinder, reduce the shutter speed until the lamp stops flashing. When the shutter is set at 'B' (Bulb) and the shutter button is pressed halfway, this warning lamp will also flash on and off.
 |
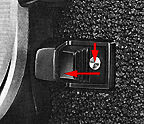
Battery Check and Stopped-Down Metering Index Mark |
Manual Aperture Control "M" Signal (LED) When the aperture ring is not set at the "A" mark, you cannot get the correct exposure in AE photography. When the aperture ring is set at any position other than the "A" mark, the manual aperture control "M" signal will blink as a warning. Also, when Canon FL lenses, Bellows or the like are used, this warning signal flashes on and off when exposure measurement is performed.
Concerning the Exposure (Shutter
Speed and Aperture Coupling) In order to obtain the correct exposure, it is necessary
to correctly match the shutter speed with the aperture. The shutter speed and the
aperture are the main factors in controlling the amount of light which is allowed
to strike the film, and when they change, the quality of the image upon the film
also changes.
1) Effects of Changing the Shutter Speed The explanations below are pertinent
to photography with fast moving subjects or when it is intended to convey the feeling
of movement in a photograph. If, as in example, a photo is taken at a shutter speed
of 1/250 sec. and above, the movement will be frozen. If, with the same subject,
the photo is taken at a speed of 1/60 sec. though the subject is somewhat blurred,
movement is well expressed. It is only a matter of aesthetics as to which of these
photographs is the best. Depending on the selection of the shutter speed, you can
freely control the expression of movement.
2) Effects of Changing the Aperture (More info relating to this topic)
Because this camera is an AE camera with shutter speed priority, when you change
the shutter speed, the aperture will also change. If you change the speed by one
gradation, the aperture also changes the equivalent of one gradation. Aperture changes
have an effect on the photographic expression as follows: The lens aperture controls
the zone of sharpness in the subject field which is observed in the viewfinder or
recorded on the film.
Aperture Priority Photography After having given careful thought to the results
of aperture adjustments, when the f/stop has been determined before shooting, press
the exposure preview switch while looking into the viewfinder. Then turn the shutter
speed dial until the meter needle on the right of the viewfinder reaches the f/stop
desired.
Depth-of-Field (More info relating to this topic) When a certain subject is brought
into focus, there is only a limited range in the foreground and background of the
subject which can be kept clearly in focus. This zone of sharpness in the subject
field is depth-of-field.
 |
There are two methods of confirming the extent of the depth of the field: by stopping down the lens diaphragm or by reading a value from the depth-of-field scale on the lens. |
Confirming the Depth-of-Field by: 1). Stopping-Down the Lens Diaphragm. Wind the film and determine the aperture required for the subject by metering, then set the f/stop by turning the aperture ring after disengaging the aperture ring from the "A" mark. 2). Press the stopped-down lever until it locks. Once locked, the depth-of-field can be checked by looking into the viewfinder. Thus, the extent of the depth-of-field can be seen as the zone of sharpness in the subject field observed on the screen. When the stoppeddown lever's release button is pressed, full aperture metering will be restored.
 |
3). After having turned the aperture ring to the maximum f/stop on the lens, reset it to the "A" mark. Otherwise, you will not be able to obtain the correct automatic exposure for the next shot. |
Stopping-down of the FD lenses should only be done after advancing the film. Should you not advance the film, the stopping-down of the lens diaphragm would only be possible up to the previous exposures aperture. Also, when the aperture ring is set at the "A" mark, the stopped-down lever cannot be pressed.
Generally, the depth-of-field will
become deeper as the aperture becomes smaller, and shallower as the aperture becomes
larger. A shorter focal length as well as a greater subject distance will also attain
deeper zone of depth-of-field. Comparing an interchangeable 28mm lens with a standard
50mm lens set at the same f/stop, the 28mm lens's depth-of-field will be greater.
And when the photographic distance changes, the depth-of-field changes, too. For
example, if the same subject is photographed from three and then from seven meters
away, the foreground and background of the subject will be deeper at the greater
distance.
4) Depth-of-Field Scale on the Lens Most
manual focus lenses has excellent depth-of-field scale engraved on the lens barrel,
shown as a series of f/numbers on each side of the distance index mark opposite the
distance scale. Focusing and depth-of-field are so closely interrelated that the
depthof-field scale is engraved together with the distance scale.You can tell the
extent of depth-of-field from the distance scale.
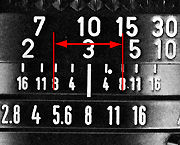 |
For example, if you use the camera with a standard 50mm lens that is focused on a subject at medium distance, say 3m with the aperture set at f/8, the depth-of-field extends from 2.4m to 4.5m. This tells you that with the 50mm lens focused at 3m and the subject between 2.4m and 4.5m the film image will be reasonably sharp. |
Using the Self-Timer Obvious uses for the self-timer are selfportraits and the inclusion of the photographer in the picture. The self-timer, though, can also be used in place of a cable release to release the shutter gently and smoothly in close range work like photomicrography or copying. Push the electronic self-timer lever forward, then press the shutter button, and the shutter will be released 10 seconds iater. The camera memorizes the exposure value the very instant the self-timer is activated by pressing the shutter button. While the selftimer is in operation, the self-timer lamp flashes on and off. After you finish taking a picture the self-timer lever should be reset to its orignal position. Otherwise, it will function again the next time you press the shutter button.
 |
Exposure will be automatically determined at the instant the shutter button is pressed, and not when the picture is actually taken. Therefore', avoid standing directly in front of the lens when you press the shutter button as the AE control may miscalculate the proper exposure. |
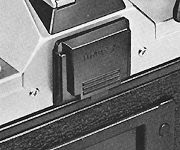
To prevent stray light from entering the viewfinder from the rear and possibly affect-ing the meter reading, it is a good idea to cover the eyepiece with the viewfinder cover which is inserted into the accessory shoe. This cover can be attached to the holder on the viewfinder eyepiece. After doing so, press the shutter button.
Cancelling the Self-Timer Operation If you should want to cancel the selftimer operation after having pressed the shutter button, depress the battery check button on the top side of the camera. Then, the self-timer lamp stops blinking and the self-timer operation will be cancelled. If the battery check button is not depressed and the self-timer lever is returned to its original position, the shutter will be released.
 |
Note: A built-in shutter eyepiece blind was eventually provided in the later Canon A-1 - not for the AE-1 yet, but some referred the Minolta XD-7 was the first model to have that considerate feature incorporated. |
| Previous | Next | 5/7
| Back | The Index page of Canon AE-1
| Back | Main Index Page of Canon SLR Models
Main Features & Background
Basic Camera Operation (7 Parts)
Auto Winder A | Winder A2 | Speedlites | Other Issues
Specifications: HTML | PDF (14K)
Main Reference map: HTML | PDF (213k)
| Message Board |
for your Canon
A-Series SLR camera(s)
| Message Board |
for your Canon optics in a shared environment
| Message Board |
Specifically for Dispose or Looking for Canon Photographic Equipment
Shared Resources:
Winder A, Winder A2, Focusing Screens, Motor Drive MA, Databack A,
Speedlites & Macro
photography.
Canon FD
Resources
Camera
Bodies:
A Series: AE-1
| AT-1
| A-1 | AV-1
| AE-1 Program | AL-1
T- Series: T50
| T60
| T70
| T80
| T90
F-1
| New F-1
Canon FL
Resources
Pellix
| FTQL
FL | Canon
FDn lenses.
| Early versions of FD lenses
Home - Photography in Malaysia |
Copyright © 2000. leofoo ®. MIR Web Development Team.
Maintenance Team: Kaipin, Terry Carraway & Dr Strangelove; Pawel Nabe for his image on the Data Memory Back. EEwyn Foo, my nephew, who has spent quite a number of nights converting the original manual in HTML format. Mr. Richard Yeow, General Manager -Optical Division of Canon Marketing for granting special permission to reproduce this manual into HTML format in his site as a form of obligation to all Canon FD mount users worldwide. * Canon, FD Lenses, Canon Marketing are registered trade names or trademarks of Canon Inc. Japan.