Electronic Exposure
Control
The electronic exposure control of the Contax RTS is based on through-the-lens light
reading at full aperture. A SPD (silicon photo diode) is used near the eyepiece to
measure light intensity and distribution. This sensor responds to variation of light
intensity at a speed several thousand times faster than the CdS cell used in most
SLRs and shows high sensitivity and it works reasonably well in low light levels.
The light reading range is an above average scale from EV -1 to 19 (F1.4 at ASA 100).
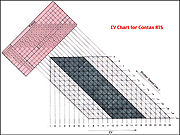 |
EV (exposure value) denotes the value of exposure through combination of the shutter speed and lens aperture; the actual exposure to light of the film emulsion depends upon the speed rating of the film and the intensity of the transmitted light. |
For instance, if correct exposure can be obtained at EV 10 with ASA 100 film, the shutter speed must be adjusted one setting toward a slower speed or the lens aperture must be opened by one stop when using an ASA 50 film; therefore, the exposure value at ASA 50 will be EV9 if the light condition remains the same and, at ASA 200, it will be EV 11.
 |
On Auto, the shutter speed is set automatically according to the subject brightness and on the basis of the preselected lens aperture. It varies continuously (stepless i.e. it could be 1/213 instead of 1/250 sec or 1/23 sec instead of 1/30 sec as indicated) in Auto mode and,therefore, provides precise exposure even at in-between speed. On manual operation, however, the shutter will not function at in-between speed settings. |
Although in cases, the auto mode with exposure
compensation in the RTS should be able to handle most general photographic situation
reasonably well, but there are times where light could be tricky or at situation
you have 'locked-in' a constant exposure value for continuous shooting session, you
may require to setup the camera for manual operation. Below are a few of the instances
where manual operation can also be considered:
When photographing by preselecting a precise shutter speed.
In flash photography.
In B (bulb) photography.
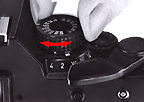
Setup the Contax RTS for manual operation:
1.Turn the shutter control dial away from the 'AUTO' setting. The green shutter speed pointer will then move away from the 'A' setting in the viewfinder.
 |
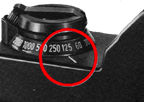 |
2.Set the required shutter speed setting in alignment with the index. When thus adjusted the green pointer will overlap the corresponding setting of the shutter speed scale visible in the viewfinder. |
3.Press the LED display pushbutton
and check the position of the LED dot.
Exposure Compensation
When shooting backlit or spot lit subjects or when special effects are desired,turn
the film speed dial and make exposure compensation by aligning the pointer with the
required setting on the exposure compensation scale.
 |
 |
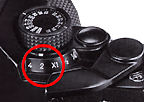
The exposure compensation scale has four click stop settings besides the 'X1' setting for normal exposure, namely, 4, 2, 1/2 and 1/4. The pointer can also be set at an in-between setting. |
To make exposure compensation, turn the film speed dial and align the exposure compensation pointer with the required setting on the scale.
 |
When thus adjusted to a position other than the 'X1' setting, the exposure compensation tab will appear in the viewfinder to signal that exposure compensation is being made. |
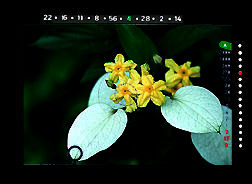
When shooting against light or when photographing subjects against a background of a bright window or snow scene, your main subject will appear underexposed if exposure is made in the normal manner. To bring out fine details of your main subject, align the exposure compensation pointer with the '2' or '4' setting on the scale.
|
|
|
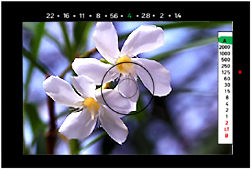
* For spot lit subjects or scene dominated by dark surrounding, set the pointer at '1/2' or "1/4'. |
|
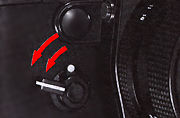
Self Timer Operations
When you wish to include yourself in the picture or in case the shutter has to be tripped at a delayed action, use the self-timer.
 |
1. Secure focus and advance the film. |
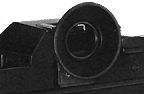
When using the self-timer to trip the shutter, slide the rubber eyecup mount upward as illustrated to prevent light from entering through the viewfinder eyepiece. By thus shielding the viewfinder eyepiece, exposure inaccuracy due to light filtering in from the eyepiece can be prevented effectively.
 |
In case the film wind is incomplete, the self-timer will activate when the self-timer start lever is pushed in the direction of the arrow but it will not trip the shutter. In such a case, give the film advance a complete wind and reset the self-timer lever. |
Note: Canceled
the operation: In case you decide not
to use the self-timer after setting the lever in the direction of the arrow, simply
return the lever to its original position.
 |
The shutter can be released in the normal manner by pressing the magnetic release even when the self-timer lever is set at the charged position. |
Depth-of-Field Preview Button
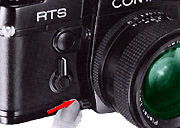 |
Although the viewfinder of the Contax RTS always provides viewing at full aperture,depression of this button stops down the lens to the preselected aperture, thus enabling depth-of-field preview. Avoid tripping the shutter while depressing the depth-of-field preview button because it will cause exposure in-accuracy. |
Mirror Lock-up Lever
In photomicrography and extreme close-up photography, better results can be obtained by making exposure with the deflection mirror locked in flip-up position.
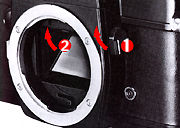 |
To lock the mirror, turn the mirror lock lever to the right until the white line is set horizontal to the camera base. Then, push in the depth-of-field preview button. The button will be locked in pushed-in state end the diaphragm will close down to the preselected aperture. |
Before locking the mirror in flip-up position,
compose, focus and make exposure adjustment.
After making the exposure, reset the mirror to its original viewing position. As
soon as the mirror resets to its viewing position, the depth-of-field preview button
will return to its original position. The mirror lock lever can be operated before
or after film wind. The
automatic exposure control will not work when the mirror is locked in flip-up position.
| Previous | Next |
Flash, Film Back, Multiple exposures, focusing screens, care and maintenance
Beyond the
User's Manual, addressing other Issues : 4 Parts
Scanned
early Contax's system accessories files in PDF format: Motor Drive | Winder | Macro | Databack/Remote | Flash | Early Lenses
1 & 2 | Accessories
Other Contax Accessories: Filters | Eye-Cups / Diopter lens / Right Angle Finder / Magnifier| Lens Caps/Lens Rear Caps / Body Caps / Lens Pouches | Soft lens Shades/Metal Lens Hoods/Adapter Ring/Gelatin Filter Holder set | Focusing Screens
| Back | to Index Page of Contax
RTS
| Back | to Index Page of Contax
RTS II Quartz
| Back | to Index Page of Contax
RTS III
| Back | to Main Index Page of
Contax RTS series models
Camera
Models: | Contax RTS |
RTS
II
| RTS III |
Shared
Resources:|
Motor
Drive-
PMD
W6| Winder - RTW-W3 | Screens |
Flash | Macro | Remote | Databack | Accessories | Zeiss T* Optic | Instruction Manuals: Contax RTS HTML | PDF | Contax RTS II Quartz
HTML | PDF | Contax RTS III (3
parts PDF
by mike@butkus.org, M. Butkus, NJ. Part A | Part B | Part C |
OFF TOPIC:-
Personal Note
| Main Reference
Map: RTS - HTML | PDF (206k) RTS II - HTML | PDF(308k) RTS III - HTML | PDF |
Specification: RTS - HTML | PDF(159k) RTS II - HTML | PDF(66k) RTS III - HTML | PDF |
1975: RTS 1979: 139Q 1980: 137MD 1982: 137MA 1982: RTS II |
1985: 159MM 1987: 167MT 1990: RTS III 1992: S2 1992: S2b |
1992: ST 1994: RX 1996: AX 1998: Aria 2000~ |
| List of Carl Zeiss T* lenses for Contax SLR cameras | ||||
|
Message Board | for your favorite Contax
RTS Series SLR camera Models
| Message Board | for your favorite optics
Caller for help: I am not entirely too happy with the content and images used here thus far, but since I have my limitation and if you think you can contribute your part as a Contax user to make this site better, mail them to me. Appropriate credit will be given for such effort.
| Home - Photography in Malaysia |
![]()
Credit: MClau, joint maintainer of the Contax RTS MB. Some of the content are extracts from: Cees De Groot, who maintains a Contax FAQ site and Tim Roger website on Contax SLR cameras, A few of the images on Zeiss lenses were downloaded from Contax US website. My buddy, Yeak & Rizal Yahya, for their cool programming with Contax RTS's Message Board, Note:certain contents and images appeared in this site were either scanned from official marketing leaflets, brochures, sales manuals or publications published by Kyocera over the years and/or contributions from surfers who claimed originality of their own work solely for educational purposes. The creator of the site will not be responsible for any discrepancies that may arise from such possible disputes except rectifying them after verification."Kyocera", "Yashica", "Contax" & "Carl Zeiss T*" are registered trade names of Kyocera Corporation Inc., Japan. A site made with an Apple IMac, dedicated to all fans of Contax cameras and Zeiss Optics.