Aperture priority automatic
operation
Aperture
Priority AE
 |
To program the camera for automatic shutter-speed control, set the mode selector to the "A" (aperture-priority) position. A mechanically controlled shutter speed scale now moves into the finder. When you push the release button part way, a row of LEDs indicates the shutter speed which the camera will automatically select. The appropriate LED lights alongside the shutter-speed calibration. |
Triangle symbols in the LED display
show the range limitations. If the combination of light level and diaphragm opening
requires a shutter speed faster than 1/1000 second, the over range LED turns on.
The over range LED indicates that you're going to get an overexposure unless you
select a smaller diaphragm opening. If the under range LED at the bottom of the display
turns on, you're going to get a shutter speed of 1 second or slower.
When you're using the "A" mode, you can leave the speed knob at any of
the calibrated shutter speeds - 1 second through 1/1000 second. The automatic speed-control
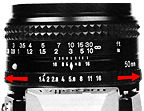
circuit disregards the speed-knob setting. As you select the f/stop, a tab on the
diaphragm-setting ring rotates the camera's diaphragm metering ring. The diaphragm
metering ring moves a brush along a resistance band, thereby programming the f/stop
information.
1. Move the mode-selector switch to align it with the click-stopped "A."
This will set the camera's computer system for fine adjusted automatic shutter speed
operation and display the shutter-speed scale at the right of the finder frame.
 |
2. Set the desired lens opening by turning the aperture ring on the lens barrel. The f-number set will appear centered below the frame in the finder, and shutter speeds as indicated by lighted LED's at the right of the frame will vary automatically to yield proper exposure for the aperture and other settings with the light being metered. |
3. It is then only necessary to
confirm focus, compose your picture, and release the shutter.
4. The XD's range of shutter speed operation in A-mode automatic is from 1/1000 sec.
to 1 sec., as indicated on the shutter speed scale. If the over-range indicator lights,
aperture or other conditions should be adjusted so that an LED lights within the
scale's range. Lighting of the under-range LED indicates use of shutter speed that
is 1 sec. or longer.
Note:
ï To continuously provide more or less exposure on automatic mode, refer to earlier
pages.
ï If exposure conditions are below the meter's range, the mirror may remain up when
the shutter is released. Should this happen, move the shutter-speed selector to "X"
and then back to its previous setting. This will reset the mirror and return the
camera to automatic operation.
Selecting the aperture
For good pictures with a minimum of care where no particular effect is desired, set
the aperture as suggested in the table at the right. There may be times, however,
when it will be important to set the lens aperture to obtain a particular effect,
such as rendering a certain range in sharp focus or emphasizing a subject against
and out-of-focus background. Small f-numbers yield a shallow field of sharpness,
as Example A below, while large f-number give greater depth of field, as in Example
B. (For information about depth of field).
A mode Aperture Setting Guide
|
|
Sunny |
Hazy Sun |
Heavy Overcast |
Indoors |
|
ASA 25 |
f8 |
f4 |
f2 |
f1.4 |
|
ASA 80 |
f11 |
f5.6 |
f4 |
f1.4 |
|
ASA 100 |
f11 |
f5.6 |
f4 |
f1.4 |
|
ASA 200 |
f11 |
f8 |
f5.6 |
f2.0 |
|
ASA 400 |
f16 |
f11 |
f8 |
f2.8 |
(Caution: These are only guidelines for typical picture taking situations).
Note: Use of a steady support or an electronic flash is recommended for use with shutter speeds of 1/60 or slower.
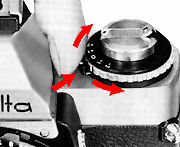
Eyepiece Shutter
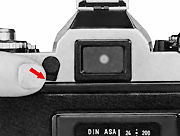 |
For remote or unmanned operation or when the camera is set on a support and used without viewing on automatic mode or manual speeds longer than 1 sec., be sure to rotate the lever at the left rear on the finder as indicated to close the eyepiece shutter. This will prevent unwanted light from entering through the eye piece and affecting the meter reading and exposure when the eyepiece is not being shielded by the photographer, as it normally would be. |
Metered/Manual Exposure Control
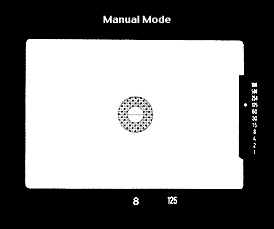
Manual Mode
 |
The third setting of the mode selector - the"M" setting, - provides manually calibrated shutter speeds. With the mode selector at "M," the shutter always delivers the selected shutter speed. The LED display now serves as a cross-coupled meter; it tells you what shutter speed will provide proper exposure according to the light conditions and to the diaphragm setting. Also, as you turn the mode selector from the "A" position to the "M" position, the viewfinder mask uncovers the shutter speed calibration in the finder. |
Although the speeds are manually
selected at the "M" mode, they're still electronically controlled. Consequently,
all three functions depend on battery power. In fact, even the shutter release requires
battery power. A second combination magnet in the XD-11 releases the mirror when
you push the release button far enough to close the release switch.
Metered/manual operation
 |
|
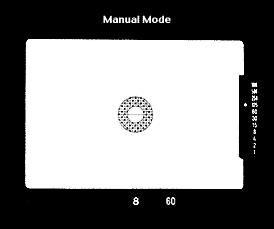
1. Move the mode-selector switch
to align it with the click-stopped "M" and turn the shutter speed dial
to align any step from "1000" to "1" with the index, The number
of the speed set will appear as the shutter setting indication at the right below
the finder frame.
2. To set proper exposure for light as metered, turn the aperture ring until an LED
lights next to the number on the shutter-speed scale that corresponds to the shutter-setting
number appearing below the frame. If necessary agreement cannot be achieved, adjust
the shutter-speed setting or other conditions to permit it.
3. Number agreement can of course be disregarded and any shutter-speed and lens-aperture
combination set for full manual operation.
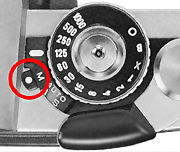
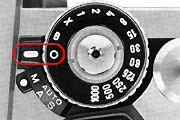
"X'' setting
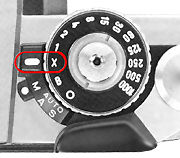 |
Turning the shutter-speed selector to align "X" with the index sets a fixed electronic shutter speed of 1/100 sec. This provides for fully synchronized flash exposure when using electronic flash units other than the Minolta X-series Auto Electro-flashes. "X" will appear at the right below the finder frame at this setting and the over-range LED will light to indicate "X" operation. |
"O" and "B"
mechanical settings
Both "O" and "B" shutter settings are mechanically controlled.
With either of these letters aligned with the index, you can view, make exposures,
and advance film even though batteries are unserviceable or completely lacking.
 |
|
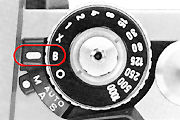
Turning the shutter speed dial (in any mode setting) to align "B" with the index sets the camera for making "bulb" exposures. That is, the shutter will open when the shutter release is depressed and remain open until it is released. "B" will appear at the bottom right in the finder frame at this setting and over-range LED will light to indicate mechanical shutter-speed operation.
Note: For extremely long exposures of 1 min. or more it is best to remove the batteries as light from the LED display may effect exposure.
Exposure Adjustment Control
To deliberately give more or less exposure on either automatic modes or on metered/manual mode, use the exposure-adjustment control as follows:
 |
Depress and move the index to the side having plus (+) numbers to produce more exposure or to the side having minus ( - ) numbers to produce less exposure. The numbers indicate he amount of adjustment in stops or EV steps (i.e., "+1" indicates one stop more or double the zero-position exposure, and "+ 2" means two stops or four times more exposure; "- 1 " is one stop less or one half the exposure, and "- 2" produces two stops' less or one quarter the normal exposure). |
There is a lock at the "0"
(zero) position and click-stops at both plus and minus "1" and "2"
positions. The index may be set at intermediate positions
Caution: Always
return the exposure-adjustment control to zero after use.
Note: The exposure-adjustment control may be
moved to only to the +1 position when the film-speed selector is set at ASA 25 and
to the -1 position at ASA 1600. It cannot be moved to the plus direction when the
selector is set at ASA 12 or to the minus direction when the selector is set at ASA
3200.
|
Previous | Next |
|
Back | to
Main
Index Page
of Minolta XD-7
| Minolta
XK/XM/X1
| Minolta
X-700
| Minolta
Maxxum 7000
|
| Message
Board
| for your favourite
Minolta
XD-7/XD-11
SLR camera(s)
| Message
Board
| for your Minolta
Optics in a shared environment
| Message Board | Specifically
tor Dispose or Looking for Minolta Photographic equipment
Home - Photography in Malaysia |
Copyright © 2000 leofoo® MIR Web Development Team
Credit: Satosh Oka for some of the very high quality images for the Minolta CD-7 and XK Motor used in this site. Oleg Volk, who has offered some help during the initial stage of development of this site; Stephen Schwartz on the few new images of XK; Mark Wasmer for the original Brouche of the few Minolta cameras; Dick Sullivan whom I used some of his info as reference in this site; Mr Poon who has helped me eith some of the images used in this site. Minolta, XD-7, XK, XM, X1, Rokkor, MC lenses are either registered tradenames or trade mark of Milnolta Optical Co. Ltd, Japan. Asite dedicted to all Minolta fans worldwide.