Modern Classic SLRs Series :
Nikon F3 - Basic Camera Operations - Part II

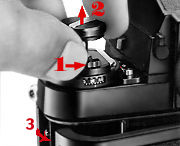
4 . Move the power switch to uncover the red dot. This makes the camera ready for exposure reading and shooting. The power switch, if switch off, will deactivate camera operation, however, the mechanical lever can still trip the shutter at approx. 1/55 sec even if the power switch is set to 'OFF'. With the MD-4 attached, it is not necessary to turn the power switch on.


Power-On.jpg (8k)
Press Btn.jpg (8k)

5. Touch the shutter release button lightly. This activates the exposure meter, indicated by numerals in the LCD panel inside the viewfinder. The meter (LCD) stays on for 16 seconds after you take your finger off the button and turns itself off automatically to conserve battery power. Nikon F3 was the second Nikon SLR body after the compact Nikon EM in 1979 that has incorporated with this energy saving feature.

6. Check battery power. Look through the viewfinder at the liquid crystal display (LCD). The shutter speed should be displayed to show that the batteries have been properly installed and their power is adequate. If not - first, double check if the main power switch mentioned earlier has been turned on.

Viewinfo.gif (5k)
Next, take out the battery(ies) and check if the polarity (+/- signs) is arranged correctly, or if you suspect the battery(ies) is/are defective, replace both batteries. The window next to the LCD display panel is the aperture window, we call it ADR (Aperture direct readout) which projects the Aperture direct readout scales (4) engraved on a AI Nikkor lens. It is blank here, because we assume it is not mounted with a lens yet.

7. Mount the lens onto the camera. Grasp the lens by its mounting ring (0). Then line up the focusing index (1) on the lens with the white dot on the camera body (2) and twist the lens counter clockwise (0) until it clicks into place. To remove: Push the lens release button (3) and turn the lens clockwise until it comes off.

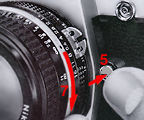
* A magnified image of the Aperture Direct Readout (ADR) scales on an AI lens.

MountLens.jpg (10k)
Caution: Before you mount a Nikkor lens, make sure it is an Nikkor with Automatic Maximum Aperture Indexing feature, more popularly referred as 'AI ' lens. However, Nikon F3 is one of very few Nikon automatic SLRs that can still accept or use Non-AI or AI lenses, which of cause, includes the current modern AF Nikkor optics. Why is this important ?

Because it will affect the way how a lens should be metered with the Nikon F3 camera. Generally, non-AI lenses use stopped down to perform metering instead of full aperture metering, which are covered in another section in 'advance' handling of the Nikon F3 segment.

Removed.jpg
If you wish to change a lens, while pushing the lens release button (5), turn the lens mounting ring clockwise (7) until it reaches the lens mounting index mark (2) and you can lift the lens off. Be very careful when you are changing lenses with film loaded in the camera, be careful not to expose the mirror box to direct sunlight.
* Illustration used here is a FE2.

It is not a good idea to load a film into your camera immediately when you receive a camera back from the shop. Always take some time to get familiar with the operations and control before you do that. But should you need to do so, you need to open the camera back. Every camera manufacturer designs their own way of opening the film back (Usually, it is quite universal, a safety lock plus pulling up the film rewind knob (since the early days, they have trying to adopt the most functional, responsive and safest way for users). For example, the Nikkormat cameras have their camera back opening lever at the lower portion of the camera at the side which you may have to spend sometime to locate it. Even the Nikon F2 was designed with the camera back opening lever at the base of the camera. The Nikon F3 adopts the way the FM/FE in 1977/1978, which is far more convenient than the Nikon F2.

Rewind.jpg (5k)
8. Open the Camera Back. Push the camera back lock lever (1) to the right with your thumb while lifting the film rewind knob (2).The camera back will pop open (3). The design of the opening of camera film back with an additional back lock lever is to avoid accidental opening of the film back. However, this is still a one hand operation to facilitate faster and swifter changing of film roll.

TakeFilm.jpg (5k)
9. Install the film cartridge.

Drop the film cartridge into the film cartridge chamber (1) so that the film leader points toward the film take-up spool (3), and push the rewind knob back down (2) into place. With the back opened, you may now load a film into the film chamber. Pull the film leader and Insert the film leader in the take-up spool. Pull the leader across the camera and insert it into any one of the slots in the take-up spool.

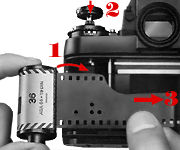
Caution: After the back is open, you must be extremely careful NOT to touch the exposed shutter blades/curtain especially with the film running across and cover the curtain (Which you may forget the delicate shutter curtain is just right underneath the film), the curling film leader when first pulled out from the film cartridge may easily scratch across the titanium shutter curtain. I have seen too many careless handling resulting in damaged or deformed shutter curtain, this level of warning applies to any film camera. Although the auto DX coding makes this a lesser unintended experience with modern AF SLRs but Nikon F3 is not equipped with auto DX coding and you have to manual feed in the film to the film take-up spool. NEVER attempt to use force if you load the film unsuccessfully.

DangerZone.jpg (13k)
10. Insert the film leader in the film take-up spool (1). Pull the leader across the camera and insert it into one of the slots in the film take-up spool.

Note: The two data back Contacts (2) located inside the camera below the film guide rails are for use with data back.

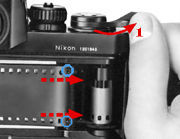
11. Wind the film advance lever (1) to advance film on to the film take-up spool. Wind the film advance lever and depress the shutter release button until the film sprockets engage the perforations on the edges of the film (illustrated in Blue circles).

Film advance.jpg (6k)
If the operation is successful, you will notice while you advance the film with the film advance lever, the film strip will be take up smoothly by the film take-up spool and the film will advance. I know many photographers still prefer manual inserting of film roll in non DX coded SLR, it is nice trying to scrimp and save a frame or two with the traditional way of slot in just a little, DO NOT attempt to use this method if you are not familiar. With practise, as many as 42 exposures are possible with a 36 exposure roll.

| Previous | Next | 2/4

NavBar
  |  |  |
  Back to Index of Nikon F3 Models
  Back to Pictorial History of Nikon SLRs
About this photographic site
Contributions and Credits
  Home - Photography in Malaysia
| Back | Index Page of F3 Camera Manual

| Back | Main Index Page of Nikon F3 models

About this photographic site Contributions and Credits

  Home - Photography in Malaysia

Modern Classic SLRs Series :
Nikon F3 - Basic Camera Operations - Part II
Copyright © 1999. leofoo ®. MIR Web Development Team.