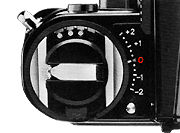
Accessory shoe
Located at the base of the rewind knob, the accessory shoe allows direct mounting of the Nikon SB-12 Speedlight. Three electrical contacts) provide for synchronization of the flash unit, automatic through-the-lens flash output control, and ready-light indication in the camera's viewfinder (via an LED), plus auto switching to the proper synchronization speed of 1/80 sec.
 |
Two flash coupling adapters are available allowing either ISO - or Nikon F2 type direct-mounting electronic flash units to be attached. |
Caution: For flash photography, it is recommended that
you use a Nikon dedicated electronic flash unit which operates with low-voltage current.
Use of any other flash which operates of high voltages may damage the camera's circuitry.
Nikon claimed any damage caused by such use is not covered by the Nikon Warranty.
Sync Terminal
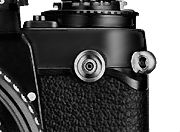 |
A separate sync terminal with a protective screw-in cover is provided on the Nikon F3 High-Eyepoint camera. It accepts all standard plug-in PC cords, plus it is threaded for use with a Nikon screw-in PC cord. When using flash bulbs or an electronic flash without a hot shoe, it is necessary to use the sync terminal. Use the following table to determine the correct synchronization speed to set on the camera. |
|
|
Shutter Speed (Sec.) |
|||||||||||||||||
|
1/2000 |
1/1000 |
1/500 |
1/250 |
1/125 |
1/60 |
1/30 |
1/15 |
1/8 |
1/4 |
>1/2 |
1 |
2 |
4 |
8 |
X (1/80) |
B |
||
|
Speedlight |
|
|
|
|
|
|
|
|
|
|
|
|
|
|
|
|
|
|
|
Flashbulb |
FP |
|
|
|
|
|
|
|
|
|
|
|
|
|
|
|
|
|
|
M |
|
|
|
|
|
|
|
|
|
|
|
|
|
|
|
|
|
|
|
MF |
|
|
|
|
|
|
|
|
|
|
|
|
|
|
|
|
|
|
| Cannot be used | ||
| Synchronized |
Viewfinder illuminator
A convenient built-in viewfinder illuminator lets you see the liquid crystal display shutter speed, including the aperture, even in dim light. While the LCD is displayed in the finder, push the illuminator button.
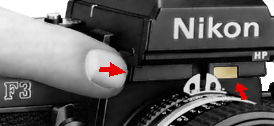 |
Note: The power switch must be turned on and the shutter button must be depressed halfway prior to using the illuminator. Otherwise, it will not light up. |
Film plane indicator
The film plane indicator is engraved in white on the top deck just behind the shutter speed dial. It indicates the exact position of the film plane inside the camera.
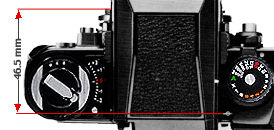 |
Whenever it becomes necessary to measure the exact distance between the subject and film plane, such as in macrophotography, use the film plane indicator. The distance between the film plane and the lens mounting flange is exactly 46.5mm. |
Infrared
Focusing Index
The red dot beside the focusing index on most lenses is the infrared focusing index.
When shooting with black-and-white infrared film, it is necessary to refocus the
lens to compensate for the fact that infrared light ray focus at a point slightly
in front of visible light.
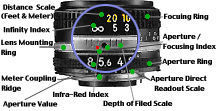 |
To use the index, first focus on your subject through the viewfinder. Then look at the lens and take note of the focused distance. Finally reset the focusing ring so that the desired distance is aligned with the red dot. |
(>Note:
Central portion being enlarged (Outlined by a circle). Meter coupling shoe hidden
for Non-AI, AI modified, AI, AI-S Nikkor).
About the Liquid Crystal Display (LCD)
l. At high temperatures (over approx. 60°C), the whole surface turns black so
that the exposure information cannot be read. However, this situation will return
to normal when the temperature drops.
2. Avoid storing the camera in excessively hot places, such as in a car parked in
direct sunlight or inside the trunk. You may shorten the LCD's life by doing so.
3. When the temperature goes below freezing, the response time decreases as the liquid
crystal becomes more viscose.
4. Although the Nikon F3 High-Eyepoint camera employs the highest quality LCD, it
deteriorates in contrast and becomes difficult to see after six or seven years. When
this happens, please contact your dealer or the Nikon service facility nearest you
for replacement of this element at a small charge.
|
| | | Back to Index of Nikon F3 Models Back to Pictorial History of Nikon SLRs |
|
|||||
|
|||||||
| Back |
Index Page of F3 Camera Manual
| Back |
Main Index Page of Nikon F3 models
| About this photographic site | Contributions and Credits |
 |
Home - Photography in Malaysia |