Before the availability
of other exciting OM models like the OM2SP, OM3, OM4, OM-4Ti and OM-3Ti , Olympus
OM-2 camera body can be regarded as the center of the OLYMPUS OM system - the 35mm
SLR camera system which has brought new meaning to reliability, versatility, and
portability in the demanding world of the modern photographer. Whether you are professional
or amateur, visionary or scientist, the extensive OM System is designed to enable
you to capture life as it happens from photomicrography to astrophotography, from
photojournalism to portraits. This remarkably compact, lightweight, and functionally-designed
camera body incorporates an electronic shutter and fully automatic exposure control
plus manual exposure control at the flip of a lever. As long as you are using a camera
in the OM system - even if your next body is not an OM-2 model, familiarize yourself
with the this camera and the many accessories available is a good way to enhance
your picture-taking capabilities because the essence of the OM system is very thoughtful
and most system accessories can find a way or another to fit in the older or newer
camera bodies.
Before you begin
with this SHORT COURSE OF INSTRUCTIONS
in this section, click here to open
a new window to use the main reference
map for illustration of various control of the camera body.
WARNING: The OM-2 can start functioning only after batteries are loaded (or loading correctly with the right polarity align inside the compartment). If you attempt to release the shutter without loading the batteries, this shutter is locked and the field of view becomes dark, stopping all the functions. You have to reset the shutter to return the mirror back to the upward position so as normal viewing through the viewfinder can be resume... No damages caused, but could cause some anxiety or panic to a relatively new OM automatic camera user. |
 |
[1] Load the camera. |
 |
 |
|---|
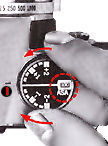
[2] Set the ASA film speed dial (Right). The Film Speed dial is also act as the exposure compensation dial, make sure after adjustment of the film speed, the exposure compensation value is still at its neutral level facing the index mark (I) .Next, just advance the film by winding a full stroke until the figure "1" appears in the exposure counter window (Pix at far right) .
 |
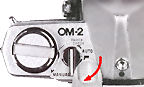 |
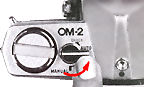
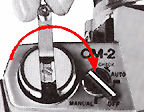
| [3] Automatic Exposure Set the selector lever to the "AUTO" position. |
[3] Manual Exposure Set the selector lever to the "MANUAL" position. |
 |
 |
| [4] Automatic Exposure
Preselect the lens aperture and look through the viewfinder to compose your picture and focus on your subject. Make sure the shutter speed scale is visible in the viewfinder. |
[4a] Manual Exposure Look through the viewfinder, compose your picture, focus on your subject, and determine the proper exposure. Make sure the over- and underexposure index marks are visible in the viewfinder. |
 |
[5] Hold the camera steady and press the shutter release button with a slow steady pressure to take the picture. |
 |
 |
[6] After the entire roll of film has been exposed, rewind the film back into the cartridge and unload your camera. |
Inserting Battery(ies) The OM-2 requires two 1.5V silver oxide batteries as a power source for both manual through-the-lens exposure measurement and automatic exposure control. The batteries must be inserted correctly or the camera will not operate.
 |
 |
[1] Remove the battery chamber cap by turning it counterclockwise with a coin. |
[2] Insert two 1 .5V silver oxide batteries (Eveready or UCAR S-760requivalent) into the battery chamber making sure that each positive (+) side is facing out as shown on the diagram inside the chamber. [3] Replace the cap by turning it clockwise until it is tight.
NEW UPLOAD
by Mr Rick Oleson relating to a solution to battery issue: "
...The Olympus OM2S, OM3 and OM4 are great cameras.... but they're also notorious
battery eaters Here's a way to run the camera on
a pair of AA penlight cells...."
* IMPORTANT: If you press the shutter release button when
the batteries are completely drained or when there are no batteries in the camera,
the mirror will Lock-up and the camera will not operate. If this occurs, follow the
"RESET" Procedure to unlock the mirror and make the camera operational
before loading new batteries.
*
Reset Procedure"
 |
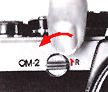
* If the mirror is up and the shutter is locked, press the "RESET" button at the lower left corner of the body mount, and rotate the manual shutter speed ring until the reset mark (*) is aligned with the red triangle on the lens mount. Then the mirror comes down, and the shutter is unlocked. |
Checking the Battery Condition To check the batteries, move the selector lever to the"CHECK" position. The battery check lamp indicates battery condition in three stages as follows:
 |
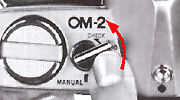 |
(1) The red lamp lights brightly - Battery voltage is sufficient. (2) The red lamp flashes on and off - Batteries are very weak. Fresh batteries are recommended. (3) The lamp does not light - Batteries are drained. Replace them. |
Battery Issues: * Silver oxide batteries should last approximately one year under normal usage. When the batteries are depleted, the mirror will Lock-up and the camera will no longer operate (repeat the reset procedure mentioned above to unlock the mirror when loaded with a fresh set of batteries). When going on a trip, it's a good idea to take a set of fresh batteries: |
| previous | Next | 1/9
| Back | to Index Page of OM2(n) Instruction Manual
| Back |
to Index Page of OM2(n)
| Back |
to Main Index Page of OM1(n) & OM2(n)
Olympus
OM-2(n):
Camera
Operations
(9
Parts)
| Other
Issues
(5
Parts)
Specifications: HTML | PDF (48k) Main Reference
Map: HTML | PDF (203k)
Olympus
OM-2 SP:
Camera
Operations
| Other Issues
Specifications: HTML | PDF | Main Reference Map: HTML | PDF
Olympus
OM-1(n): Camera Operations (6 Parts) | Other
Issues
(5
Parts)
Specifications: HTML | PDF | Main Reference Map: HTML | PDF (217k)
Shared
Resources:
Supplementary
articles:
TTL
Metering,
Depth
of Field,
Shutter
Speed
& Aperture
Motor
Drive and Power Winder: Main Index Page (4 Parts)
Motor
Drive 1
| Motor
Drive 2
| Winder
1
| Winder
2
Flash Photography: Main
Index Page
(4
Parts)
T45 | T32 | T20 | F280 | S20 | Qucik AUTO 310 | QA300, 200, 200S
Macro-Photography: Main
Index Page
(3
Parts)
Macro Flash Units: T10 Ring Flash, T28 Twin, T28 Single,
T8 Ring Flash
Accessories: Databack
1-4
| Screens | Finder Accessory | Remote | Cases
Zuiko Lenses: UPLOADED !!
| Message Board | for
your favourite
Olympus
OM-1(n)
and OM-2(n)
series
SLR Camera models
| Message Board | for your Zuiko Optics in a shared environment
| Message Board |Specifically for Dispose or Looking for OM Photographic Equipment
Home - Photography in Malaysia |
Copyright © 2000. leofoo ®. MIR Web Development Team.
Site
& Message Board Maintainers:
Mr. Bruce hamm <bhamm@magma,ca>; Mr. Rick
Oleson <rick_oleson@yahoo.com>; Mr. Simon
Evans <ruralwales@yahoo.com>; Mark Dapoz
<md@dementia.org>;Mr. Rick Oleson
<rick_oleson@yahoo.com>
My
old time buddy, Ahmad
Ikram,
Dr of Rubber Research Institute (RRI), Malaysia
who shares the same passion with me and also left his collection of OM-1n, OM-4 bodies
alsong with a Motor Drive 1 preparing some images appeared in this site. Mr Poon
of Foto Poon, Ipoh, Mr Richard, Ampang Park, Mr Lim and Miss
Jenny of Foto Edar for their generosity for their OM1(n), OM2n camera and some
Zuiko lenses. Mr KKLow for some of his earlier images on the OM-1. Miss Wati and Mirza for helping me
to convert this Operation Manual into a HTML format. Mr MCLau for rectifying
some mistakes made on the earlier preview sites. Site created 'unfortunately' again
with a PowerMac
A
personal tribute to the creator of the OM system and also a site dedicated to all
the fans of Olympuses and Zuiko Optics worldwide. Olympus
is a registered tradename of Olympus Inc, Japan.