<Exposure
Counter>
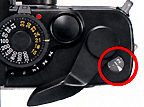 |
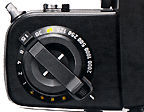
The exposure counter advances one number every time the film advance lever is operated, and returns to "S" (start) when the rear cover is opened, regardless of whether or not film is loaded in the camera. |
The exposure counter on top of the camera starts with "S", then goes to "1" followed by even numbers "2" through "36". The odd numbers from "3" onward are indicated by dots etched between the even numbers. The numbers "12", "20", "24" and "36" are in orange since they indicate the number of exposures given on standard 35-mm film cassettes.
 |
<Memo Holder> |
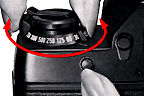
Setting the Film Speed
After the film has been loaded properly, be sure to set the film speed ring (ASA/ISO) according to the speed rating of the film in use.
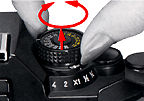 |
To set the film speed, lift and turn the ring around the film speed ring and align the index (white line) with the figure (white numbers) corresponding to the ASA or DIN rating of the film in use. |
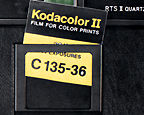
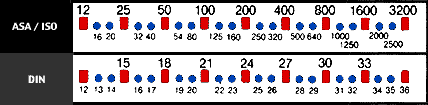
Use the film speed rating indicated on the outer carton of the film. The orange-colored ratings on the dial indicate the DIN film speed ratings.
Always see to it that the index is set properly in the click stop position. If set improperly, the accuracy of the exposure control will be affected. |
Film Speed Values
The Contax RTS II has a moderately high ASA film speed range from 12 to
3200. In case of emergency, if you intend to rate the film at higher range, you can
safely combine the exposure compensation to increase the range to additional two
stops. Represented in values on top of the film speed dial and it can be easily referred.
 |
The Shutter |
The original RTS employs with a silk fabric horizontal traveled focal plane shutter, the upgrade in the RTS II Quartz now uses a more durable titanium shutter which features an e/electronic circuit incorporating an ultra, high precision quartz oscillator that provides precise shutter speeds in both AUTO and manual exposure modes.
<Shutter Control Dial Settings>
"A" (AUTO) In the "A"
mode, the camera will provide correct exposures by automatically controlling the
shutter speeds over a wide range, covering 1/2000 to 16 seconds, for the aperture
setting, image brightness and film speed in effect at the time. And when used with
the TLA electronic flash system, it will provide TTL electronic flash coupled to
all aperture settings of the lens in use.
"2000" ~ "4"
.... The figures in this range indicate the shutter speeds available in the Manual
mode. Shown in white, "2000" represents a shutter speed of 1/2000 second,
Likewise, the white figures "125", "2", and "1" represent
shutter speeds of 1/125, 1/2 and 1 second respectively. The figures "2"
and "4", shown in orange, indicate shutter speeds of 2 and 4 seconds in
that order. When the shutter speed number is shifted to the next larger number, it
halves the amount of light falling on the film (for example, when it is moved from
125 to 250) conversely, the amount of light is doubled when the shutter speed is
changed to the next tower number,
"B" (Bulb) ... The shutter stays open as long as the
shutter release is pressed, causing the light to be transmitted to the film.
"X" (Synchro
Contact) .... This setting is used for taking flash
shots. The synchro contact on the RTS II Quartz is an X contact that operates at
1/60 second. However, when using the TLA Flash Unit system, you can use the "A"
setting, there being no need to use the "X" setting.
 |
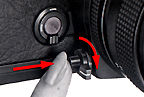
<Setting the Shutter Control Dial> Set the shutter speed by turning it in either direction and aligning the desired shutter speed number or letter (all with click stops) with the index. The "A" and "X" settings lock in place to prevent accidental shifting of the setting. |
To unlock the dial from these settings, turn the dial while pressing and holding down the shutter dial lock-release button. To facilitate resetting of the dial, grip the raised surfaces located at the "A" and "15" marks on opposite sides of the dial. On manual operation, the shutter will not function at in-between speed settings.
 |
<Mechanical Shutter> Often referred as a life saver feature in an electronic camera. When the battery is weak, weather is too cold or its power completely depleted, the camera will not function. In this case, it will be necessary to replace the battery with a new one. |
However, in a situation where your battery runs down while you are still photographing and you feel that you must have the picture, the mechanical shutter comes in very hardly. Lower the mechanical shutter switch lever as far as it will go and then press the depth-of field preview button / mechanical shutter release button. The shutter will function at 1/50 second regardless of the shutter speed set on the shutter control dial or of the availability of battery power. For the correct exposure, consult the film maker's guide sheet that comes packed with your film, or guess the exposure.
Warning: When shooting with the mechanical shutter, DO NOT advance the film using the Real Time Winder or the Professional Motor Drive. Also, the mechanical shutter will not function in concert with the self-timer. |
Aperture Ring
The aperture ring regulates the amount of light transmitted to the film plane. The amount of light transmission is halved when the aperture is changed to the next larger f value (for example, when f/4 is changed to f/5.6), and doubled when it is changed to the next smaller f value.
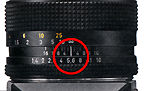 |
The aperture also controls the depth of field, a lens property giving you varying depth in the plane of focus at different apertures. (Refer to page 100) To set the aperture, turn the aperture ring until the desired aperture setting is aligned with the aperture/distance scale index. The aperture ring can be used at in-between positions. |
With the exception of the Mirotar lenses,
all Zeiss lenses feature automatic diaphragms that stop down to the selected aperture
when the shutter is opened upon activation of the shutter release. Thus, your viewfinder
always gives you a brilliant image at full aperture of the lens in use.
Aperture Guide
Lighting Condition (ASA/ISO 100) |
Aperture |
Outdoors under bright sunlight |
8, 11, 16 |
Outdoors (overcast) |
4, 5, 6 |
Indoors or night photography |
1.4, 1.7, 2.8 |
Focusing
|
|
|
|
|
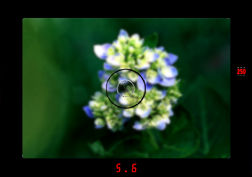
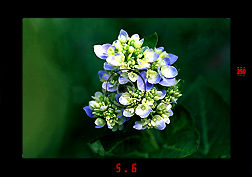
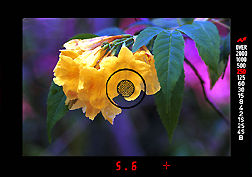
With your eye on the viewfinder, turn the lens focusing ring until the image appears sharply defined within the microprism center or the matte field. When subject is not in focus, the microprism center will produce a glittering image; and the matte field, a blurred image.
When using a telephoto or other slow lens, or in close-up photography, the microprism focusing section in the screen center may become dark, making it difficult to focus. In such a case, use the outer matte field for focusing or choose any of the few optional screen that you deem easier to focus.
Eyepiece Diopter Lenses Diopter lenses are available for farsighted and nearsighted people. There are 8 types available, ranging from - 5, - 4, - 3, - 2, 0, + 1, + 2, to + 3 Dpt. Choose the lens that suits your vision.
 |
Viewfinder Display |
Note: Illustration shown at left is a full field illustration, in actual display, only the relevant shutter speed, aperture and other symbol relate to an exposure will prevail.
(1) Aperture Digital Display The
selected aperture is indicated by a red LED digital display that comes on. The marked and
intermediate aperture values shown by the display are 1.2, 1.4, 1.7, 2.0, 2.4, 2.8,
3.5, 4.0, 4.5, 5.6, 6.5, 8.0, 9.5, 11, 13, 16, 19, 22, 27 and 32. However, when the
camera is mounted with a lens of a maximum aperture of 5.6 or smaller or with such
accessories as the auto bellows, and microscope adapter which do not have the automatic
coupling feature, the digital display will always indicate "1.4" but the
metering system will be functioning normally.
(2) Shutter Speed Display The shutter speeds for the AUTO and manual mode
are indicated by a red LED display that comes on, in a continuously lit
or flashing lighting pattern. The display reading from top to bottom, shows "OVER",
2000, 1000, 500, 250, 125, 60, 30,
15, 8, 4, 2, 1S, 2S, 4S, and "2000"
represents 1/2000 second; 125, 1/125 Second~ and "2", 1/2 second; while
"1S", "2S' 4S indicate 1, 2 and 4 seconds respectively. The 'B'
is used to indicate "Bulb", an extended time-exposure (up to 16 Seconds),
or underexposure "OVER" indicates that it is too bright for correct
exposure.
(3) Exposure Compensation Warning LED When the exposure compensation dial
is set any Position other than "X1", a red LED showing a "
+
" or "-", sign in accordance with the direction in
which the dial is turned will come on, indicating that exposure compensation is in
effect. This LED helps remind you to reset the compensation dial to "X1"
whenever you have finished using the exposure compensation feature.
(4) TLA Flash Ready/After-Flash Signal Mark When the camera is used with a
TLA flash unit, a green mark in the viewfinder display lights up to indicate
that the flash unit has been fully charged, and pulsates after each flash exposure
whenever the exposure has been correct.
| Previous | Next | Film Rewind, Metering system, EV range, AE photography, Eyepiece Shutter, Exposure check 2/6 Parts
Beyond the User's Manual, some relating topics: 6 Parts
Other Contax Accessories: Filters | Eye-Cups / Diopter lens / Right Angle Finder / Magnifier| Lens Caps/Lens Rear Caps / Body Caps / Lens Pouches | Soft lens Shades/Metal Lens Hoods/Adapter Ring/Gelatin Filter Holder set | Focusing Screens
| Back | to Index Page of Contax
RTS
| Back | to Index Page of Contax
RTS II Quartz
| Back | to Index Page of Contax
RTS III
| Back | to Main Index Page of
Contax RTS series models
Camera
Models: | Contax RTS |
RTS II | RTS
III
|
Shared
Resources:|
Motor
Drive-
PMD
W6| Winder - RTW-W3 | Screens |
Flash | Macro | Remote | Databack | Accessories | Zeiss T* Optic | Instruction Manuals: Contax RTS HTML | PDF | Contax RTS II Quartz
HTML | PDF | Contax RTS III (3
parts PDF
by mike@butkus.org, M. Butkus, NJ. Part A | Part B | Part C |
OFF TOPIC:-
Personal Note
| Main Reference
Map: RTS - HTML | PDF (206k) RTS II - HTML | PDF(308k) RTS III - HTML | PDF |
Specification: RTS - HTML | PDF(159k) RTS II - HTML | PDF(66k) RTS III - HTML | PDF |
1975: RTS 1979: 139Q 1980: 137MD 1982: 137MA 1982: RTS II |
1985: 159MM 1987: 167MT 1990: RTS III 1992: S2 1992: S2b |
1992: ST 1994: RX 1996: AX 1998: Aria 2000~ |
| List of Carl Zeiss T* lenses for Contax SLR cameras | ||||
| Message Board | for your favorite Contax RTS Series SLR Models
| Message Board | for your Contax optics
in a shared environment
| Message Board | Specifically for Dispose or Looking for Contax Photographic
Equipment
About this
photographic
site.
| Home - Photography in Malaysia |
![]()
Credit: MClau, joint maintainer of the Contax RTS MB. Some of the content are extracts from: Cees De Groot, who maintains a Contax FAQ site and Tim Roger website on Contax SLR cameras, A few of the images on Zeiss lenses were downloaded from Contax US website. My buddy, Yeak & Rizal Yahya, for their cool programming with Contax RTS's Message Board, Note:certain contents and images appeared in this site were either scanned from official marketing leaflets, brochures, sales manuals or publications published by Kyocera over the years and/or contributions from surfers who claimed originality of their own work solely for educational purposes. The creator of the site will not be responsible for any discrepancies that may arise from such possible disputes except rectifying them after verification."Kyocera", "Yashica", "Contax" & "Carl Zeiss T*" are registered trade names of Kyocera Corporation Inc., Japan. A site made with an Apple IMac, dedicated to all fans of Contax cameras and Zeiss Optics.