 |
Film Rewind When the end of the roll of film is reached it will not be possible to advance the film any further. Instead of attempting to forcibly advance the film, check the exposure counter to see whether you have come to the end of the roll. If so, be sure to rewind the film into its cassette before removing it from the camera. |
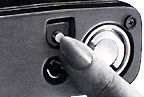
(1) Depress the film rewind release button on camera base for an instant and let go.
 |
(2) Unfold the film rewind crank handle and turn it in direction of the arrow. As soon as the crank handle is rotated, you will hear a sound, indicating that the film is being rewound smoothly. When the film end unhitches from the take-up spool you will feel a slight resistance; however, continue rewinding until the crank handle rotates freely and silently. Then open the camera back and remove the cassette from the camera. |
 |
Metering System The RTS II Quartz features TTL (Through-The-Lens) metering which measures the light entering through the lens. It is of the center-weighted metering type which emphases the central portion of the finder image while taking into account the surrounding area seen in the viewfinder. |
 |
After setting the film speed and aperture, you can photograph in the AUTO mode using the aperture priority metering which automatically selects the matching shutter speed to give you the correct exposure combination, or you can use the manual mode which lets you select the desired aperture and shutter speed. The display showing the exposure information collected can be turned on within the viewfinder by pressing the exposure check button. And when shooting flash using the dedicated TLA electronic flash unit, you can take advantage of the direct TTL center-weighted light metering system which automatically controls the intensity of the flash illumination by measuring the light reflected from the film surface. |
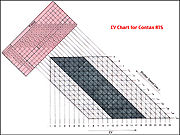
Download a copy (275k) of the EV range chart in PDF format for the Contax RTS II Quartz |
|
<Light Reading Range> The table in PDF format illustrates and gives the EV Light reading range for various lenses, showing the interrelationship between aperture, shutter speed and EV (exposure values). For instance, when an f/1.4 lens at ASA/ISO 100 is used, the reading range spanning the points that the vertical lines (EV) and the horizontal lines (shutter speed) intersect with the diagonal lines extending from the f values of "1.4" to "16" (representing the minimum aperture of the Zeiss Planar T* 50 mm f/1.4), denotes the reading range from EV-1 to 19.
** The EV denotes the value of exposure through combination of the shutter speed and the lens aperture that yield the same exposure effect on a film when the photo graphing conditions (film speed rating and prevailing illumination) remain the same. For example, when using EV 13 from the chart on the following page as a guide, it can be seen that the same exposure effect is attained using the combinations of f/16 at 1/30 sec. and f/6 at 1/125 sec.
* The table in PDF format showing EV from -1 to 19 and shutter speeds from 16 to 1/2000 sec. denotes the range over which the camera correctly meters the light in the AUTO mode. * * That part of the operating range which is shown in color denotes the light reading range when using an f/1.4 lens at ASA/ISO 100.
Automatic Exposure (AE) Photography
 |
|
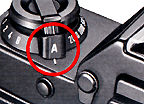
In the AUTO mode, you merely select the desired lens aperture and the camera's exposure system varies the shutter speed from 1/2000 to 16 seconds to assure correct exposure under varying lighting conditions. When operating the camera in the AUTO mode, the shutter speed in effect can be checked by turning on the LED display within the viewfinder. (1) Set the shutter control dial on "A" Setting shutter control dial on "A" readies your camera for Automatic exposure, and even locks the dial to prevent accidental shifting to another setting. |
|
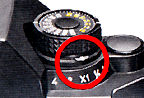
Also check to see that the exposure compensation Ideal is
set at "X1", For normal photography, if the dial is on any setting
other than ''X1", your camera may give you a wrong exposure reading.
|
The exposure compensation scale is only activated for compensating some exposure due to scenes that may have a big portion of high contrast elements that could mislead the camera meter to provide a undesirable exposure reading. Although to a new user, the scale could be even more easy to refer using 'industry standard of + - '0' to '2'instead of the IX scale used in the Contax. |
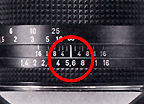
| (2) Select the Lens Aperture Turn the aperture ring to the desired f/stop. Intermediate aperture settings between click stops can also be used. |
(3) Focus and Compose With your eye on the viewfinder, train the camera on your subject and focus on it by turning the focusing ring on the lens, composing your picture as you do so. |
 |
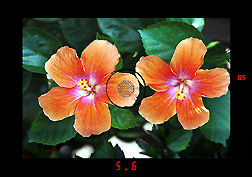
(4) Check the Exposure. Unlike many other popular SLRs which uses the light pressing shutter release button to activate exposure reading method, the Contax RTS II Quartz followed the earlier Contax model by using the exposure check button at the front of the camera. Press the exposure check button to turn on the LED display showing the aperture and shutter speed readings inside the viewfinder. |
When the shutter speed display comes on to indicate any particular speed within the range of "2000" to "B", it means that a correct exposure can be made at the indicated shutter speed.
 |
(5) Press the Shutter Release to Take Picture If the shutter release is held down when the shutter release has been activated, the LED display within the viewfinder will stay on but will go off as soon as your finger is lifted up from the shutter release button. |

Shooting at Your Selected Shutter Speeds By taking advantage of an interrelationship in which the shutter speed increases as the aperture widens up and conversely the shutter speed decreases as the aperture narrows down, you can adjust the aperture to photograph your subject at your selected shutter speeds. With your eyes on the viewfinder, turn the lens aperture ring until the desired shutter speed lights up in the LED display and then press the shutter release button.
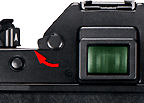 |
<Viewfinder Eyepiece-Blind Lever> When photographing in the AUTO mode using the self-timer or the remote control system, the photographer's eye is not there to shade the viewfinder eyepiece. |
Thus stray light admitted through the unshaded eyepiece can possibly affect the exposures. In such instances, you can close the blind inside the viewfinder by operating a lever located to the left of the eyepiece. To close it, turn the lever in the direction shown by the arrow.
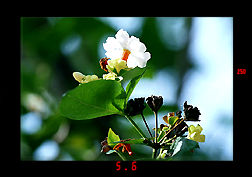 |
<Exposure Check> When the exposure check button is pressed, the LED display will light steadily to indicate the correct shutter speed in effect, and pulsate to indicate an over- or underexposure situation. When button pressure is relieved, the display will stay on for 16 seconds before turning itself off. Also turns itself off when shutter release button has been activated. The RTS II Quartz is an electronic camera in nature, it needs battery power to function (other than the mechanical speed of 1/50 sec and 'B'). The design of the auto turn off feature is to conserve battery for higher power efficiency of the camera. |
 |
 |
1) Pulsating display (Overexposure) |
* Note: When the LED indicating "OVER" flashes, the picture will be over-exposed. Since the subject is too bright, turn the aperture ring until "2000" or a smaller number is indicated before shooting. If you stop down all the way and "OVER" is still indicated, it is necessary to use a neutral density filter, which is available as optional accessory.
 |
On the other extreme, when the LED indicating "B" flashes, it will result in under-exposure. Since your subject is too dark, turn the aperture ring to a wider lens opening until the "B" lights steadily or a faster shutter speed is indicated before shooting. If the LED indicating "B" is still flashing even after the aperture is opened fully, switch to flash photography. |
| Previous | Next | Exposure Compensation, AE Lock, Manual control, bulb, flash photography 3/6 Parts
Beyond the User's Manual, some relating topics: 6 Parts
Other Contax Accessories: Filters | Eye-Cups / Diopter lens / Right Angle Finder / Magnifier| Lens Caps/Lens Rear Caps / Body Caps / Lens Pouches | Soft lens Shades/Metal Lens Hoods/Adapter Ring/Gelatin Filter Holder set | Focusing Screens
| Back | to Index Page of Contax
RTS
| Back | to Index Page of Contax
RTS II Quartz
| Back | to Index Page of Contax
RTS III
| Back | to Main Index Page of
Contax RTS series models
Camera
Models: | Contax RTS |
RTS II | RTS
III
|
Shared
Resources:|
Motor
Drive-
PMD
W6| Winder - RTW-W3 | Screens |
Flash | Macro | Remote | Databack | Accessories | Zeiss T* Optic | Instruction Manuals: Contax RTS HTML | PDF | Contax RTS II Quartz
HTML | PDF | Contax RTS III (3
parts PDF
by mike@butkus.org, M. Butkus, NJ. Part A | Part B | Part C |
OFF TOPIC:-
Personal Note
| Main Reference
Map: RTS - HTML | PDF (206k) RTS II - HTML | PDF(308k) RTS III - HTML | PDF |
Specification: RTS - HTML | PDF(159k) RTS II - HTML | PDF(66k) RTS III - HTML | PDF |
1975: RTS 1979: 139Q 1980: 137MD 1982: 137MA 1982: RTS II |
1985: 159MM 1987: 167MT 1990: RTS III 1992: S2 1992: S2b |
1992: ST 1994: RX 1996: AX 1998: Aria 2000~ |
| List of Carl Zeiss T* lenses for Contax SLR cameras | ||||
| Message Board | for your favorite Contax RTS Series SLR Models
| Message Board | for your Contax optics
in a shared environment
| Message Board | Specifically for Dispose or Looking for Contax Photographic
Equipment
About this
photographic
site.
| Home - Photography in Malaysia |
![]()
Credit: MClau, joint maintainer of the Contax RTS MB. Some of the content are extracts from: Cees De Groot, who maintains a Contax FAQ site and Tim Roger website on Contax SLR cameras, A few of the images on Zeiss lenses were downloaded from Contax US website. My buddy, Yeak & Rizal Yahya, for their cool programming with Contax RTS's Message Board, Note:certain contents and images appeared in this site were either scanned from official marketing leaflets, brochures, sales manuals or publications published by Kyocera over the years and/or contributions from surfers who claimed originality of their own work solely for educational purposes. The creator of the site will not be responsible for any discrepancies that may arise from such possible disputes except rectifying them after verification."Kyocera", "Yashica", "Contax" & "Carl Zeiss T*" are registered trade names of Kyocera Corporation Inc., Japan. A site made with an Apple IMac, dedicated to all fans of Contax cameras and Zeiss Optics.