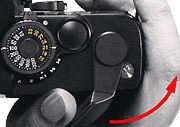
When you wish to include yourself in a group or special occasion picture, use the camera's quartz self-timer. Once you press the self-timer button it double functions as a self-timer flasher (LED) to indicate that the self-timer is in operation.
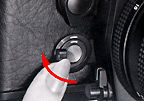 |
Quartz Timed Self Timer |
 |
(2) Once the self timer button/self-timer flasher is pressed, it will begin flashing and continue flashing for about 10 seconds before the shutter is automatically tripped. |
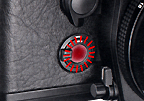
The flashing rate will accelerate about two seconds before end of countdown to let you know that the shutter is about to be released. You can cancel the self-timer at any time during countdown by repressing the button. After using the self-timer, reset the lock ring to its original position.
 |
* When taking pictures in the AUTO mode using the self-timer or standing away from the camera, make it a point to close the eyepiece shutter (viewfinder blind) by operating the lever located alongside the viewfinder eyepiece. The AE Lock can also be used to obtain the same effect in preventing stray light from affecting the exposure reading. |
* * The shutter can be activated by pressing the shutter release even in the midst of a self-timer countdown. When this is done, the self-timer will cancel and the self-timer flasher will be turned off.
* * * Resetting of the self-timer lock ring to its original position will not cause the self-timer to cancel during its countdown.
* * * * During the self-timer countdown period, the LED display inside the viewfinder will be turned off.
Multiple Exposure Operation
By using international multiple exposure
for register different subjects or multiple shots of the same subject on a single
frame you can obtain unusual and interesting results.
 |
However, multiple exposure operation in the Contax RTS II Quartz is still not that easy and assuring. One would expect a Multiple Exposure Lever to de included next to the frame counter for easier reference and operation, even with motor drive or winder attached. |
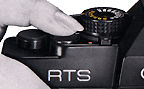
(1) Advance the film and trip the
shutter to make the first exposure. Then, push in the film rewind release button
on the camera base, immediately taking your finger away from the button upon pressing
it.
(2) Give the film advance lever a full turn. This will cock the shutter without
advancing the film and the exposure counter which has been left disengaged.
 |
(3) Press the release button and make the second exposure. This procedure can be repeated to make multiple exposures of two or more registers on the same frame. The film rewind release button will automatically reset to its original position when the film advance lever is wound up. |
 |
Note: When taking multiple exposures there is a possibility of a slight shifting of the multiple images being registered. Focusing screen like FS.6 (Sectioned Matte) can be quite helpful to get a more precise registration. |
* For intentional multiple exposures, it is advisable to choose a dark background first and to superimpose a subject with a brighter background. Multiple exposures of subjects against a predominant, white-toned or ultra-bright background will not come out too well.
Depth of Field (DOF) Fundamentals
One property of lenses is that when
they are focused on a certain object, not only the subject itself, but all objects
in a certain range in front and back of the subject will appear acceptably sharp
in the picture. This range is called the depth-of-field. The depth-of-field of a
given lens varies, as follows.
(1) If the aperture is stopped down, the depth-of~field
increases; if the aperture is opened up the depth-of-field decreases.(2)
As the distance to the subject increases the depth-of-field increases; as the distance
to the subject decreases the depth-of-field decreases. (3)
The depth-of-field is greater behind the subject on which the lens is focused than
in front of it.
Note:
Different lenses may have different depth-of-field limits. A lens of short focal
length has greater depth-of-field at any set distance than a lens of long focal length.
 |
Depth-of-Field Scale on the lens section: |
If you are using a moderate wideangle lens
such as 28mm or 25mm, just by selecting an aperture of f5.6 to f8 is quite adequate
to handle a dinner table or group shots. Just position yourself to around to ensure
the people in the scene are falling within the selected aperture scale covers, you
need not even have to focus anymore. You can also combine that with bounce flash
if the ceiling is low enough.
<Depth-of-Field
Preview Button>
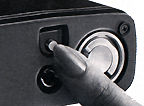
There are times when you require to visually check the DOF such as in product, portraiture or macrophotography, there is a convenient way to have a 'preview' of the zone of sharpness covers with the selected aperture value.
 |
Although the viewfinder of your Contax RTS II Quartz always provides viewing at full aperture, depressing of this button stops down the lens to the preselected aperture (the image in the viewfinder will become darker), letting you see in advance which parts of the scene will be in focus or blurred. |
Warning: Avoid tripping the shutter while depressing the
depth-of-field preview button because it will cause exposure inaccuracy because the
camera is using open aperture metering method (Meaning the lens will automatically
set to its largest aperture so as to make sure the viewfinder image is bright enough
for you to focus or compose a picture prior to exposure). In theory, stop down metering
with the DOF button depressed can be more accurate but it is time consuming and the
viewfinder will darken as the aperture chosen is smaller (e.g. f11, f16, f22 etc.).
Open aperture metering is an simulated metering method with all the value being compensated
and taken into calculation. You don't have to worry this part, it has been perfecting
over the years and it is very accurate.
Interchangeable Camera Back
 |
<Interchangeable Camera Back> When using the dedicated Data Back Quartz D4 (a device which records the year month, day, hour and minute on the film), remove the regular camera back, and replace it with the Data Back Quartz D-4. To remove the camera back, push the camera back release lug down and remove the back. |
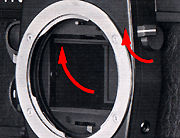 |
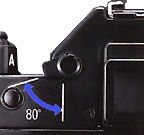
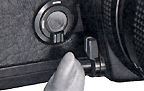
<Mirror Lock> This is a device to flip up and lock the mirror when you want to reduce vibration effects to a minimum in photomicrography and extreme close-up work. To lock the mirror, turn the mirror lock lever in the direction of arrow until the mirror flips up and locks in that position. (The viewfinder will not be viewable) To unlock the mirror, return the mirror lock lever to its original position. |
* Once the mirror is locked up, it will not be possible to make a correct exposure in the AUTO mode or an exposure check. So make such exposure or check before locking up the mirror, with the AE Lock or the manual mode switched ON.
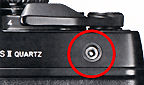 |
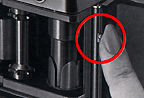
<Release Socket> This socket may be used to attach a remote control device such as a Cable Switch S, Infrared Controller S, Radio Controller Set Auto Bellows PC and the RTF540 Auto Flash unit. It receives electrical signals from these accessories which are used to operate the shutter. |
The use of an ordinary cable release (mechanical type) may cause camera damage
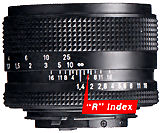 |
<Infrared Compensation Mark> With infrared film (and a red filter), correction for infrared rays during focusing is necessary because their longer than visible light spectrum waves will cause the lens to shift its focal point without it being evident in the viewfinder. |
To compensate for this, Zeiss lenses are provided with an infrared correction mark (a red index) on the depth-of-field scale on the lens barrel. (The Mirotar lenses do not need this adjustment, while the Vario-Sonnar lenses are provided with no such marks.) First, focus in the normal manner, then realign the distance reading which is indexed on the focusing ring to the "R index" mark.
| Previous | Next | Interchangeable Focusing Screens, Types of screens, camera care and maintenance 5/6 Parts
Beyond the User's Manual, some relating topics: 6 Parts
Other Contax Accessories: Filters | Eye-Cups / Diopter lens / Right Angle Finder / Magnifier| Lens Caps/Lens Rear Caps / Body Caps / Lens Pouches | Soft lens Shades/Metal Lens Hoods/Adapter Ring/Gelatin Filter Holder set | Focusing Screens
| Back | to Index Page of Contax
RTS
| Back | to Index Page of Contax
RTS II Quartz
| Back | to Index Page of Contax
RTS III
| Back | to Main Index Page of
Contax RTS series models
Camera
Models: | Contax RTS |
RTS II | RTS
III
|
Shared
Resources:|
Motor
Drive-
PMD
W6| Winder - RTW-W3 | Screens |
Flash | Macro | Remote | Databack | Accessories | Zeiss T* Optic | Instruction Manuals: Contax RTS HTML | PDF | Contax RTS II Quartz
HTML | PDF | Contax RTS III (3
parts PDF
by mike@butkus.org, M. Butkus, NJ. Part A | Part B | Part C |
OFF TOPIC:-
Personal Note
| Main Reference
Map: RTS - HTML | PDF (206k) RTS II - HTML | PDF(308k) RTS III - HTML | PDF |
Specification: RTS - HTML | PDF(159k) RTS II - HTML | PDF(66k) RTS III - HTML | PDF |
1975: RTS 1979: 139Q 1980: 137MD 1982: 137MA 1982: RTS II |
1985: 159MM 1987: 167MT 1990: RTS III 1992: S2 1992: S2b |
1992: ST 1994: RX 1996: AX 1998: Aria 2000~ |
| List of Carl Zeiss T* lenses for Contax SLR cameras | ||||
| Message Board | for your favorite Contax RTS Series SLR Models
| Message Board | for your Contax optics
in a shared environment
| Message Board | Specifically for Dispose or Looking for Contax Photographic
Equipment
About this
photographic
site.
| Home - Photography in Malaysia |
![]()
Credit: MClau, joint maintainer of the Contax RTS MB. Some of the content are extracts from: Cees De Groot, who maintains a Contax FAQ site and Tim Roger website on Contax SLR cameras, A few of the images on Zeiss lenses were downloaded from Contax US website. My buddy, Yeak & Rizal Yahya, for their cool programming with Contax RTS's Message Board, Note:certain contents and images appeared in this site were either scanned from official marketing leaflets, brochures, sales manuals or publications published by Kyocera over the years and/or contributions from surfers who claimed originality of their own work solely for educational purposes. The creator of the site will not be responsible for any discrepancies that may arise from such possible disputes except rectifying them after verification."Kyocera", "Yashica", "Contax" & "Carl Zeiss T*" are registered trade names of Kyocera Corporation Inc., Japan. A site made with an Apple IMac, dedicated to all fans of Contax cameras and Zeiss Optics.