 |
Exposure Compensation When shooting against the light, a bright window, or other bright background, me main subject will tend to be underexposed using the auto exposure system. Conversely when subject is spotlighted or intensely illuminated, it is likely to be overexposed. To overcome lighting problems of this nature as effectively as possible, your Contax RTS II Quartz features a choice of two exposure compensation methods: the AE Lock (Auto Exposure) lever and the exposure compensation dial. In addition to exposure compensation, both of these methods are also useful for intentional over- and under exposure for special effects photography. |
<Using the AE Lock (Automatic Exposure Lock) Lever>
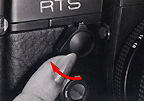 |
The AE Lock is a memory device used to hold the exposure information (appropriate shutter speed and aperture combination). Thus, when the white index mark of the AE Lock lever is turned all the way to the top, it will lock itself into place, storing in the camera's memory the exposure in effect at moment of setting. |
When the shutter release is pressed, the shutter releases at the memory-oriented shutter speed regardless of the surroundings. At this time, the LED display in the viewfinder will pulsate the memory-oriented shutter speed number. Disenable the AE Lock by turning back the lock lever with your fingertip. The shutter speed display will now light steadily.
Note: The AE Lock on the RTS II Quartz is a memory system that holds a meter reading taken from a combination of the aperture and the shutter speed data. Thus, when the aperture is changed after setting of the AE Lock, the camera will automatically select a corresponding shutter speed to assure you of a uniform exposure setting at all times.
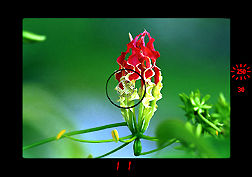
For example,you have a situation where the background is excessively bright and you wish to place the subject in one side of the picture. In this situation you can either center the finder on the subject and set the AE Lock, or approach the subject to take a direct exposure reading at close range and then set the AE Lock. Reposition the camera, reframe your subject and obtain a picture showing good detail.
Warning: To avoid unnecessary battery drain, always return the AE Lock lever to its original position whenever you are through photographing. |
Once the exposure reading is locked in,
if remains locked in until the AE Lock is released. Thus, when using a motor winder
to take sequential photos of a moving subject , lock in the exposure reading and
release the shutter for uniformly exposed photos without having your meter influenced
by changing lighting conditions in the background. In situations calling for intuition
and experience, such as bright backgrounds, backlighted subjects, and spotlighted
subjects, you can easily obtain the correct exposure by using the AE Lock.
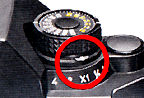
<Using the Exposure Compensation Dial>
For exposure compensation, adjust the dial to one of the settings marked "4", "2", "1/2" and "1/4", with usable intermediate click stops in 1/2-step increments. The "4" and "1/4" settings are equivalent to changing the shutter speed by two settings, the "2" and "1/2" settings correspond to changes of 1 shutter speed setting.
 |
The integral values "4" and "2" indicate that additional exposure is being given; the fractional values "1/2" and "1/4" are used to decrease the amount of exposure. For example, when using a shutter speed of 1/125 second, a setting of "2" has the effect of reducing the shutter speed to 1/60 second; and a seeing of "4", to a shutter speed of 1/30 second. |
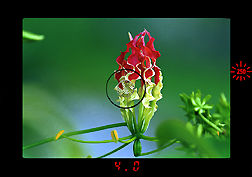
A lighted signal turns on in the viewfinder
to show when the exposure compensation is in use. To the right of the aperture reading
display, it shows a " + " when the dial is adjusted to "2" or
"4", and a "-" when a setting of "1/2" or "1/4"
is in use. The indicated shutter speed will change in response to the amount of exposure
compensation in effect.
Note:
If the dial is engaged after setting the AE Lock, the exposure compensation will
not be enable even though the exposure compensation LED lights up.
*
For Backlighted Subjects Set at "2" or "4"
When shooting main subject against the light, or against a bright sky, window or
beach scene, where a bright background dominates the picture area, your main subject
will be underexposed, causing it to be silhouetted and lacking in detail. In such
a case, set the exposure compensation dial at "2" or "4" to give
your subject more exposure. An alternative way (A more pleasant effect) is to use
fill-in flash to get a balance effect between fore and background.
**
For Spotlighted Subjects Set at "1/2" or "1/4"
When shooting main subject in spotlight, a situation where a dark background
dominates the scene, your main subject will appear overexposed, causing a washed
out effect. In such a case, turn the exposure compensation dial to "1/2"
or "1/4" to decrease exposure. Depending on the area of brightness, this
may require experience to achieve ideal effect in a shadowy effect. In both cases,
unless you are shooting slide film, make sure the printing lab has been informed.
In most cases, an inexperienced print film lab assistant can create more damages
by overriding your set preferences in exposure compensation.
Warning: Always be sure to reset the compensation dial back to "X1" when exposure compensation is no longer needed. |
 |
Manual Exposure Control |
 |
(1) While pressing the shutter dial lock-release button, turn the dial to the desired manual shutter speed setting. After releasing the "A" or "X" setting on the shutter control dial, there is no need to use the lock-release button for further resetting of the dial. |
(2) Press the exposure check button. The LED display
will flash to indicate the selected shutter speed, while a second LED display will
steadily light, just as in the case of the AUTO mode, to indicate the correct shutter
speed for the aperture setting in effect. For correct exposure, turn the aperture
ring until the steadily lit shutter speed reading merges with the other reading that
is flashing.
(3) Correct exposure is indicated when the steadily
lit LED display merges with the flashing LED display, leaving only the flashing display
in view. Press the shutter release button to photograph your subject.
 |
* When resetting the shutter speed after having selected the aperture setting, adjust the shutter control dial until the flashing LED display merges with the steadily lit display before releasing the shutter. However, when two steadily lit LEDs come on simultaneously, since the shutter control dial may not be used in the intermediate settings, you will not be able to merge the two LEDs completely at an intermediate position. In this case, you will need to merge the two LEDs at one of the marked shutter speed settings by making a fine adjustment of the aperture setting. |
** When shooting with the shutter control dial in the "B" setting, the shutter will remain open as long as the shutter release button is depressed. So, in order to avoid camera shake, it will be necessary to use a tripod or other means of support, together with the Contax Cable Switch S (optional accessory) connected to the camera.
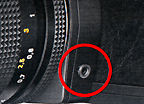 |
<Mechanical Bulb Release Socket> By connecting a commercially available cable release of the mechanical type to your camera, you will be able to mechanically induce the shutter to remain in an opened position for any desired length of time regardless of whatever shutter speed setting is in effect or of whether any battery power is available. |
Since you will be able to use it for bulb
photography without any concern over running the batteries dead as in the case of
an electronic cable release, you will find it highly suitable for extremely long
time exposures in astrophotography applications. It should be noted that the LED
display will not function when the mechanical bulb release socket is being used.
*
When shooting by means of a cable connected to the mechanical bulb release socket,
be sure to cock the film advance lever one complete stroke.
** The
mechanical bulb release socket is not designed to accept the optionally available
Cable Switch S.
 |
Flash Photography |
Because of the direct TTL flash metering system, you will find it easy to employ such advanced techniques as bounce flash, diffuse flash and close~up flash. Also, the camera's exposure compensation system can be coupled to adjust the flash output, and the necessary exposure information is displayed in the viewfinder. The original TLA Auto Flash system consists of the clip-on types TLA20 and TLA30 and the grip-type RTF540 but you can also make use of the various flash Contax has designed for the TLA system at later years. Various cables for extension and multiple unit purposes are available.
Note: If you want a direct TTL flash metering capability for your RTF540, use a TLA adapter which is available as an optional accessory.
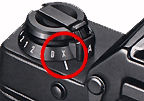 |
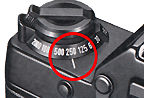
<With other Flash Units> The synch contact of the RTS II Quartz is an X contact (1/60 second). When using a flash unit other than of the TLA Auto Flash system, refer to the following table for the correct shutter speed setting. |
The shutter control locks when it is adjusted
to the "X" setting. The LED display in the viewfinder will flash
at the "60" position, which is indicative of the flash synch speed,
and it will also steadily light, just as in the case of the AUTO mode, to indicate
the correct shutter speed for the aperture setting in effect. The camera's hot shoe
is a direct X contact that permits use of flash units of the cordless type.
If a synchro cord is needed, it may be connected to the synch terminal on the front
of the camera. To determine the correct flash exposure (aperture setting), consult
the instructions accompanying the flash unit in use.
|
Synch Shutter Speeds |
|||||||||||||||||
|
Shutter Speeds |
1/2000 |
1/1000 |
1/500 |
1/250 |
1/125 |
1/60 |
1/30 |
1/15 |
1/8 |
1/4 |
1/2 |
1 |
2 |
4 |
X(1/60) |
B |
|
|
Electronic Flash |
|
|
|
|
|
O |
O |
O |
O |
O |
O |
O |
O |
O |
O |
O |
|
|
Flash bulb |
FP |
|
|
|
|
|
|
O |
O |
O |
O |
O |
O |
O |
O |
O |
O |
|
M |
|
|
|
|
|
|
O |
O |
O |
O |
O |
O |
O |
O |
O |
O |
|
|
MF |
|
|
|
|
|
|
O |
O |
O |
O |
O |
O |
O |
O |
O |
O |
|
| Previous | Next | Self Timer, Multiple Exposures, Depth of Field Preview, Film Back, Release Socket, Infrared Index 4/6 Parts
Beyond the User's Manual, some relating topics: 6 Parts
Other Contax Accessories: Filters | Eye-Cups / Diopter lens / Right Angle Finder / Magnifier| Lens Caps/Lens Rear Caps / Body Caps / Lens Pouches | Soft lens Shades/Metal Lens Hoods/Adapter Ring/Gelatin Filter Holder set | Focusing Screens
| Back | to Index Page of Contax
RTS
| Back | to Index Page of Contax
RTS II Quartz
| Back | to Index Page of Contax
RTS III
| Back | to Main Index Page of
Contax RTS series models
Camera
Models: | Contax RTS |
RTS II | RTS
III
|
Shared
Resources:|
Motor
Drive-
PMD
W6| Winder - RTW-W3 | Screens |
Flash | Macro | Remote | Databack | Accessories | Zeiss T* Optic | Instruction Manuals: Contax RTS HTML | PDF | Contax RTS II Quartz
HTML | PDF | Contax RTS III (3
parts PDF
by mike@butkus.org, M. Butkus, NJ. Part A | Part B | Part C |
OFF TOPIC:-
Personal Note
| Main Reference
Map: RTS - HTML | PDF (206k) RTS II - HTML | PDF(308k) RTS III - HTML | PDF |
Specification: RTS - HTML | PDF(159k) RTS II - HTML | PDF(66k) RTS III - HTML | PDF |
1975: RTS 1979: 139Q 1980: 137MD 1982: 137MA 1982: RTS II |
1985: 159MM 1987: 167MT 1990: RTS III 1992: S2 1992: S2b |
1992: ST 1994: RX 1996: AX 1998: Aria 2000~ |
| List of Carl Zeiss T* lenses for Contax SLR cameras | ||||
| Message Board | for your favorite Contax RTS Series SLR Models
| Message Board | for your Contax optics
in a shared environment
| Message Board | Specifically for Dispose or Looking for Contax Photographic
Equipment
About this
photographic
site.
| Home - Photography in Malaysia |
![]()
Credit: MClau, joint maintainer of the Contax RTS MB. Some of the content are extracts from: Cees De Groot, who maintains a Contax FAQ site and Tim Roger website on Contax SLR cameras, A few of the images on Zeiss lenses were downloaded from Contax US website. My buddy, Yeak & Rizal Yahya, for their cool programming with Contax RTS's Message Board, Note:certain contents and images appeared in this site were either scanned from official marketing leaflets, brochures, sales manuals or publications published by Kyocera over the years and/or contributions from surfers who claimed originality of their own work solely for educational purposes. The creator of the site will not be responsible for any discrepancies that may arise from such possible disputes except rectifying them after verification."Kyocera", "Yashica", "Contax" & "Carl Zeiss T*" are registered trade names of Kyocera Corporation Inc., Japan. A site made with an Apple IMac, dedicated to all fans of Contax cameras and Zeiss Optics.