< Preparation
before Shooting >
<Battery Installation>
The TLA30 Auto Flash Unit is powered by four 1.5 V AA-size penlight batteries, alkaline-manganese or manganese, or by four 1.2 V rechargeable Ni-Cd batteries of the same size. The use of high performance alkaline-manganese batteries is particularly recommended.
 |
|
1) Slide the battery compartment cover out as illustrated and remove it. |
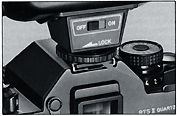
Test Flash To test the flash unit, first set the power switch to "ON" and then press the combination Flash-Ready Lamp/Test Button control when it lights red. When not using the flash unit immediately afterwards, reset the power switch to "OFF" to conserve the batteries.
Precautions: * Recycling time will slow down as the batteries weaken. When the flash-ready lamp fails to light within 30 seconds of the previous flash, it means the batteries are inadequately charged. When this occurs, replace all four batteries at the same time. Mixing of old and new batteries will shorten battery life.
** Battery performance will deteriorate temporarily when batteries are exposed to near subzero temperatures. When using the flash unit in cold areas, it is recommended that the batteries be protected from the cold by keeping the flash unit in a bag or in some cold weather gear, or that a set of fresh batteries be kept on hand. Batteries thus weakened will regain their power and become serviceable again upon being returned to normal temperatures.
*** Battery contacts contaminated with
oil or sweat can cause poor electrical contact. Wipe the contacts clean with a dry
cloth before use to ensure maximum performance.
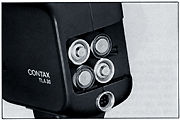
<Mounting the Flash Unit> The TLA30 is designed
to function only on cameras with a hot shoe (Direct X) contact.
 |
 |
Loosen the shoe locking ring and then slide the flash unit base all the way into the accessory shoe for positive contact. * Make sure that the flash unit base is firmly pushed all the way into the shoe; otherwise, contact will not be ensured. |
Firmly secure the flash unit
by turning the locking ring as far as it will go in the direction of the arrow.
|
CONTAX TLA 30 Flash Model |
|||
|
Flash Mode |
Type of Flash Operations |
GN (ASA/ISO 100, m) |
|
|
AUTO |
TTL |
Direct TTL flash (Using a Contax camera with direct TTL auto flash metering system.) Electronic flash exposure is automatically controlled by camera's built-in sensor. Couples at all apertures of the lens in use. |
30 - 4 |
|
|
Normal Auto Flash Couples at aperture indicated by green or red mark. Electronic flash exposure is automatically controlled by sensor on front of flash unit. |
30 - 4 |
|
|
MANUAL |
F |
Manual Flash Operation "F" denotes full output, -1/4" and '1/16- denote 1/4 and 1/16 of full output, respectively. |
30 |
|
1/4 |
15 |
||
|
1/16 |
7.5 |
||
(1) Film Speed Index
The white index marks "
(2) Wide Panel Index
The orange colored marks "
(3) Film Speed Scale
(4) Distance Scale
(5) Aperture Scale
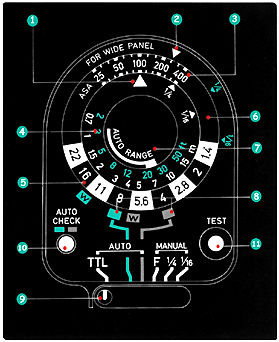 |
(6) Exposure Computer Dial By setting the ASA/ISO film speed scale to the speed of the film in use, it is possible to read out the following exposure data: (a) In the TTL Auto mode, the flash range for the aperture in effect-, (b) In the Normal Auto mode, the coverage aperture readings and the flash ranges for the given apertures,- and (c) In the Manual Flash mode, the correct aperture reading for the selected flash-to-subject distance. |
You can also Download a Copy of the PDF file (516k) for your future reference.
(9)
Flash Mode Selector The selector is used to switch to any of the three modes,
TTL Auto, Normal Auto and Manual flash. Be sure to set the selector precisely on
the click-stop position.
(10) Auto Check Lamp (For Normal
Auto Flash Mode Only) In the Normal Auto flash mode, this lamp is used to indicate
whether subject was within effective flash range. After the exposure, it will signal
a green after-flash for about three seconds if your subject was within effective
flash range; otherwise, the absence of such a signal indicates that the subject was
not within the correct flash range. The Auto Check Lamp is not designed to operate
in the TTL Auto or the Manual flash modes.
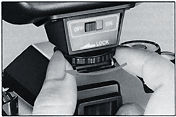
(11) Flash-Ready Lamp/Test Button
The Flash-Ready Lamp lights red when the flash unit is ready to flash. This control
also doubles as a test button for test flashing.
< Basic Electronic Flash Control with Contax TLA 30 >
TTL AUTO Flash Operation
When using the TLA30 with a Contax camera incorporating direct TTL auto flash metering system, merely set the camera to the auto mode and the flash unit to the "TTL" mode. When the flash unit is ready to flash, the camera automatically switches over to the camera's synch speed and two LEDs inside the viewfinder indicate that both the flash unit and camera are ready to flash.
 |
 |
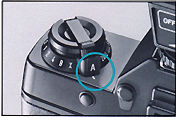
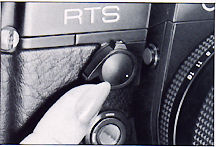
(1) Set the Camera on the Auto Mode. The camera is set on the auto mode by turning the shutter control dial to "A". |
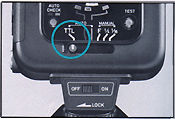
(2) Set the Flash Mode Selector to "TTL". Slide the flash mode selector to the "TTL" click-stop position.
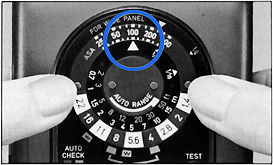 |
(3) Set the Film Speed Scale. Rotate and set the Exposure Computer Dial by aligning the white -,L" index mark with the correct ASA/ISO film speed for the film in use. To rotate the dial, exert fingertip pressure against the two little round-shaped projections placed opposite each other on the dial, making sure to set the scale squarely on a click-stop. |
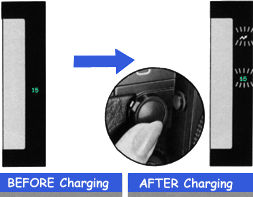 |
(4) Check the LED Indicators Inside the Viewfinder. Turn the flash unit's power switch to "ON", and then press the camera's exposure check button to make a functional check of the LED display inside the viewfinder. When the flash unit has recycled, the camera switches to its flash synch speed (1/60 sec. for the RTS II Quartz) and a " |
Note: In the case of the Contax 137 MA/MD Quartz, make a functional check of the viewfinder LED display by lightly depressing the shutter release button part way down.
 |
(5) Set the Aperture. Rotate the aperture ring to the desired aperture setting. Because of the direct TTL metering feature, you can freely select any aperture within the full aperture range of the lens in use. The effective flash range varies with the aperture setting in use. |
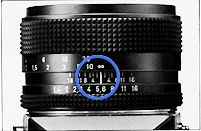
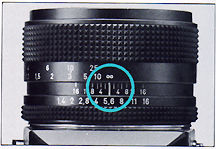
For example, if you choose
f/5.6 with ASA/ISO 100 film in the camera, you will need to align the extreme right
of the white band on the Auto Flash Range Guide with the "5.6 " mark on
the Exposure Computer Dial. In so doing, you will obtain correct flash exposure over
an effective flash range between approximately 0.7 and 5 meters. Your subject will
be correctly exposed within this flash range.
 |
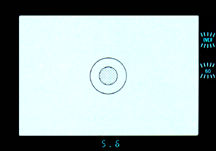
(6) Make the Flash Exposure Focus and press the shutter release. After the exposure, the " |
Note: The "![]() " mark will flash even when
your subject is shot closer than the effective flash range. However, in this case,
your subject will be overexposed.
" mark will flash even when
your subject is shot closer than the effective flash range. However, in this case,
your subject will be overexposed.
 |
a) In addition to flashing at the synch shutter speed, the "OVER" mark inside the viewfinder will also flash as shown when shooting against the light or with daylight synch flash. This indicates that the reading for the correct shutter speed is faster than the synch shutter speed. If the exposure is made in such a situation without any adjustment, the background will be overexposed showing a washed out effect. To overcome this, close down the aperture ring until the "OVER" indication goes away; then, shoot. |
b) On completion of the auto flash exposure, the camera reverts to the non-flash auto exposure function until the flash unit has recycled;
c) When checking the after-exposure flash function without film loaded in the camera, lay the flash test sheet supplied with the flash unit over the film plane to ensure sufficient reflection surface.
<Auto Flash with the AE Lock>
When shooting subject against a dusky background or in a room of great depth, often your main subject is properly exposed but the background comes out dark and flat In this instance you can obtain a more natural and better lighting balance between your subject and background by employing direct TTL Auto flash with the AE Lock of the camera.
1) Set the lens aperture after
making sure that the camera's shutter control dial has been set on "A"
and the flash unit on "TTL".
 |
 |
|
Note: In the case of the Contax 137 MA/MD Quartz and Contax 139 Quartz, the shutter speed is locked in.
3) When the LED mark "
a) The AE Lock can be set either before or after the flash unit has charged.
 With AE Lock |
 Without AE Lock |
b) The same effect as when the AE Lock is used can be obtained by leaving the flash unit on "TTL" and setting the camera's shutter speed at 1/60 second or slower. However, with the AE Lock, it is a much simpler task and produces much more expressive results. |
| Previous | NEXT | Normal AUTO flash, Manual Flash Control 2/4
BACK to Main Index Page of CONTAX FLASH SECTION.
Other Contax Accessories: Filters | eyecups / Diopter lens / Right Angle Finder / Magnifier| Lens Caps/Lens Rear Caps / Body Caps / Lens Pouches | Soft lens Shades/Metal Lens Hoods/Adapter Ring/Gelatin Filter Holder set | Focusing Screens
| Back | to Index Page of Contax
RTS
| Back | to Index Page of Contax
RTS II Quartz
| Back | to Index Page of Contax
RTS III
| Back | to Main Index Page of
Contax RTS series models
Camera
Models: | Contax RTS |
RTS
II
| RTS III |
Shared
Resources:|
Motor
Drive-
PMD
W6| Winder - RTW-W3 | Screens |
Flash | Macro | Remote | Databack | Accessories | Zeiss T* Optic | Instruction Manuals: Contax RTS HTML | PDF | Contax RTS II Quartz
HTML | PDF | Contax RTS III (3
parts PDF
by mike@butkus.org, M. Butkus, NJ. Part A | Part B | Part C |
OFF TOPIC:- Personal Note
| Message Board | for your favorite Contax RTS Series SLR Models
| Message Board | for your Contax optics
in a shared environment
| Message Board | Specifically for Dispose or Looking for Contax Photographic
Equipment
| Main Reference
Map: RTS - HTML | PDF (206k) RTS II - HTML | PDF(308k) RTS III - HTML | PDF |
Specification: RTS - HTML | PDF(159k) RTS II - HTML | PDF(66k) RTS III - HTML | PDF |
1975: RTS 1979: 139Q 1980: 137MD 1982: 137MA 1982: RTS II |
1985: 159MM 1987: 167MT 1990: RTS III 1992: S2 1992: S2b |
1992: ST 1994: RX 1996: AX 1998: Aria 2000~ |
| List of Carl Zeiss T* lenses for Contax SLR cameras | ||||
About this
photographic
site.
| Home - Photography in Malaysia |
![]()
Credit: Mr. Timothy Daley of www.alkit.com <cameras@AS400.alkit.com> for both of his images on TLA20 and TLA30; MClau, joint maintainer of the Contax RTS MB. Some of the content are extracts from: Cees De Groot, who maintains a Contax FAQ site and Tim Roger website on Contax SLR cameras, A few of the images on Zeiss lenses were downloaded from Contax US website. My buddy, Yeak & Rizal Yahya, for their cool programming with Contax RTS's Message Board, Note:certain contents and images appeared in this site were either scanned from official marketing leaflets, brochures, sales manuals or publications published by Kyocera over the years and/or contributions from surfers who claimed originality of their own work solely for educational purposes. The creator of the site will not be responsible for any discrepancies that may arise from such possible disputes except rectifying them after verification."Kyocera", "Yashica", "Contax" & "Carl Zeiss T*" are registered trade names of Kyocera Corporation Inc., Japan. A site made with an Apple IMac, dedicated to all fans of Contax cameras and Zeiss Optics.