< Normal AUTO Flash Operation >
Along with TTL Auto flash
in which exposures are controlled by the camera's independent sensor, the TLA30 also
offers Normal Auto flash over two aperture ranges, using its foreside sensor to control
for correct exposure. When used with a Contax featuring the direct TTL auto flash
metering system or even with the Yashica FX-D Quartz, merely set the camera to the
auto mode. Upon recycling of the flash unit, the camera will automatically switch
over to its flash synch speed and the viewfinder LED will indicate flash-ready status.
And, even when its shutter control dial is set at faster than the flash synch speed,
the camera will automatically switch to the flash synch speed as soon as the flash
unit has completed its recycling.
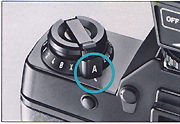
1) Set the Camera on Auto Mode. The camera is set on the auto mode by turning
the shutter control dial to "A".
 |
 |
|
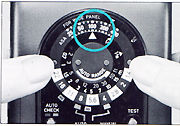
2) Set the Film Speed Scale. Rotate and set the Exposure Computer Dial by aligning the white "A" index mark with the correct ASA/ISO film speed. |

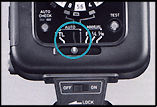 |
4) Set the Flash Mode Selector. Slide and set the Flash Mode Selector to a Normal Auto index bar corresponding to the color (red or green) of the index mark used to select the correct coverage aperture. |
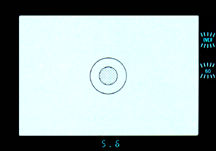
5) Checking LED Display Inside Viewfinder. Turn the flash unit's power switch to "ON", and press the camera's exposure check button to see if the LED display inside the viewfinder lights. The display here is the same as that seen in the TTL Auto mode).
 |
6) Take Your Picture. Focus and press the shutter release. After the exposure, the Auto Check lamp will light up green with an after-flash (about three seconds) if your subject was within the effective flash range. To check for flash range before making flash exposure, press the Test Button while holding the flash unit in position identical to that during actual exposure. |
Note: Since the camera's direct TTL metering
function is operative even in the normal auto flash mode, you will sometimes see
the after-flash mark "![]() " pulsate. Thus, be sure to check for correctness of the flash range
by using the flash unit's Auto Check lamp.
" pulsate. Thus, be sure to check for correctness of the flash range
by using the flash unit's Auto Check lamp.
 |
< Normal Auto Flash with the AE Lock > Normal auto flash photography with the camera's AE Lock is possible using the same operations employed in the TTL auto flash mode. |
< Using the TLA30 with Other SLR Cameras > Set the camera shutter speed
to that recommended in the instruction manual for the camera in use, Then, follow
procedures outlined in steps 2 through 6. Since the viewfinder display will not be
operative in this case, use the test lamp on the flash unit to make your flash-ready
check, and the auto check lamp to make your after-flash check.
< MANUAL
FLASH OPERATION
>
When you want to take flash
photographs at certain fixed flash outputs depending on your photographic intentions
or the prevailing picture-taking situation, you have the option of using any one
of three manual flash modes, the "F" mode for full output, and the "1/4"
and "1/16" modes for reduced outputs. When used with a Contax featuring
the direct TTL auto flash metering system or the Yashica FX-D Quartz or equivalent
camera bodies, merely set the camera to the auto mode as in the case of normal auto
flash operation. As soon as the flash unit has completed its recycling, the camera
will automatically switch to its flash synch speed and the viewfinder LED will indicate
flash-ready status. And, even if the camera is set at higher than its flash synch
speed, it will be automatically switched to its flash synch speed when the flash
unit has completed recycling.
1) Set the Camera on Auto Mode. The camera is set on the auto mode by turning
the shutter control dial to "A".
 |
2) Set the Flash Mode Selector. Slide and set the Flash Mode Selector at a click stop for "P, "1/4" or "1/16". The guide numbers are 30, 15 and 7.5 for the 'F", "1/4" and "1/16" settings respectively, at ASA/ISO 100, meters. |
3) Set the Film Speed Scale. Rotate and set the Exposure Computer Dial so that the correct ASA/ISO film speed aligns with the index mark corresponding to the selected manual flash output. (When using the full manual output, set the dial at the white "A" index mark.)
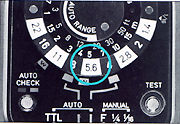 |
4) Set the Aperture. Focus and set the aperture ring to the coverage aperture read out from the Exposure Computer Dial as applicable to the desired flash-to-subject distance. For instance, when you have selected the "F" flash mode with ASA/ISO 100 film in the camera, the correct aperture for a flash-to-subject distance of 5 meters will be f/5.6. When not using the Exposure Computer Dial, you can compute the correct aperture by using the following formula: |
GN (Guide Number) divided by Subject
Distance = f-number.
5) Take Picture After Checking Viewfinder LED Display. Turn on the flash unit's
power switch. Press the exposure check button to see if the "![]() " mark inside the viewfinder
will light, and then effect exposure. The display here will be identical to that
seen in the TTL auto mode. When the shutter control dial is set to "X",
or to 1/60 sec. or slower, the LED display will flash the setting in effect.
" mark inside the viewfinder
will light, and then effect exposure. The display here will be identical to that
seen in the TTL auto mode. When the shutter control dial is set to "X",
or to 1/60 sec. or slower, the LED display will flash the setting in effect.
|
Note: Since the camera's direct TTL metering function is operative even in the manual flash mode, you will sometimes see the after flash mark " |
For guide numbers, use the following chart as a reference. (Bracketed GN for Wide Panel use.)
< Sequential Flash > With the Flash Mode Selector
set at the low manual setting of "1/16" (GN 7.5, ASA 100, m), the TLA30
can be used for synchronized sequential flash at a speed of three frames per second
(using the RTW W-3) for a duration of about six frames. The Normal Auto and TTL Auto
modes can also be used for sequential flash provided the output is equal to or less
than GN 7.5, ASA 100, m. For sequential flash, be sure to use four fresh alkaline
dry batteries to ensure satisfactory performance.
< Using TLA30 with Other SLR Cameras > Set the camera shutter speed
to that recommended in the instruction manual for the camera in use. Then, follow
procedures outlined in steps 2 through 5. Since the viewfinder display will not be
operative in this case, use the test lamp on the flash unit to make your flash-ready
check.
Usage Precautions:
When using a camera other than a Contax with direct TTL auto flash metering system, the TLA30 will operate in the Manual mode with a Guide Number of 30, at ASA/ISO 100m.
* When not using the flash
unit, always turn off the Power Switch to avoid battery drain. When not using the
flash unit for long periods of time, remove all four batteries. Also, periodically
test the flash unit to keep the capacitor in top working condition.
**
DO NOT leave
the flash unit exposed to direct summer heat (uncovered on the beach, in a car parked
in direct sunlight, etc.) for long periods of time. This could result in damage to
the flash system.
< Advanced Flash Techniques >
In the TTL Auto flash mode, the TLA30 couples with the Exposure Compensation Dial system of the camera, permitting you to take exposure compensated flash photos. Use the function to compensate flash exposure when you want to intentionally under- or overexpose, or when you otherwise cannot obtain a correct exposure due to extreme lighting contrast between your main subject and its background.
 |
Increasing Exposure When you want to intentionally overexpose in such instances where mirrors or white colored furniture with highly reflective, bright surfaces dominate the scene you can compensate for correct exposure of subject by increasing the exposure. |
 |
Decreasing Exposure When you want to intentionally underexpose in such situations where your subject is shown against a background completely dominated by dark-toned walls or furniture, you can compensate by decreasing exposure. # In the Normal Auto or Manual flash modes, the Exposure Compensation Dial system will not function for flash operation. In this instance, you can attain exposure compensation by changing the lens aperture setting. |
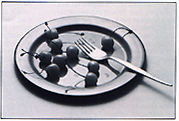
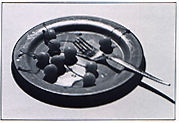
<
Diffused
Flash >
This technique applies to a method where the light is scattered to produce a softening
effect by placing a sheet of tracing paper or a thin, white handkerchief between
the flash head and subject or directly over the flash head.
Diffused flash can be used effectively when you want a softer lighting effect with
close-range portraits, or to reduce reflections when there are metal or glass surfaces
within the picture area. To obtain a more pleasing, soft lighting effect, it would
be preferable to place a sheet of tracing paper a short distance away from rather
than directly over the flash head.
 |
 |
* With diffused flash, less intensive light will fall upon subject due to scattering effect of the light. Thus, allow for underexposure by using a wider aperture setting. ** With diffused flash in the Normal Auto mode, be sure that the line of view from the flash unit's foreside sensor to subject is not obstructed. |
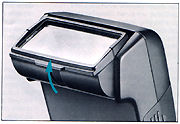
< Bounce Flash >
Bounce flash is the technique of aiming the flash head at the ceiling or walls instead of directly at the subject. The result is a softer, more natural lighting as opposed to the harsh lighting of direct flash.
 |
 |
With the TLA30 in at-camera position, the TLA30 flash head can be elevated vertically to a maximum of 900 (click stops at 600, 750 and 900 provided), permitting you to take bounce flash under varying conditions with the use of these features. |
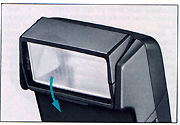
And it even tilts 150 downward, making it very handy for parallax-free close-up photography. (When the flash head is tilted downward, a red mark appears on the back of the flash head unit to warn you that the flash head is turned out of its normal straight-ahead position, thus serving as a reminder to re-till the head upward when reverting to normal direct flash shots.) In the TTL Auto mode, the light from the subject is metered through the taking lens to ensure you of correct exposure at all times. When the TLA Extension Cord (sold separately) is connected, the flash unit may be used off-camera, permitting you to take flash pictures in the TTL Auto mode at any desired flash position or angle.
 |
 |
* For optimum results it is necessary to consider the reflectance ratio of the bounce surface, the angle of bounce, and the bounce-path distance, and choose your f/number accordingly. |
While the exposure will be considerably affected by the conditions involved, satisfactory results can be obtained by using an aperture wider than for direct flash, using a white or gray colored reflection surface.
** In bounce flash, make sure that no direct light from the flash unit strikes the subject.
*** In the Normal Auto flash mode, the
TLA30, set at-camera position, will enable you to take correctly exposed bounce flash
shots with the flash head positioned at any of the click stop positions because its
foreside sensor is being aimed toward the subject. And when using the TLA Extension
Cord for off-camera flash, always be sure that the sensor is kept aimed at the subject.
<
Synchro-Sunlight Flash Photography >
When shooting outdoor pictures, photographing subject in bright sunlight or in backlit conditions, your main subject will come out with shadow areas or be underexposed.
 |
 |
To overcome this situation, use supplementary light from your flash unit to relieve the shadows and beautifully capture the background at the same time. |
Daylight synch flash is effective under the following conditions:
a) When photographing subject against the light or a bright window.
b) When subject's face is darkened by shadows of a tree or when it is shaded because of sunlight being partially blocked by the tree limbs.
c) When a highly contrasting shadow area is produced on subject's face under direct sunlight; and;
d) When taking portraits in weak light during the earliest and last hours of sunlight.
In the TTL Auto mode, you will be able to change the aperture setting in accordance with the background brightness, thus relieving you of any complicated calculations even when taking daylight synch flash shots
< Close-up Flash Photography >
Using the TLA30 with a Contax incorporating a direct TTL auto flash metering system,
you can easily take close-up flash shots in the TTL Auto mode by coupling it to macro
lenses, adapter rings, Auto Bellows unit, etc.
 |
With the direct light metering feature, you can attain correct exposure for varying apertures and image magnification. However, light cutoff by lens barrel and uneven lighting often occur with close-ups taken from at-camera position. In such instances, you can overcome lighting problems with at-camera close-ups by tilting the flash head vertically downward 150 or you can achieve the same by using a TLA Extension Cord, which is sold separately, and shooting from an appropriate position or angle from off-camera. And even better results can be attained with the use of the Wide Panel that comes packaged with your TLA30 flash unit. |
* When taking close-ups, guard against overexposure that tends to occur at certain flash-to-subject distances. ** Since it is very difficult to determine correct exposure for close-ups in the Normal Auto and Manual flash modes, it is recommended that such determination be made by experimenting to find the optimum exposure under varying conditions.
| Previous | NEXT | Various Flash System Accessories and Technical Specification 3/4
BACK to Main Index Page of CONTAX FLASH SECTION.
Other Contax Accessories: Filters | eyecups / Diopter lens / Right Angle Finder / Magnifier| Lens Caps/Lens Rear Caps / Body Caps / Lens Pouches | Soft lens Shades/Metal Lens Hoods/Adapter Ring/Gelatin Filter Holder set | Focusing Screens
| Back | to Index Page of Contax
RTS
| Back | to Index Page of Contax
RTS II Quartz
| Back | to Index Page of Contax
RTS III
| Back | to Main Index Page of
Contax RTS series models
Camera
Models: | Contax RTS |
RTS
II
| RTS III |
Shared
Resources:|
Motor
Drive-
PMD
W6| Winder - RTW-W3 | Screens |
Flash | Macro | Remote | Databack | Accessories | Zeiss T* Optic | Instruction Manuals: Contax RTS HTML | PDF | Contax RTS II Quartz
HTML | PDF | Contax RTS III (3
parts PDF
by mike@butkus.org, M. Butkus, NJ. Part A | Part B | Part C |
OFF TOPIC:- Personal Note
| Message Board | for your favorite Contax RTS Series SLR Models
| Message Board | for your Contax optics
in a shared environment
| Message Board | Specifically for Dispose or Looking for Contax Photographic
Equipment
| Main Reference
Map: RTS - HTML | PDF (206k) RTS II - HTML | PDF(308k) RTS III - HTML | PDF |
Specification: RTS - HTML | PDF(159k) RTS II - HTML | PDF(66k) RTS III - HTML | PDF |
1975: RTS 1979: 139Q 1980: 137MD 1982: 137MA 1982: RTS II |
1985: 159MM 1987: 167MT 1990: RTS III 1992: S2 1992: S2b |
1992: ST 1994: RX 1996: AX 1998: Aria 2000~ |
| List of Carl Zeiss T* lenses for Contax SLR cameras | ||||
About this
photographic
site.
| Home - Photography in Malaysia |
![]()
Credit: Mr. Timothy Daley of www.alkit.com <cameras@AS400.alkit.com> for both of his images on TLA20 and TLA30; MClau, joint maintainer of the Contax RTS MB. Some of the content are extracts from: Cees De Groot, who maintains a Contax FAQ site and Tim Roger website on Contax SLR cameras, A few of the images on Zeiss lenses were downloaded from Contax US website. My buddy, Yeak & Rizal Yahya, for their cool programming with Contax RTS's Message Board, Note:certain contents and images appeared in this site were either scanned from official marketing leaflets, brochures, sales manuals or publications published by Kyocera over the years and/or contributions from surfers who claimed originality of their own work solely for educational purposes. The creator of the site will not be responsible for any discrepancies that may arise from such possible disputes except rectifying them after verification."Kyocera", "Yashica", "Contax" & "Carl Zeiss T*" are registered trade names of Kyocera Corporation Inc., Japan. A site made with an Apple IMac, dedicated to all fans of Contax cameras and Zeiss Optics.