Bulb Mode
Use this mode for long exposures, as in astro or night photography. Set the aperture
value with the main dial. There is NO exposure warning in this mode. The operation
time is represented by three bars and numbers from 1 - 30 which appear in the display
panel. Each bar mark represents 30 seconds. The maximum time display is 120 seconds.
* Use a tripod and Remote Switch 60T3 (available optionally) for long
exposures.
* The accessory Command Back E1 (available optionally) controls the exposure
time within a period of 23 hours 59 minutes.
* Bulb cannot be used with auto exposure bracketing.
* This mode requires very little power for minimal battery drain.
 |
 |
 |
 |
M. Difficult Subjects for Autofocus
Although the AF system of the camera is very accurate, it is not perfect The following
subjects are difficult for autofocus When AF is impossible, the green AF symbol will
blink in the viewfinder
SUBJECTS
Low contrast subjects (e.g. misty scenes, light-colored, or white objects)
Subjects in extremely low-light situations (e.g. a dark room, night scenes)
Subjects with an object in front of them (e.g. caged zoo animals)
Subjects having generally horizontal patterns
Subjects with bright spectral reflections (e.g. shiny metal, snow, ice, surface
of a lake)
Subjects in extremely strong backlight
Fast-moving subjects (e.g. difficult to keep within the AF frame)
Focus these subjects as follows:
1. Focus on a substitute subject at the same distance from the camera as your main
subject and then recompose the picture using focus lock function.
2. Hold the camera vertically, focus the subject, and then recompose the picture
using focus lock function.
3. Manually focus the subject following the steps at bottom.
Note: When using a lens
with a maximum aperture of f/2.8 or larger (except EF 50 mm f/2.5 compact macro and
EF 28 - 80 mm f/2.8 - 4.0L), vertical composition is NOT
necessary.
An off-topic remarks: In comparison against the EOS-1N when only the centre AF point is activated, the original EOS-1 camera is much more responsive than the EOS-1N when AF is used during low light shooting conditions. This is due to the EOS-1 having an AF sensitivity level of EV-1 compared to EV 0 for the EOS-1N model. However, when all the 5 AF-point are activated, the AF response of the EOS-1N is faster and more responsive than the EOS-1.
 |
 |
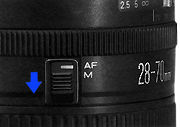
1) Slide the lens focus mode switch to "M". |
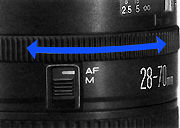
3) Turn the lens' manual focusing ring until the subject is sharp. The green in-focus indicator lights up in the viewfinder and a short beeper sounds when the shutter button is pressed halfway and the main switch is set to "
|
Comparisons between AF Mode and Film Winding Mode (In evaluative metering) |
||
| Film winding mode / AF Mode |
ONE SHOT AF |
AI SERVO AF |
| S: single |
AF lock and AE lock take place simultaneously when AF completes. |
AF follows a subject and the exposure is determined at the moment of shutter release. |
| C: continuous |
AF lock and AE lock take place simultaneously when AF completes, then continuous exposure is made. |
AF follows a subject and the exposure is determined at the moment of shutter release. AF is adjusted to follow the subject during exposure. |
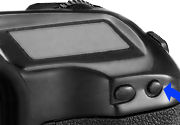
N. Exposure Compensation
Use exposure compensation for intentionally underexposed (low-key) or intentionally overexposed (high-key) pictures. The range of exposure compensation is up to +/- 3 steps in 1/3-step increments.
 |
 |
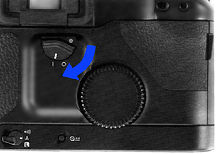
1) Set the quick control dial switch to "| ". |
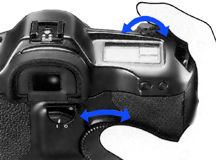
The dial must be turned within six seconds after the shutter button has been pressed halfway. It is effective when taking vertical composition pictures with the Power Drive Booster E1 (optionally available) attached. Note: An exposure compensation value can also be set by turning the main dial while pressing the exposure compensation button.
4) Press the shutter button all the way to take the picture.
 |
 |
Note 1: The " +/- " mark indicating exposure compensation status appears in the viewfinder. |
 |
LCD shown without any compensation |
 |
Compensation activated by - 3 stops (Note the blinking symbols) |
O. Automatic Exposure Bracketing (AEB)
Use auto exposure bracketing to produce
a sequence of three pictures to vary the rendition of the subject intentionally by
changing the exposure. The range of bracketing is up to + / - 3 steps in 1/3-step
increments. You control the timing of shutter re/ease for each individual exposure
in the AEB sequence. Note: Auto exposure bracketing is NOT possible
with a flash.
 |
 |
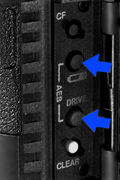
1 ) Open the palm door and press both the film winding mode selector and the battery check button simultaneously to display "AEB" in the display panel. |
 |
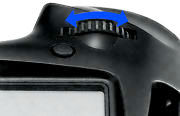
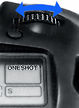
2) Turn the main dial to the
desired bracketing amount. If you set 2 in the display panel, for example, you can
take three exposures in the sequence of -2 steps, normal, and +2 steps over the correct
exposure according to the camera's meter.
Other useful Information relates
to AEB
- The AEB function remains active until you decide to cancel it. To cancel AEB at any time, turn the main switch to "L".
- Do not set an amount that will exceed the maximum or the minimum aperture value of the lens in use or that will exceed either 1/8300 second or 30 seconds shutter speed.
- To shift the bracketed exposure value toward overexposure or underexposure, you can combine exposure compensation with AEB. Be sure to set the bracketing amount before setting the exposure compensation amount.
- Please note that the three exposure values for the AEB sequence are displayed both in the viewfinder and on the display panel.
- During the AEB sequence, the "AEB" mark on the display panel blinks as does the "*" mark in the viewfinder.
- When using manual exposure mode, you may select either aperture value or shutter speed as the variable setting in the AEB sequence by setting Custom Function #5.
- To take three continuous exposures, of a moving subject with AEB, for example, set the film winding mode to C (continuous exposure) and keep pressing the shutter button all the way down.
P; Multiple
Exposures
The multiple exposure function allows you to take two or more exposures on the same
frame for a creative effect. Up to nine exposures on the same frame can be preset
with the simple operation of the main dial.
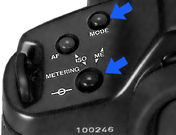
1) Press both the shooting mode selector and the metering mode selector simultaneously.
The "ME" mark indicating multiple exposure status appears in the
display panel and the frame counter starts at "1" indicating the number
of exposures.
2) While pressing both, turn the main dial to the desired number of exposures. For
example set "3" on the frame counter if you want to make three exposures
on the same frame.
 |
 |
Note: 1) "ME" blinks during multiple exposures. |
| Previous | NEXT | 4/5 Clearing Preset Exposures, Other related information, Custome function control, Infrarred photography, Flash Batteries Issues and other Canon EOS system components...
| Back
| Index Page of Instruction
Manual for Canon EOS-1
| Back
| Main Index Page
of Canon EOS-1 Site
| Back | Main Index Page of Canon EF series Lenses
| Back |
Main Index Page of Canon EOS-1 Series AF-SLR cameras
| Message
Board
| for EOS-1 Series SLR Camera
Models
| Message Board | for your Canon Optics
in a shared environment
| Message Board | Specifically tor Dispose or Looking for Canon Photographic
equipment
About this photographic site.
Home - Photography in Malaysia |
![]()
Credit: To all the good people who has contributed their own experience, resources or those who are kind enough granting us permission to use their images appeared in this site.
Members of the EOS Site Maintenance Team : Philip Chong, CYLeow, Vincent Thian. images handling on EOS models: EeWyn; Setup, coordination by: Wati. Mirza. *Credit: Mr. Richard Yeow & Mr. Simon Wong from camera division of Canon Marketing, for their continual effort in sopporting development of this EOS/EF website. Note:certain content and images appeared in this site were either scanned from official marketing leaflets, brochures, sales manuals or publications published by Canon Inc over the years and/or contribution from surfers who claimed originality of their work for educational purposes. The creator of the site will not be responsible for may discrepancies arise from such dispute except rectifying them after verification."Canon", "EF lenses" & "EOS" are registered tradenames of Canon Inc., Japan. Site made with an Apple IMac.