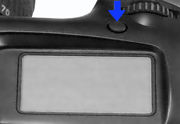
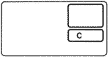
F. Display
Panel Information:
When the white mode clear button inside the palm door is pressed, all controls are
cleared and reset to the following conditions at right which appear in the display
panel.
 |
Display Panel Illumination |
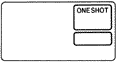
(1) Program shooting mode;
(2) Aperture value (appears when the shutter button is pressed halfway, may vary according to the shooting condition);
(3) Shutter speed (appears when the shutter button is pressed halfway, may vary according to the shooting condition);
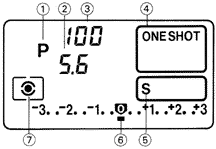 |
(4) One shot AF mode; |
 |
Warning: Before loading the first roll of film. remove the plastic insert. |
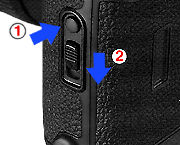 |
1) Open the back cover by pressing the back cover-lock button in and sliding the latch down. |
 |
 |
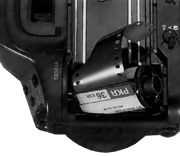
3) Be especially careful that the film tip is aligned with the orange mark. If the film tip extends past the orange mark, the film will tear or create unnecessary malfunction and damage to your camera. 4) Make sure the film lies flat and close the back cover. The film will automatically advance to the first usable frame and "1" appears in the frame counter. |
 |
5) If you want precise alignment with the frame numbers of the loaded film with the EOS-1, e.g. frame numbers "1 & 1A" fits in exactly alongside its particular 24x36 frame format rather in between two separate frames, just make sure the fifth sprocket hole (on the film leader) is the one that takes up the middle of the sprocket gear latches (of three visible) and directly facing you. It is very easy to do this because the fifth hole placing and the tip of the leader is aligned with the orange mark simultaneously. |
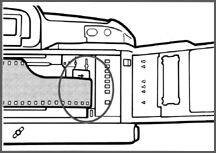
Note: During film advance, the film transport bars move from left to right at the bottom of the display panel to confirm correct film insertion and loading.If the bars blink, film has not t properly and the shutter will NOT release. Reload the film. Film becomes soft and tears easily in high humidity. Keep it stored in the canister until loading.
Others: Proback with instant films: -
 |
Credit: Images courtesy of Adorama® Inc. "Ebay - Mathew Duren" <ebay@adorama> Webisite URL: Adorama.com, who also operates a popular Ebay Store. All images appeared herein are Copyright © 2005. All rights reserved. Please respect the visual property of the contributing photographer. |
 |
The film speed for DX-coded film is automatically set according to the code on the cartridge from ISO 25-5000. The film speed will appear in the display panel while the film advances to the first usable frame |
WARNING: Certain film canisters, even new rolls, may have had their DX coding surfaces scratched and will not give the correct information to the camera during loading. Always check the film speed after film loading is completed to make sure the correct ISO film speed is coded.
 |
For non DX-coded film, set the film speed from 6-6400 by pressing both the AF mode and metering buttons while turning the main dial until the desired speed appears. To override the DX-code setting, please set Custom Function #3 . This will cancel the automatic setting for manual input. |
Note: When using non-DX Film cartridges, the previously set film speed blinks in the display panel to warn that the correct film speed may not have been set. This warning stops:after the two buttons marked "AF" and "METERING" on top of the camera have been pressed. If you want to change the ISO setting, turn the main dial while pressing these buttons.
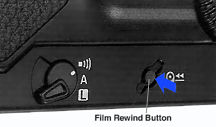
H. Film rewind
Film rewind starts automatically at the end of the roll. The film leader is completely rewound into the cartridge. The film rewind time is about 8 seconds with 24-exp. film.
 |
One of the irritating part of the EOS-1 is its loud film rewinding noise. Its successor, the EOS-1N and its variant model, the EOS-1N RS, solved this problem by giving the user a silent film rewind option by selecting Custom Function #1-2 (auto rewind after last frame) or #1-3 (manually activated auto rewind). |
Note: Auto rewind may be canceled by setting Custom Function # 1. In this case rewind is started by pressing the film rewind button.The film leader may be left out by setting Custom Function #2 after completion of film rewinding.
I. Film Winding Modes
 |
 |
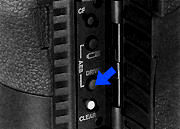
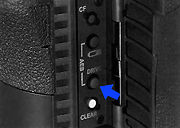
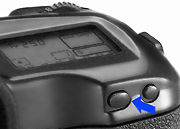
There are two film winding modes. To set the film winding mode, press the blue button marked "DRIVE" (behind the palm door where it housed the custom function settings) and turn the main dial. |
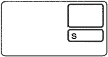 |
"S" - Single, film automatically advances to the next frame after exposure. |
When the Power Drive Booster E1 accessory
is attached, the continuous icon "C" changes to:
![]() - (Low) film winds at a maximum 3 fps. (approximate)
- (Low) film winds at a maximum 3 fps. (approximate)
![]() - (High) film winds at a maximum 5.5 fps. (approximate)
- (High) film winds at a maximum 5.5 fps. (approximate)
 |
"C" - Continuous, advances at 2.5 fps. when the shutter button is held. |
Note: The power drive speed automatically changes from high to low when its batteries are weak to conserve energy. The icon blinks in the display panel to warn you.
Continuous Film Winding Speed Comparison
|
Mode |
One Shot AF Mode |
AI Servo AF Mode |
|
C |
2.5 fps |
2 fps |
|
|
3 fps |
2.5 fps |
|
|
5.5 fps |
4.5 fps |
Self-Timer
The self-timer has two release delays, 2 or 10 seconds. Choose ![]() to minimize the risk of camera-shake
in critical situations, or
to minimize the risk of camera-shake
in critical situations, or to put yourself in the picture.
 |
|
Since the EOS-1 lack a mirror Lock-up feature, the 2-second self-timer delay is best suited for use whenever the camera is used for macro photography or copying. |
1 ) Open the palm door and press the blue button marked "DRIVE".
2) Turn the main dial counterclockwise to go to the self-timer mark with the desired release delay appears. Turn the dial clockwise, the settings will be the camera's film winding mode from Single to CL, CH and back to 2 or 10-second self-timer releases.
 |
3) After composing, press the shutter button halfway to confirm focus and exposure. |
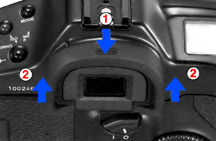
1) Press the center of the eyecup frame
and push up from the bottom to remove.
2) Attach the viewfinder cover.
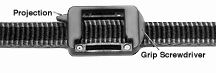
The viewfinder cover also serves as a tool to press the buttons inside the palm door
and to turn the grip screw.
 |
Note: The new EOS-1N model did away with the viewfinder cover via the strap by incorporating a built-in shutter blind for the viewfinder to block out any stray light that may enter when the self-timer is used or when your eye will not be at the viewfinder area. |
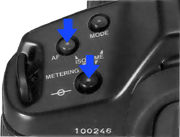
J. Setting the (AF) Autofocus Modes
There are two autofocus (AF) modes,
ONE SHOT and AI SERVO plus manual focus (M. FOCUS). Set the AF mode by pressing the
AF mode button on top of the camera and turning the main dial.
 |
|
ONE SHOT - The lens stops moving when the subject is in focus. The shutter releases only after the subject is in focus. When the shutter button is pressed halfway, focus and exposure are locked. The AF symbol in the viewfinder and the optional beeper tone confirm focus completion. |
When Custom Function #4 is selected
(AF start by pressing AE lock button), the shutter can be released in one shot AF
mode regardless of whether the subject is in focus or not.
AI SERVO - The lens continues to refocus as the shooting
distance changes. The shutter releases regardless of whether the subject is in focus
or not. Exposure is determined at shutter release. The AF symbol and beeper tone
are canceled
 |
 |
 |
Set the lens for manual focus by switching the lens' focus mode switch from "AF" to "M". |
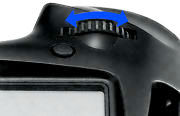
K. Setting the Metering Mode
To select the metering pattern that best suits the shooting condition, turn the main
dial while pressing the metering mode selector. The display changes in the order
written below.
![]() Evaluative Metering
Evaluative Metering
 |
6 Zones Evaluative Metering This metering mode measures light in six different areas of the picture frame while analyzing subject size, pattern and ambient light. An emphasis is placed on the center of the picture frame. |
Use this mode in normal shooting
conditions. Special care must be taken when using this mode on subject against extreme
backlighting situations since the metering may be fooled by the extra brightness
causing underexposures.
*
The performance may vary with small subjects.
*
This mode can be switched to center-weighted average metering with Custom Function
Control #8.
 |
* When combined with the one-shot AF mode the original exposure remains locked as long as the shutter button is kept pressed halfway. (Automatic AE lock function). When Custom Function #4 is used, AE lock is possible with both One-Shot AF and AI Servo AF by pressing the shutter button is pressed halfway. |
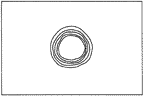 |
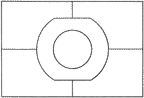
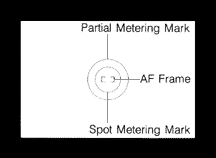
Partial Metering Sensitivity Pattern This metering mode measures approximately 5.8% of the picture frame. It is marked on the focusing screen by the outer circle. Use this mode for stage photography or when there is a big difference in brightness between the main subject and the background. |
Highly recommended when shooting outdoor sporting events like tennis, motorcycling, swimming etc. where lighting condition on isolated subject is tricky .
* Even when combined with the one-shot
AF mode, exposure is determined at shutter release. Exception is when Custom Function
#4 is used where the shutter button also serves as the AE lock button.
![]() Spot Metering
Spot Metering
 |
Spot Metering Sensitivity Pattern This metering mode measures approximately 2.3% of the picture frame. It is marked on the focusing screen by the inner circle near the AF frame. |
Use this mode for subjects which require precise measurement, such as macro photography and extreme backlighting subjects. * Even when combined with the one-shot AF mode, exposure is determined at shutter release. When Custom Function #4 is used, the shutter button also serves as the AE lock button.
AE Lock Photography
When the evaluative metering is combined with one shot AF mode, exposure is automatically locked upon focus completion.
 |
At other times, exposure is determined at shutter release. If you wish to control exposure before shutter release, AE lock is possible. AE lock can be used in any metering mode: Evaluative, Spot, Partial, or Center-weighted average (Custom Function #8). |
1) Focus the subject and start metering by pressing the shutter button halfway.
2) Lock the exposure by pressing the AE lock button on the back of the camera. The AE lock indicator * appears in the viewfinder. Recompose the picture while keeping the shutter button pressed halfway. Note: You can remove your thumb from the AE lock button if you keep the shutter button pressed halfway. Exposure will be locked at the value displayed in the viewfinder and on the display panel.
3) Press the shutter button all the way to take the picture. Note: After the picture has been recomposed, both the current and the locked exposure values appear in the viewfinder on the right side in the exposure scale.
| Previous | NEXT | 2/5 Shooting Mode. Various expsure control modes, Manual Control, DOF preview...
| Back
| Index Page of Instruction
Manual for Canon EOS-1
| Back
| Main Index Page
of Canon EOS-1 Site
| Back | Main Index Page of Canon EF series Lenses
| Back |
Main Index Page of Canon EOS-1 Series AF-SLR cameras
| Message
Board
| for EOS-1 Series SLR Camera
Models
| Message Board | for your Canon Optics
in a shared environment
| Message Board | Specifically tor Dispose or Looking for Canon Photographic
equipment
About this photographic site.
Home - Photography in Malaysia |
![]()
Credit: To all the good people who has contributed their own experience, resources or those who are kind enough granting us permission to use their images appeared in this site.
Members of the EOS Site Maintenance Team : Philip Chong, CYLeow, Vincent Thian. images handling on EOS models: EeWyn; Setup, coordination by: Wati. Mirza. *Credit: Mr. Richard Yeow & Mr. Simon Wong from camera division of Canon Marketing, for their continual effort in sopporting development of this EOS/EF website. Note:certain content and images appeared in this site were either scanned from official marketing leaflets, brochures, sales manuals or publications published by Canon Inc over the years and/or contribution from surfers who claimed originality of their work for educational purposes. The creator of the site will not be responsible for may discrepancies arise from such dispute except rectifying them after verification."Canon", "EF lenses" & "EOS" are registered tradenames of Canon Inc., Japan. Site made with an Apple IMac.