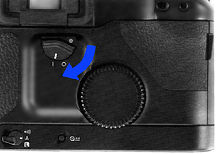
L. Setting the Shooting Mode
There are five shooting modes plus bulb that are set by pressing the mode button
and turning the main dial. The modes change in the order below:
 |
 |
 |
 |
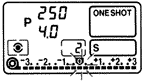
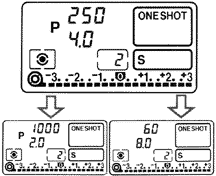
Program AE In Program AE, both aperture and shutter speed are automatically set taking into account the characteristics of the lens in use. Viewfinder Information If the shutter speed and aperture blink, exposure will be incorrect. Use a neutral density filter in bright settings or switch to flash photography in dark settings.
 |
|
To adjust the aperture or shutter speed in Program AE, turn the main dial. This adjustment will clear after one exposure if you have released your finger off the shutter button. |
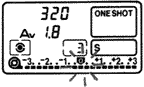
Aperture-Priority AE Turn the main dial to set the aperture in 1/3 steps and the camera sets the shutter speed for the existing light conditions. The previously used aperture appears in the display panel. Use Custom Function # 6 for full-step setting. In the EOS-1N, you can select either a 1/2 step or full-step settings using the same Custom Function #6.
Viewfinder Information
 |
 |
Underexposure - the shutter speed of 30~ blinks. Set a larger aperture until 30~ stops blinking. Overexposure - the 1/8300 shutter speed blinks. Set a smaller aperture until the shuttle speed stops blinking. |
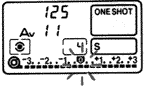
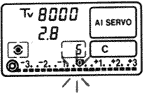
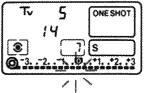
Shutter-Priority AE Turn the main dial to set the shuttle speed in 1/3 steps and the camera sets the aperture for the existing lighting conditions. The previously used shuttle speed appears in the display panel. Use Custom Function # 6 for full-step setting. In the EOS-1N, you can select either a 1/2 step or full-step settings using the same Custom Function #6.
Viewfinder Information
 |
 |
Underexposure - the lens' maximum aperture starts blinking. Set a slower shutter speed until it stops blinking. |
D
e p t h -of- F i e l d AE
Mode This mode places everything between two user set points in the foreground
and background in focus. The camera sets the necessary aperture and shutter speed
to obtain the best possible exposure under the existing lighting.
Note: This mode cannot
be used with flash.
1 ) Put the AF frame over the subject in the point one at the foreground and press
the shutter button halfway.
2) Remove your finger when the AF symbol and "DEP 1" light up.
3) Repeat steps # 1 and # 2 for the subject at point two at the background ("dEP
2").
4) Reframe the picture and press the shutter button halfway. After the AF symbol
and shooting values light up, press the shutter button completely.
* Press the shooting mode
selector to clear all focus points and start again.
Viewfinder Information
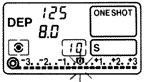 |
If the minimum aperture is blinking, clear the focus points, move back from the subject, and repeat steps # 1 through #4. When the aperture stops blinking, the distance range will be sharply focused and correct exposure obtained. |
Additional Information
- A. If the minimum aperture continues to blink, the distance range is too deep for sharp focus. The exposure will produce the best possible results under the existing conditions.
- B. Wide-angle lenses are best used in this setting for maximum depth-of-field effect. Lenses longer than 200 mm are not recommended for deep depth of field.
- C. This mode can also be used to minimize depth of field by focusing on the same point both times. A telephoto lens gives portraits the best shallow depth of field effect.
- D. If both values blink, exposure is incorrect. Use a neutral density filter in bright settings.
- E. If the focus points are extremely near and far, the shutter speed may be very slow. Hold the camera steady, or use a tripod.
- F. Do not change the focal length after setting the first focus point on a zoom lens. Always set the focal length first.
- G. In this mode, exposure is determined at shutter release even with the combination of one shot AF mode and evaluative metering.
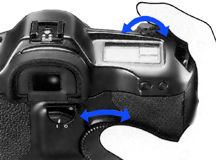
Manual Exposure
Maintain complete control of the exposure with this mode by setting the shutter speed
and aperture. The main dial sets the shutter speed and the quick control dial sets
the aperture. This setting method can be reversed if desired with Custom Function
# 5. The correct exposure is indicated in the viewfinder on the right side.
 |
 |
The letter M appears to the left of the shooting values at the bottom of the viewfinder. |
| Note: Be sure the Quick Control Dial switch is set to " | " | The previously used shutter speed and aperture value appear in the display panel. |
Depth-of-Field Preview
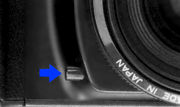 |
Push the depth-of-field button and the camera will stop-down the aperture allowing you to see the range of sharpness. |
| Previous | NEXT | 3/5 Shooting Mode. Various expsure control modes, Manual Control, DOF preview...
| Back
| Index Page of Instruction
Manual for Canon EOS-1
| Back
| Main Index Page
of Canon EOS-1 Site
| Back | Main Index Page of Canon EF series Lenses
| Back |
Main Index Page of Canon EOS-1 Series AF-SLR cameras
| Message
Board
| for EOS-1 Series SLR Camera
Models
| Message Board | for your Canon Optics
in a shared environment
| Message Board | Specifically tor Dispose or Looking for Canon Photographic
equipment
About this photographic site.
Home - Photography in Malaysia |
![]()
Credit: To all the good people who has contributed their own experience, resources or those who are kind enough granting us permission to use their images appeared in this site.
Members of the EOS Site Maintenance Team : Philip Chong, CYLeow, Vincent Thian. images handling on EOS models: EeWyn; Setup, coordination by: Wati. Mirza. *Credit: Mr. Richard Yeow & Mr. Simon Wong from camera division of Canon Marketing, for their continual effort in sopporting development of this EOS/EF website. Note:certain content and images appeared in this site were either scanned from official marketing leaflets, brochures, sales manuals or publications published by Canon Inc over the years and/or contribution from surfers who claimed originality of their work for educational purposes. The creator of the site will not be responsible for may discrepancies arise from such dispute except rectifying them after verification."Canon", "EF lenses" & "EOS" are registered tradenames of Canon Inc., Japan. Site made with an Apple IMac.