EXPOSURE CONTROL
The shutter speed dial and the use
 |
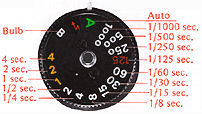 |
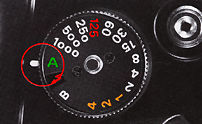
The manual shutter speeds range from 4 to 1/1000 sec., plus B. The orange numbers on the dial represent full seconds while those in white represent fractions of a second. The red 125 stands for 1/125 sec., the highest shutter speed which can be used to synchronize with a speedlight. Do not set the dial at an intermediate position between clickstop settings. At the B setting, the shutter remains open as long as the shutter-release button is held down. If you have forgotten to install the battery or in the event of battery failure, the shutter gives a mechanically fixed 1/90 sec. speed regardless of the setting (later electronic model fixed this flaw by incorporating a "M90" or "M250", which signifies mechanical speed of 1/90 sec and 1/250 sec - depends on models).
Automatic exposure control
When the shutter speed dial is set at A, the green shutter needle in the viewfinder is positioned at A (AUTO) position. This automatically controlls the shutter speed, and the black needle (exposure metering needle) in the viewfinder will indicate the correct shutter speed. The shutter speed varies in response to the lens aperture and the brightness of the subject, as long as ASA of the loaded film has been set.
When the camera is set on A (auto), the camera operates at intermediate shutter speeds when the needle is at an intermediate position between graduations on the scale. When the exposure meter needle falls into either upper or lower warning zones in orange, the brightness of the subject is outside the range of automatic shutter speed control to be indicated on the scale
Manual exposure control
Manual exposure can be considered to use it in the following situations:
1.When a photograph is to be taken at a certain shutter speed, regardless of the exposure meter needle indication.
2. When the shutter speed is set by making astop-down measurement.
3. When Bulb(B) exposure is being used for time exposures.
4. When a flashlight is used (To avoid jamming of the first few frames in case you are working in a dark surrounding). |
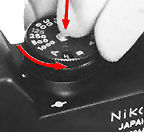
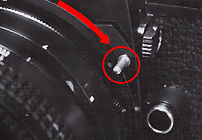
To make manual control, press the shutter speed dial lock in the center of the shutter speed dial and turn the dial and align the desired shutter speed graduation to the indicator mark. In manual exposure control, intermediate speeds between graduations cannot be used.
 |
|
In case of manual
exposure control, the black needle in the viewfinder needle, indicates the shutter
speed which results in the correct exposure in relation to the aperture setting at
the time. Thus, when the two needles meet by adjusting either the aperture ring or
the shutter speed, a correct exposure will be obtained.
Lens Aperture Diaphragm
The Nikkormat ELW can be used with any Nikkor interchangeable lens with a Nikon F
bayonet mount. Except the reflex lens, these lenses are equipped with aperture diaphragms,
and graduated with a stop by stop scale from full aperture to the minimum stop number.
When a Nikkor lens is mounted on to the camera, it is designed to stay open at full
aperture even when the aperture ring is turned down. The aperture diaphragm is set
only when the shutter button is snapped and the shutter curtain is opened. This is
called the automatic diaphragm mechanism. The diaphragm regulates the amount of light
reaching the film, while stopping down the aperture by one graduation (from F5.6
to F8), cuts the amount of available light in half. Diaphragm openings also have
a direct bearing on the depth of field.
Depth-of-field preview button
Since the EL series (and many
other Nikon Manual focus models until the arrival of the first programmed AE
Nikon FG
in 1982 and the Shutter Priority capabled Nikon FA in 1983) are aperture
priority based AE SLRs. The
depth-of-field preview button lets you check the depth of field before shooting to
make any desired adjustments. Press the button and the lens stops down to the preselected
aperture to allow you to see how much background or foreground is in or out of focus.
 |
* Caution: In full-aperture measurement, if the shutter is released while simultaneously pressing the depth-of-field preview button, the correct exposure will not be obtained. Also, do not operate the film advance lever while pressing the button. |
** Caution: When using the Auto Winder
AW-1 do not snap the shutter while pressing this button. If you do so by accident,
switch the AW-1 power off and then on again to restore normal operation.
Stop-down exposure measurement
Full-aperture exposure measurement is not possible with the following lenses and accessories, either because the lenses have no auto diaphragms or because the diaphragms will not couple with the meter.
 |
Therefore, the stop-down method of measuring exposure with the lens aperture diaphragm manually stopped down to the taking aperture must be used. First, push the coupling pin as far to the right as it will go. Mount a lens or lens/accessory setup to the camera and switch on the meter. |
Auto lenses without coupling prong
With automatic exposure control: Use the depth-of-fieLd preview button to stop down the lens and turn the aperture ring until the black needle is in the shutter-speed scale (Take note of the meter's EV range).
With manual override: Use the same procedure as above. Then turn the shutter-speed dial until the green needle matches the black one. At manual setting, pressure on the depth-of-field preview button is no longer necessary since the correct exposure is set mechanically.
* Caution: Never advance the film with the depth-of-field preview button in the depressed position.
Micro-Nikkor 55 mm f/3.5 with M2 ring. Use the same procedures as the auto lenses without coupling prong.
Preset lenses (e.g. PC-Nikkor 28 mm). Set the shutter-speed dial at "A" and turn the aperture ring until the black-needle swings to an appropriate shutter speed.
Bellows focusing attachments, extension rings and focusing units. Using the same procedure as that for lenses with preset diaphragms.
Reflex-Nikkor lenses. The Reflex-Nikkor 500 mm f/8, 1000 mm f/11 and 2000 mm f/11 lenses have no aperture diaphragm. Set the shutter-speed dial at "A" and the black needle gives the shutter speed.
COMPENSATION OF EXPOSURE
Due to special lighting conditions, or in situations of high contrast such as occur in repro-copying, it may not be desirable to take the picture as is.
The amount of exposure the film receives is determined by a combination of the lens aperture and the shutter speed. Since the two are interrelated, different combinations will give the same amount of exposure. The best combination depends on the results desired. Use fast shutter speeds to freeze motion or slow ones to create deliberate blur. Small apertures give greater depth of field; large ones let the subject stand out against an out-of-focus background.
Just as with automatic operation, care must be taken to be sure the ASA/f-stop/shutter speed combinations are within the EV range of the meter.
To compensate exposures, the following three methods are used:
1. Compensation by manual exposure control (Manual override)
If you want deliberate underexposure or over-exposure, reset the green needle to a numbe higher or lower than the number indicated , the black needle in the shutter-speed scale.

2. Resetting the ASA dial temproarily
The picture is taken after resetting the ASA die by the amount of compensation, with other factors left unchanged.For instance, when a film of ASA 100 is used: And i compensation by one stop increase is desired, adjus the index to 50. And a compensation by one and 1/3 stops decrease i~ desired, adjust the index to the dot following 200. Caution: Remember to return the ASA dial to its origina position upon completion of picture-taking under the adjusted setting.
3. Using the exposure memory lock
 |
When there are severe brightness differences between the subject and the background, you will often obtain better results using the ELW's center-weighted metering system and memory lock, which is integrated into the self-timer. |
Well, when you
are using this lever, you ought to have a little confidence in Nikon's electronic
circuit - because even if you have push the lever inward and lock the exposure reading,
the needle inside the viewfinder is still moving. This drawback was not being address
in the Nikon FE of 1978 but finally it was being tackled and resolved in the Nikon
FE2 in 1983 (The needle will not move and stick to specific shutter speed once you
have locked it in).
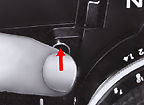
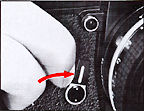
How to Use Memory Lock
First place the subject in the central part of the viewfinder, or better still, if
the subject is accessible, move in on it to make a close-up reading of that particular
portion you wish to emphasize. Then press the self-timer/memory lock to the left;
the light based on the main subject is now frozen. With the memory lock lever still
pressed to the left, move back to get your desired composition and shoot. The shutter
has been released at the speed on the memorized reading. The memory "hold"
disconnects upon releasing the finger from the memory lock - even though the needle
in the metering bar is still reacting to ever changing light.
For landscapes including an expanse of sky, tilt the camera downward during measurement
and lock the reading to prevent underexposure caused by the brightness of the sky.
For backlit subjects, move up close and include dark areas of the subject and freeze
the reading with the memory lock. Even when the lever has locked the memory system,
the black needle inside the viewfinder continues to deflect according to the brightness
of the scene, providing a convenient reference for contrast ratios.
Place the subject in the center of the viewfinder and lock the reading and re-compose
to place the subject of interest anywhere that you like it to be, and shoot.
|
Previous | TTL expsoure meter, EV chart & shutter
speed control
|
Next | Expsoure compensation,
Self timer, Mirror Lock and flash photography (7/8)
Back to
Main
Index Page of Nikkormat EL-W
| Back | to
Main Index Page of Nikkormats EL Series
| Back | to
Main Index Page of Nikkormats
History
& Background
of Nikkormat Cameras
"Nikomat" Picture Library of Japanese
local version
Outline the major key features and differences of various models
The
Camera Bodies
| FT | FS | FTn | EL | FT2 | ELW | FT3 | EL2
| Main Reference
Map
|
HTML Format: FT | FS | FTn | EL | FT2 | ELW | FT3 | EL2 | AW-1 Motor Winder
PDF Format: FT
| FS | FTn | EL | FT2 | ELW | FT3 | EL2 | AW-1 Motor Winder
| Specifications |
FT
| FS | FTn | EL | FT2 | ELW | FT3 | EL2
| Message Board | for
your favourite Nikkormats
| Message Board | for your Nikon Optics
in a shared environment
| Message Board | Specifically for Dispose or Looking for Nikon/Nikkor Photographic
Equipment
 |
The Eyes of Nikon:- |
Fisheye-Nikkor Lenses - Circular | Full Frame | Ultrawides Lenses - 13mm15mm18mm20mm | Wideangle Lenses - 24mm28mm35mm |
Standard Lenses - 45mm 50mm 58mm | Telephoto Lenses - 85mm105mm135mm180mm & 200mm |
Super-Telephoto Lenses - 300mm 400mm 500mm 600mm 800mm 1200mm |
Special Application lenses:
Micro-Nikkor Lenses - 50mm~55mm -60mm 85mm -105mm 200mm Micro-Zoom 70-180mm
Perspective Control (PC) - 28mm 35mm PC-Micro 85mm
Dedicated Lenses for Nikon F3AF: AF 80mm f/2.8 | AF 200mm f/3.5 EDIF
Depth of Field Control (DC): 105mm 135mm
Medical Nikkor: 120mm 200mm
Reflex-Nikkor Lenses - 500mm 1000mm 2000mm
Others: Noct Nikkor | OP-Nikkor | UV Nikkor 55mm 105mm | Focusing Units | Bellows-Nikkor 105mm 135mm
Nikon Series E Lenses: 28mm35mm50mm100mm135mm | E-Series Zoom lenses: 36~72mm75~150mm70~210mm
MF Zoom-Nikkor Lenses: 25~50mm | 28~45mm | 28~50mm | 28~85mm | 35~70mm | 36~72mm E | 35~85mm | 35~105mm | 35~135mm |
35~200mm | 43~86mm | 50~135mm | 50~300mm | 70~210mm E | 75~150mm E | 80~200mm | 85~250mm |
100~300mm | 180~600mm | 200~400mm | 200~600mm | 360~1200mm | 1200~1700mm
Tele-Converters: TC-1 | TC-2 | TC-200 | TC-201 | TC-300 | TC-301 | TC-14 | TC-14A | TC-14B | TC-14C | TC-14E | TC-16 | TC-16A | TC-20E
![]()
Nikon F
| Nikon F2 |
Nikon
F3
| Nikon F4 |
Nikon
F5
| Nikon F6 |
Nikkormat / Nikomat |
Nikon FM
| Nikon FE/ FA | Nikon EM/FG/FG20 | Nikon Digital SLRs | Nikon - Other models
MIR Supports for Photographic Community: Various Message Boards/Community
Forums
Nikon
F-series|
Nikon
F2-series|
Nikon
F3-series|
Nikon F4-series| Nikon
F5-series|Nikkormat/Nikomat-series
Nikon FM-series|Nikon
FE-series|Nikon
FA|Nikon
Digital
SLR
series|Various
Nikon
Models|Nikkor
Optic
-shared
Others:- Free Trade Zone - Photography| Free Trade Zone - Business Community |Free To Zouk - Photographic Community
Apple's Mac Public Community Message Board | Windows based PC &
Apple/Mac
Public Community Trade Exchange Centre
Recommended links to understand
more technical details related to the Nikkor F-mount and production Serial Number:
http://rick_oleson.tripod.com/index-153.html by: my friend, Rick Oleson
http://www.zi.ku.dk/personal/lhhansen/photo/fmount.htm by: Hansen, Lars Holst
http://www.mir.com.my/rb/photography/hardwares/nikonfmount/lens2.htm
http://www.photosynthesis.co.nz/nikon/serialno.html
About
this photographic
site.
Home - Photography
In Malaysia
![]()
Copyright
© 1998.
HIURA Shinsaku ® ; Nikomat ML, Japan,
in collaboration with leofoo ®. MIR Web Development Team.
* Credit: A
Great thanks to Mr Denis Pleic for his volunteering
effort to reedit content and and patching some grammatical mistakes found in this
section of the PIM site. Miss
Rissa (Marketing) & Edward
(Techical) of Shriro Malaysia, distributor of Nikon cameras in Malaysia, in providing
so many useful inputs to make this site possible. Mr Hong,
Ipoh for lending me his FT2 to take some of the images used in this site. This site
is created for his eldest son, Yuen who has picked up his father's hobby and
the FT-2. My friend, John Walls from Florida, US for his images of the FTn
body and the Zoom Nikkor
43-86mm.
[Left Brain][Right brain][Home-MIR] [Invention][Art & Design][Clubs]
[Portfolios][On assignments] [Trading room][Knowledge & Resources] [Free-trade-zone][Thoughts & opinions][Links]