Foreword
By replacing the standard camera back of a motor driven Nikon F3-series camera, with
the Magazine Back MF4, you can shoot up to 250 frames without changing film.
The MF-4 has a built-in micro motor to drive the takeup magazine, a separate shutter
release button, and two kinds of frame counters: an additive and a subtractive type.
The additive counter keeps track of the total number of frames exposed; the subtractive
one, on the other hand, shows the remaining number of unexposed frames and can be
set to any desired number. When the subtractive counter reaches "0," the
motor drive automatically stops firing.
SETTING UP: Attach the motor drive to the camera body.
 |
1. First, make sure that
the S-C mode selector of the Motor Drive MD-4 is set to the L (lock) position and
attach the motor drive to the camera body. For details, refer to the MD-4's instruction
manual.
|
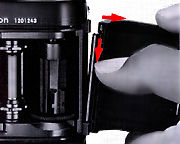 |
2. Remove the camera's
back.
Open the back of the camera and remove it by depressing the locking catch on the
hinge.
|
|
 |
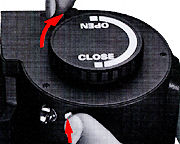
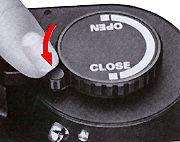
3. Set the open/close
knob to the "OPEN" position.
Turn the MF-4's open/close knob on the supply side to the "OPEN" position
until it clicks in place and the word "OPEN" is aligned with the open/close
knob index (an orange square).
|
 |
4. Release the camera
clamp.
While applying pressure to the camera clamp lock release button turn the camera
clamp lever clockwise to release the clamp.
|
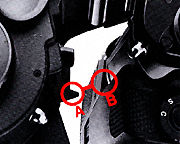 |
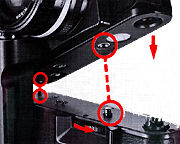
5. Attach the magazine
back to the camera body.
Line up claw (A) at the bottom of the camera holder with space (B) between the motor
drive's grip and the camera body.
|
 |
Then while using this
claw as a guide fit the magazine back carefully into place.
Caution: When attaching the magazine
back to the camera, be sure to keep both the camera's right and left neck strap eyelets
up so that they will not get caught between the camera and the magazine back.
|
 |
6. Lock the magazine
back.
While pushing the magazine back's supply side and the end of the camera body together,
turn the camera clamp lever counterclockwise until it stops. Be sure to turn the
camera clamp lever until the camera clamp lock release button clicks.
Caution: When the temperature goes
down to approx. -20°C, the camera clamp lever becomes more difficult to turn due
to the hardening of the rubber which clamps onto the camera. Therefore, be sure to
turn the lever as far as it will go.
|
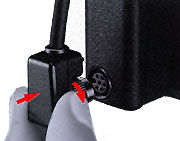 |
7. Connect the magazine
back to the motor drive.
Plug the cord into the magazine back terminal located at the base of the motor drive's
grip. While applying pressure, turn the locking ring of the plug until it stops.
|
Note: Store the magazine back terminal's
cover in a safe place for future use. Caution: Do not remove the magazine
back from the camera with the cord plugged into the terminal.
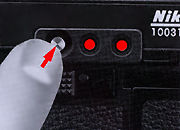 |
8. Check the battery
power.
Depress the battery check button on the back and the motor drive's LED indicators
will light up to indicate the condition of the battery. When the magazine back is
used power is consumed faster.
|
Therefore always make sure the batteries in use are powerful enough, so that both
LED's light up when the battery check button is depressed. If only one LED glows,
the batteries should be replaced with a fresh set. For details on the power supply,
check section follows up later.
| Next | 1/6
Handling and Loading
the Cassette
| Back to Index Page | of
Instruction Manual of 250 Bulk Film Backs
| Back to Main Index
Page | of Film Backs for
Nikon F3
| Back to Nikon F3 Site |
 |
Home - Photography in Malaysia |