Special Situations
 |
|
|
 |
|
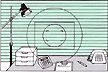 |
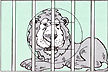
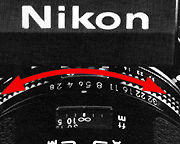
Subject with no vertical lines The red X glows continuously. In this case, turn the camera vertically and perform autofocus or focus-aid operation, or focus manually; alternatively, perform autofocus or focus-aid operation using an alternate subject at the same distance which has vertical lines. |
 |
|
 |
|
||
To match the convenience of autofocus, the Nikon F3AF features aperture-priority auto exposure. All you do is set the camera at A (Auto) and fire away. Light is automatically measured through the lens at full aperture, and the correct shutter speed is electronically determined to match the aperture in use.
 |
|
 |
|
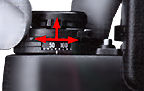
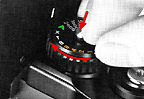
Setting the Film Speed To program the F3AF to give the correct exposure with a particular film, you must first set the camera to the correct film speed. The film speed, represented by an ASA/ISO number, is a numerical rating of the film's sensitivity to a given amount of light: the higher the number, the greater the sensitivity, and vice versa. This number is printed on the film carton and the cartridge itself. To handle all film types, the camera's ASA/ISO dial (22) has settings from ASA/ISO 12 to 6400. Two dots between each pair of ASA/ISO numbers stand for intermediate settings, such as 64, 80, etc. The table above gives the speeds for all intermediate settings.
Note: In certain situations, you can set the ASA/ISO dial to a setting which is different from the recommended film speed. For example, some photographers rate their colour slide film at a slightly higher ASA/ISO setting to produce intentional underexposure for more colour saturation. Or when shooting in very low light you can "push" high-speed black-and-white film by doubling or quadrupling the ASA/ISO, then overdeveloping it to compensate for the underexposure.
EV Setting the Aperture
The second factor in
determining exposure is the shooting aperture. Aperture, or the opening formed by
the diaphragm inside the lens, controls the amount of light allowed to pass through
the lens and strike the film; it also controls depth of field . In low light, you
are generally required to use large apertures (indicated by f-numbers which are low
in numerical value, e.g. f/2.8), while in bright light, small apertures are called
for (e.g., f/16).
 |
|
 |
Shutter speed, or the length of time the shutter remains open, also determines the amount of light allowed to strike the film. |
The Nikon F3AF offers
automatic stemless shutter speed control over the range from 1/2000 sec. to 8 sec.,
plus full manual control with a choice of 18 settings, including B, T, and X. All
shutter speeds, except T, are electro-magnetically controlled.
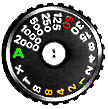
The shutter speed dial has the following settings:
 |
|
The numbers engraved
on the dial in white are reciprocals, for example 2000 means 1/2000 sec. 60, also
a reciprocal, appears in red and indicates the highest manual shutter speed for proper
synchronization with electronic flash (with the exception of X). Numbers engraved
in orange represent actual shutter speeds, for example an orange 8 means 8 sec.
- B (Bulb): The shutter remains open as long as the shutter release button (75) is depressed.
- T (Time): At this mechanical setting, the shutter stays open until the dial is rotated to another setting, making it ideal for really long time exposure. To avoid unnecessary battery drain, follow this procedure: turn the power switch (73) off and make certain the LCD is not displayed in the finder, then trip the shutter using the backup mechanical release lever (6).
- X (X-sync): Provides 1/80 sec. speed, the proper synchronization speed for any electronic flash unit.
With one of these indications displayed, correct exposure will NOT be obtained.
- + 2000 indicates that the subject is too bright for the working aperture you have chosen; to remedy this situation, use a smaller aperture. If the correct exposure is still unobtainable even at the smallest aperture, use an ND (neutral density) filter.
- - 8 - indicates the subject is too dark and you should use a larger aperture. If the correct exposure is unobtainable even at maximum aperture, use an electronic flash or other supplementary illumination.
When making blank exposure with the shutter speed dial set at A or 1/125 sec. or above, an 80 will appear until you reach frame one.
Automatic
Exposure Control
Automatic exposure is the most convenient way to shoot with the Nikon F3AF, because
it allows you to concentrate fully on the subject without worrying about the exposure.
By presetting the aperture and locking the shutter speed dial (72) at A, the camera
automatically sets the proper stemless shutter speed from 1/2000 to 8 sec. as soon
as the shutter release button (75) is depressed halfway. To keep you fully informed,
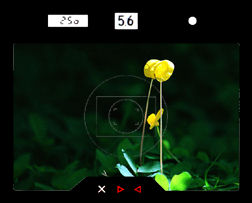
the shutter speed is displayed via LCD in the viewfinder. Speeds between 1/2 and
1/2000 sec. are shown as a reciprocal of the actual speed, for example 125 means
1/125 sec. Speeds between 1 and 8 seconds are signified by a - symbol appearing to
the upper right of the number, for example 8- means 8 sec. To make the display easy
to read, intermediate speeds appear in the display as a discrete shutter speed which
is closest to the actual speed. (For instance, 1/287 sec. might be the automatically
selected shutter speed in use, but 250 will be displayed.) The LCD stays on for approx.
16 sec. after you remove your finger from the shutter button.
Before shooting, check the exposure display.
Note: The camera's effective metering range depends on the shutter
speed and aperture in use at a particular film speed.
Use a larger aperture or slower shutter speed. |
|
Use a smaller aperture or faster shutter speed. |
|
Within +/- (1/4) EV |
Manual
Exposure Control
In the manual exposure mode, you can shoot at any combination of f/stop and shutter
speed from 1/2000 to 8 sec., enabling you to select your desired shutter speed. Manual
exposure is also required when stop-down exposure measurement is necessary or when
you want to use the B, T, or X setting. Except at the B, T, and X settings, the shutter
speed you set is shown in the viewfinder immediately after the shutter release button
(75) is depressed halfway. As before, the - symbol at the upper right of the number
indicates shutter speeds from 1 to 8 sec. Also the letter M appears to the left of
the number, indicating the manual exposure mode. Above the M, the following symbols
appear: -, +, and - + which indicate underexposure, overexposure, and correct exposure,
respectively. To obtain correct exposure, simply turn the shutter speed dial (72)
and/or aperture ring until the - + symbol appears. The LCD stays on approx. 16 sec.
after you remove your finger from the button.
Intermediate settings on the shutter speed dial cannot be used while those on the lens aperture ring (68) can be. Therefore, stop the lens aperture down or open it up to the appropriate intermediate setting when fine adjustment of the exposure is necessary.
* When making blank exposures with the shutter speed dial set between 1/125 and 1/2000 sec., the shutter fires at 1/80 sec with M 80 displayed until the frame counter reaches one. |
|
** At the B or T setting,
an M - appears in the viewfinder.
*** At X, an M* 80 appears. However, the + does not mean overexposure, because the
meter does not function at this setting as soon as a dedicated Nikon Speedlight is
attached to the F3AF and turned on, the + disappears from the display, leaving just
M 80.
|
| | | Back to Index of Nikon F3 Models Back to Pictorial History of Nikon SLRs |
|
|||||
|
|||||||
| Back to Main Index Page of Nikon F3 Site |
| About this photographic site | Contributions and Credits |
 |
Home - Photography in Malaysia |