Focus The Nikon F3AF features a through-the-lens autofocus system which takes the guesswork out of focusing: just point the camera at what you want to photograph, depress the shutter release button halfway, and watch the subject literally snap into harp focus...automatically.
The system consists of three parts : the special F3AF camera body, the AF Finder DX-1, and an AF-Nikkor lens, either the 80mm f/2.8 or the 200mm f/3.5 IF-ED. The Finder DX-1 is interchangeable and covers approx. 92% of the image area of the actual photograph, meaning that the final photograph will be larger than the image seen in the viewfinder. The focusing screen is built into the bottom of the viewfinder and cannot be interchanged. However, when other Nikon F3 interchangeable viewfinders are used with the F3AF, you have a choice of 20 interchangeable focusing system in unique in that it features exceptionally quick response, allowing you to keep up with active, fast moving subjects.
The Nikon F3AF offers you three different ways of focusing:
1) autofocus; 2) focus-aid operation (using the focus indicators inside the finder), or; 3) manual focus (using the matte portion of the focusing screen). As shown in the following table, however, only AF-Nikkor lenses are usable for autofocus. With other lenses having maximum apertures of f/3.5 and faster, you can use the focus indicators as a guide in focusing as you manually rotate the lens focusing ring (49).
Note: Because of the cropping which occurs in the case of mounted slides or regular snapshot-size prints, the actual picture might come out slightly smaller than the image seen in the viewfinder.
Usable Lenses
| Focusing method | Lens |
| Autofocus | AF-Nikkor 80mm f/2.8, AF-Nikkor 200mm f/3.5 IF-ED |
| Focus-aid operation | Nikkor (Including AF-Nikkor) and Nikon Series E lenses with a maximum aperture of f/3.5 or faster. |
| Manual focus | Nikkor (including AF-Nikkor) and Nikon Series E lenses |
Notes:
- Even with lenses slower than f/3.5, the focus indicators will light up when the shutter release button is depressed halfway. this indication, however, is not reliable.
- Although the following Nikkor lenses have a maximum aperture of f/3.5 or faster, they cannot be used for focus-aid operation: 16mm f/3.5, 20mm f/3.5, 28mm f/3.5. 135mm f/3.5, Micro 55mm f/3.5, PC 28mm f/3.5, PC 35mm f/2.8 and PC 35mm f/3.5.; the Micro-Nikkor 55mm f/2.8 cannot be used at closer than 280mm.
- When the Nikon Teleconverter TC-14, 200 or 300 is attached to the lens, focus-aid operation cannot used. However, when the TC-14 is attached to the Nikkor 200mm f/2 IF-ED, it is possible.
- The following lenses cannot be mounted on the F3AF with the DX-1 Finder: Nikkor 13mm f/5.6, Reflex-Nikkor 500mm f/8, and Reflex-Nikkor 1000mm f/11.
- Certain filters cannot be used for autofocus/focus-aid operation. (For details, please refer to page 64.)
 |
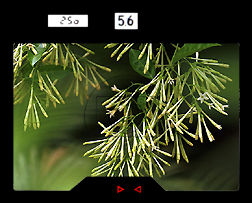
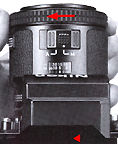
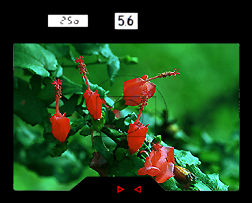
(1) LCD exposure information; |
Subject in focus |
|
Far focus (the lens is focused behind the subject) |
|
Near focus (the lens is focused in front of the subject) |
|
Autofocus or focus-aid operation is impossible. (This warning also lights up momentarily at the start of autofocus or focus-aid operation, if there is a big difference between the actual camera-to-subject distance and the lens distance setting.) |
Autofocus
 |
 |
|
If there is a big difference
between the actual camera-to-subject distance and setting on the lens distance scale,
the red X lights up momentarily but disappears as soon as focusing begins. If the
subject is closer than the closest distance to which the lens can focus, either the
far-focus arrow (<) or the red X lights up continuously.
However, when the red X blinks or lights up continuously, this indicates that the
autofocus system does not function well with the particular subject or shooting situation
(please refer to page 26 for further details).
Notes: 1) After taking a picture during autofocus operation, the
lens will continue to focus for 16 sec. after you remove pressure from the shutter
release button. To stop the lens movement at any time to conserve battery power slide
the A-M switch to M. Immediately lens movement stops, but the red arrow(s) or red
X remain on for 16 sec. until switched off automatically 2) While shooting fast-moving
subjects, one or both of the red arrows may blink to show that the image is quite
close to the In-focus zone; for ordinary snapshots, taking the shot even In this
situation can produce satisfactory results. However, if sharp focus is mandatory
wait until both red arrows light up condonously 3) When the batteries In the viewfinder
are nearly exhausted, autofocus becomes slow or may even stop, even though the red
arrow(s) or red X remain lit. In this case, replace the batteries In the finder at
your earliest convenience, or set the A-M switch to M and turn the focusing ring
manually using the red arrows as a guide.
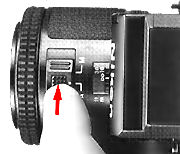
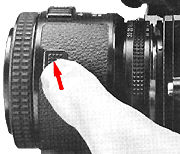
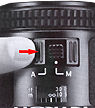
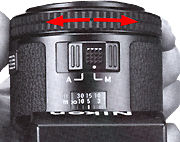
Focus lock The AF-Nikkor lens has two focus lock buttons on the lens barrel, one on the side and the other on the A-M switch. You can use either of these buttons, depending on your choice of horizontal- or vertical-format shooting. During autofocus operation, depressing the focus lock button allows you to lock in the autofocus distance setting on the lens.
 |
 |
|
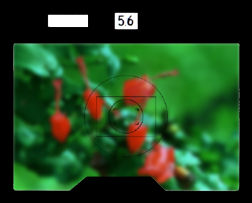
To take pictures with
the main subject off-center, first center the main subject within the focusing frame
in the viewfinder, depress the shutter release button halfway and make sure both
focus indicators light up; then depress the focus lock button and, while holding
it in, recompose and shoot.
Notes: 1) With the focus lock button held down, the in-focus indication
(> <) may change in the following
two cases: l) when you once again depress the shutter release button halfway after
the camera's automatic 16-sec. switch has fumed off the indication, or 2) just after
you have taken a picture. However, regardless of the focus indication change, the
distance set on the lens is Sun the same as when you depressed the focus lock button.
2) When taking pictures in the automatic exposure mode with the main subject off-center,
you must a/so depress the memory lock button to get the correct exposure.
 |
 |
 |
|
 |
 |
In case the red X blinks or lights up continuously and does not disappear even after the focusing ring is turned, this indicates that the focus-aid indication system does not function well with the particular subject or shooting situation. Note: While shooting fast-moving subjects, one or both of the red arrows may blink to show that the image is quite close to the in-focus zone; for ordinary snapshots, taking the shot even in this situation can produce satisfactory results. However, if sharp focus is mandatory, continue to rotate the focusing ring until both red arrows light up continuously
 |
|
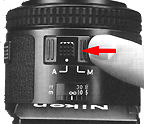
3) when the focus-impossible warning blinks or lights up continuously, or 4) when you simply want to focus the lens yourself. With an AF-Nikkor lens, set the A-M switch to M; then turn the lens focusing ring until the image on the matte portion of the screen inside the viewfinder looks sharp and clear. With all other lenses, rotate the focusing ring in the normal manner.
Note: With the A-M switch on the AF-Nikkor lens set at A, you cannot shift the lens distance setting by turning the focusing ring.
|
| | | Back to Index of Nikon F3 Models Back to Pictorial History of Nikon SLRs |
|
|||||
|
|||||||
| Back to Main Index Page of Nikon F3 Site |
| About this photographic site | Contributions and Credits |
 |
Home - Photography in Malaysia |