Eyepiece Shutter
Lever
 |
|
 >1. >1. |
 2. 2. |
 3. 3. |
 4. 4. |
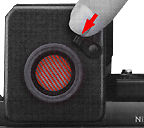
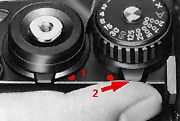
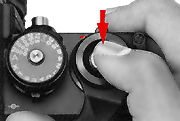
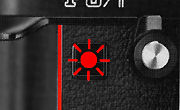
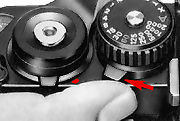
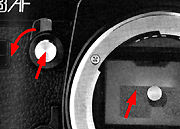
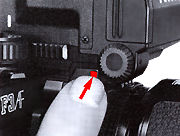
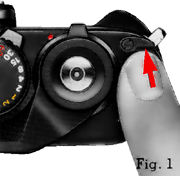
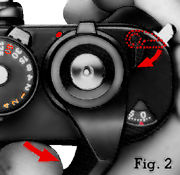
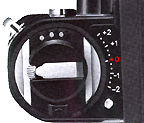
The F3AF's blinking self-timer provides a 10-sec. delay in shutter release. To operate the self-timer, push the self-timer lever to uncover the red dot (Fig. 1). (When using the camera in autofocus and /or automatic exposure modes, don't forget to close the eyepiece shutter to prevent stray light from entering the eyepiece.) Then push the shutter release button. (Fig. 2). Immediately the red LED on the front of the camera will start blinking and then speed up during the final two seconds before the shutter opens to warn you to get ready (Fig. 3). Finally, return the self timer to its original position after use (Fig. 4). If you want to cancel the self-timer after pushing the shutter release button, return the self-timer lever to its original position. This will prevent the picture from being taken. Note: The B setting on the shutter speed dial does not function as B with the self-timer.
In the following situations, the F3AF's mirror must be locked up in the "up" position: when you want to operate the Motor Drive MD-4 at 6 frames per second or when using certain fisheye lenses which do not feature through-the-lens viewing. Also, when using super-telephoto lenses or doing photomicrography, it becomes necessary to minimize camera vibration.
 |
|
Caution: With the mirror locked up, you should not operate the camera on automatic. Even though the LCD continues to show you the shutter speed automatically selected by the camera, this speed will not produce the correct exposure. Autofocus operation with the mirror in the "up" position is also impossible.
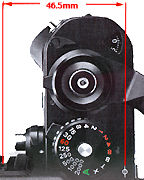
A convenient built-in viewfinder illuminator lets you see the the LCD exposure information and the aperture, even in dim light. To turn on the illuminator, push the red illuminator button located at the base of the viewfinder just in front of the shutter speed dial (72).
 |
|
Notes: 1) If you plan to use the illuminator for extended periods, take along a spare set of fresh batteries for the camera body, because the illuminator consumes a lot of power. 2) At low temperatures or with nearly exhausted batteries, using the illuminator might temporarily lower the voltage, causing the LCD to disappear. If the LCD appears again, when the illuminator is off, you can release the shutter without replacing the batteries.
For creative and unusual effects, the F3AF allows you to record more than one image on the same frame of film. To make double or multiple exposures, follow this procedure: 1) Take the first shot.
 |
 |
|
Memo Holder
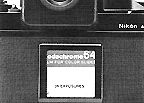 |
When the film is already loaded, you must remove the DX-1 finder. |
 |
|
 |
|
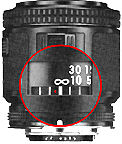
In infrared photography, use of an R60 filter is required. At first, focus on your subject through the viewfinder by rotating the lens focusing ring (49) without the filter in place. Then look at the lens and take note of the focused distance. Reset the focusing ring so that the desired distance is aligned with the red dot. Finally take the pictures with the filter attached.
Note: Automatic focusing is impossible in black and white infrared photography.
Flash
Photography
(More info on Flash with Nikon F3 cameras) The Nikon F3AF has been specially designed to
make electronic flash photography easier than ever. When used with an accessory Nikon
dedicated flash unit, the camera offers fully automatic through-the-lens (TTL) control
of the flash exposure. This means that while the shutter is open, the camera's silicon
photo diode (SPD) reads the light reflected directly off the film and tells the flash
unit to cut itself off when the exposure is correct.
To prevent mistakes, the camera also offers automatic switch over of the shutter
speed for proper synchronization. With the shutter speed dial set at A or 1/125 sec.
or above, the shutter speed is automatically switched to 1/80 sec. as soon as the
flash is turned on. As a reminder, the LCD shows '80' on auto or 'M80' on manual.
For creative fill flash effects, you can set the speed manually to 1/60 sec. or below
and the shutter fires at the speed set with the speed in use displayed in the the
viewfinder.
For non-dedicated flash units, an X setting is provided, giving you the proper manual
speed of 1/80. At X, 'M80' appears in the LCD. However, if you use a Nikon dedicated
flash unit at this setting, 'M80' appears as soon as the unit is turned on. When
shooting manually with any flash unit, it is necessary to determine the flash unit's
guide number for the film you are using.; then set the aperture to match the shooting
distance.
Located at the base of the rewind knob, the accessory shoe allows direct mounting of a Nikon dedicated flash unit, such as the SB-12 or SB-16A. To mount other direct mounting flash units (having either an ISO or Nikon F2 type mounting foot) to the F3AF's accessory shoe, a Nikon Flash Unit Coupler is required.
 |
|
Three electrical contacts on the accessory shoe provide for synchronization of the flash unit, automatic TTL output control and ready light indication (via LED) in the camera's viewfinder, plus auto switching to the proper synchronization speed of 1/80 sec. Caution: For flash photography, it is recommended that you use a Nikon dedicated flash unit which Nikon claims operates with a low voltage current and if TTL flash exposure control is highly desirable in your photography, ensure third party flash unit you bought is equipped with the appropriate contacts necessary for proper TTL flash control.
|
| | | Back to Index of Nikon F3 Models Back to Pictorial History of Nikon SLRs |
|
|||||
|
|||||||
| Back to Main Index Page of Nikon F3 Site |
| About this photographic site | Contributions and Credits |
 |
Home - Photography in Malaysia |