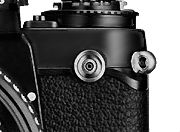
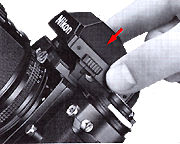
Sync Terminal
 |
|
A built-in LED ready-light is provided in the upper right-hand portion of the viewfinder outside the picture area. When a Nikon dedicated flash unit (or TTL sensor cord) is attached to the accessory shoe (59), the ready light comes on as soon as the flash is recycled, indicating that the unit is ready to fire.
 |
|
As an additional warning, it blinks if the flash is not connected properly or if the ASA/ISO setting on the camera is outside the dedicated flash unit's range of ASA/ISO 25~400. For more detailed information, refer to the flash unit's instruction manual.
Nikon F3AF/ Speedlight Combination Chart
| Speedlight |
Camera's Ready light |
Shutter speed auto changeover |
Usable flash output control |
| SB-16A |
yes |
yes |
TTL, auto, manual, MD |
| SB-12* |
yes |
yes |
TTL, manual |
| SB-11/14 (with SC-12) |
yes |
yes |
TTL, manual |
| SB-11/14 (with SC-13) |
yes |
yes |
auto, manual |
| SB-11/14 (with SC-11) |
no |
no |
auto, manual |
| SB- 15 (with AS-7) |
yes |
yes |
auto, manual, MD |
| SB-10 (with AS-4,7) |
yes |
yes |
auto, manual |
| SB-7 (with AS-3) |
no |
no |
auto, manual |
| SB-6 (with SC-6) |
no |
no |
manual, MD |
| SB-6 (with AS3, SC-9, SU-1) |
no |
no |
auto, manual, MD |
| SB-E** (with AS-4,7) |
yes |
yes |
auto only |
* With the SB-12 or SB-15 mounted on the Nikon F3AF, the flash head cannot be rotated so that it is over the AF Finder DX-1. ** The SB-E cannot be mounted on the F3AF unless the Eye level finder DE-2 or High Eyepoint Finder DE-3 is used. (Check with Flash sections for info on compatibility issues with other flash units) It may sound crazy.. but most of the flash units that are compatible (Direct or indirectly) are here in this site: SB-11 | SB-12 | SB-14 | SB-140 UV-IR | SB-15/17 | SB-16A | SB-21A (SB-29) Macro flash | Accessories
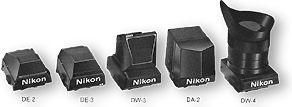
In addition to the AF Finder DX-1, the F3AF also accepts other interchangeable viewfinders designed for the regular F3. With them, all Nikkor and Nikon Series-E lenses, including the AF-Nikkor lenses, are usable with the F3AF body. Regardless of which finder is attached, you still have full automatic exposure control because the meter is build into the camera body rather than the finder.
 More info: Section on Interchangeable Prisms |
|
The Eye level finder DE-2 offers regular eye level viewing and provides an upright non inverted image in the viewfinder. The High-Eyepoint Finder DE-3 gives you the same eye level viewing, but allows eyeglass wearers and action photographers alike to see the entire frame with the eye up to approx. 25mm away from the eyepiece. The Waist-Level finder DW-3 is ideal when you want to use the camera at a low angle or upside down over your head when shooting over crowds. The Action Finder DA-2 works well for those situations when you cannot bring your eye close to the finder, such as fast breaking sports event, when you are wearing a helmet or goggles, or when the camera is enclosed in waterproof underwater housing. The 6x Magnification Finder DW-4 is for critical high-magnification close-up work or photomicrography. When using the DA-2 or DW-3, be careful that stray light does not enter from the top and cause an inflated meter reading.
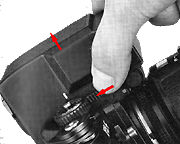
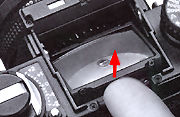
To attach the new finder, position it above the camera with the nameplate facing toward the front of the camera and gently push the viewfinder down until it is fully seated in place. Make sure the finder is attached securely.
 |
 |
|
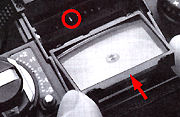
Before attaching another viewfinder; a focusing screen must be installed. Do not forget to remove the focusing screen from the body when you reattach the AF-Finder DX-1. If not, both the focusing screen inside the camera body and the one built into the bottom of the DX-1 might be damaged.
Caution:
- When handling the F3AF with the DX-1 removed, be careful not to soil or damage the electrical contacts at the bottom of the finder or the matching ones inside the camera body at the top of the mirror box. Also do not short-circuit them.
- Do not pick up the camera by the finder only. The force may cause damage to the camera.
- To prevent dirt from getting inside the finder, always keep the eyepiece glass attached.
- When storing the DX-1 separately from the camera body, attach the protective cover (supplied with the camera) to prevent the built-in finder screen from becoming scratched.
System Accessories
Interchangeable Focusing Screens When using a viewfinder other than the standard AF Finder DX-1, you have a choice of 20 interchangeable focusing screens each with different functions and configurations.
 |
 |
|
To take out the focusing screen, first remove the finder, then insert your fingernail under the rear edge of the screen and lift it out.
Focusing Screen Selector Guide:
Type A: Matte/
Fresnel field with 3mm circular split-image rangefinder spot and 12mm reference circle.
Rapid and accurate focusing. Excellent for general photography.
Type B: Fresnel field with 3mm fine ground matte focusing spot and 12mm reference
circle. Good for general photography especially with long lenses.
Type C: Fine-ground matte field with 4mm clear spot and cross hair. For photomicrography,
astrophotography and other high-magnification applications, using parallax focusing
on aerial images.
Type D: Overall, fine ground matte field. For specialized close-up photography
and for use with long lenses.
Type E: Matte/ Fresnel field with 3mm fine ground matte spot, 12mm reference
circle and etched horizontal and vertical lines. Ideal for architectural photography.
Type G: Clear fresnel with extra-bright 12mm microprism focusing spot for viewing
and focusing in poor light. Four models (G1~G4) are available corresponding to specific
focal length lenses. Depth of field cannot be observed.
Type H: Clear fresnel field with microprism focusing pattern over the entire
screen area. Permits rapid focusing on any part of the screen with optimum edge-to-edge
brightness in poor light. Available in four models (H1- H4) corresponding to particular
focal length lenses.
Type J: Matte/Fresnel with central microprism focusing spot and 12mm circle.
Good for general photography.
Type K: Combination of Type A and J screens. Matte/ Fresnel field with 3mm split
image rangefinder spot surrounded by 1mm wide micro prism doughnut. Rapid and accurate
focusing for subjects with both straight lines and ill defined contours. Suitable
for general photography.
Type L: Same as Type A screen but with split-image rangefinder line at 45°
angle. Best for subjects with horizontal lines.
Type M: Fine-ground Fresnel field with 5.5mm clear spot and double cross-hair
for use in parallax focusing on aerial image, plus millimetre scales for calculation
of individual magnification of objects or for measuring objects. Brilliant image
in dim light. Suitable for close-ups, photomicrography and other high-magnification
applications.
Type P: Same as Type K but with split-image rangefinder line at 45° angle
and etched horizontal and vertical lines as an aid to composition. Rapid and accurate
focusing for subjects with with horizontal or vertical lines or ill-defined contours.
Suitable for general photography.
Type R: Same as Type A but with rangefinder prisms of sloping surfaces at
a smaller angle and horizontal and vertical lines to aid proper composition. Works
best with lenses having maximum apertures from f/3.5 to f/5.6.
Type T: Matte/ Fresnel field with split-image rangefinder, 12mm reference circle
and horizontal and vertical lines. Used when preparing slides for TV broadcast. Dotted
lines indicate standard TV screen format. Solid outline shows "safe action"
area, whereas broken lines indicate "safe title" area.
|
| | | Back to Index of Nikon F3 Models Back to Pictorial History of Nikon SLRs |
|
|||||
|
|||||||
| Back to Main Index Page of Nikon F3 Site |
| About this photographic site | Contributions and Credits |
 |
Home - Photography in Malaysia |