Modern
Classic SLRs Series : |
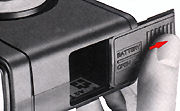
1. Open the battery chamber. Slide the lid in the direction of the arrow. 
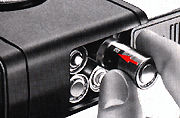
2. Load the batteries. Following the + and - symbols on the inside of the chamber, load four AA-type penlight batteries into the chamber.![]()
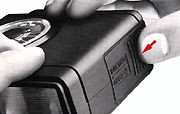
3. Close the battery chamber. Slide the lid back into place. 4. Attach the speedlight to the camera's accessory shoe. First rotate the speedlight's locking ring counterclockwise to uncover the mounting foot. Then slip the mounting foot onto the camera's accessory shoe from the front.
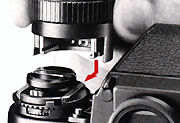
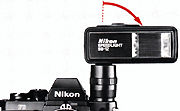
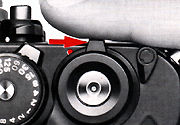
5. Lock the speedlight securely into place. Rotate the locking ring clockwise until it stops.
6. Rotate the flash head. Turn the flash head 90° so that the calculator dial is on top.
![]()
7. Set the shooting mode selector to 'A' (AUTO)
Set the exposure calculator dial. Turn the dial until the ASA/ISO index is opposite the speed of the film in use. Note the colour-coded f/numbers which appear on the left side of the colour-coded lines.
These lines indicate the range of camera-to-subject distance in which the correct flash exposure can be obtained. For example, if you're using ASA/ISO 100 film and select f/4, the automatic shooting range is indicated by an orange line. Thus, you can shoot any subject located between approx. 1 and 6 meters (approx. 3 and 20 feet) away from the camera.
9. Set the lens aperture ring to an appropriate f-number.
Referring to the calculator dial, select an f/number which is appropriate for the camera-to-subject distance; then set this f/number on the lens. Any aperture can be used as long as the subject is within the automatic shooting range.
10. Set the shutter speed dial to "A" (AUTO) on the F3 camera. Turn camera power on. Move the power switch to the right to uncover the red mark.
![]()
12. Turn on the speedlight. by sliding the power switch to the right to uncover the red mark.
13. Look into the viewfinder. As soon as the LED ready-light comes on the flash is ready to fire. If you depress the shutter button halfway, you'll notice that the LCD displays 80 indicating that the proper synchronization speed of 1/80 sec. has been automatically set by the speedlight
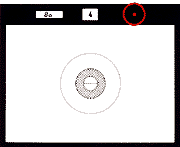
14. Take the picture. If the LED ready-light does not blink, then you have a perfect flash exposure. If it does, just ensure the flash to subject distance is within the permissible flash working range or check other settings mentioned earlier..
15. Turn off the speedlight.![]()
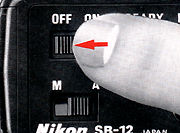
To conserve battery power between shooting sessions, slide the power switch to the left.
NavBar | Basic Flash Setup | Controls in Detail |
| Specifications |
Back to Index of Nikon F3 Models
About this photographic site Contributions and Credits
Home - Photography in Malaysia
Modern
Classic SLRs Series : |