Detailed Flash/Camera Operations
 |
|
2) LED ready-light signal transmission, plus auto switching to the proper synchronization
speed of 1/80 sec. with the camera on "AUTO", or manually set to 1/125
sec. or above; and 3) through-the-lens control of the flash exposure using the camera's
SPD metering cell as the auto sensor.
|
|
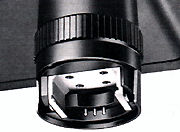
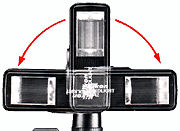
Flash Head The SB-12's flash head rotates through an arc of 180° with click-stops every 90°. With the speedlight unit mounted on the camera, it is recommended to turn the flash head to the horizontal position (with the calculator dial on top) to insure adequate coverage when using wideangle lenses.
 |
|
With the optional Wide-Flash
Adaptor SW-4, coverage is wide enough for a 28mm lens. Using the SB-12 in the vertical
position is generally not recommended, since this will result in inadequate coverage
with light falloff in the corners of the frame. The colour temperature of the SB-12's
light output makes it suitable for use with daylight-type colour film.
|
|
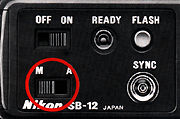
Shooting Mode Selector On Auto: To shoot on Auto, slide the shooting mode selector to "A." The SB-12 is able to vary its light output automatically to match the camera to-subject distance.
 |
|
On Manual:
The SB- 12 incorporates an override for man control. You can use it in situations
require a regular electronic flash unit. To use, slide shooting mode selector to
"M." Then the SB will fire at its maximum light output.
|
|
As soon as the SB-12 is mounted onto the f accessory shoe and turned on, the shutter speed is automatically switched to the pro synchronization speed of 1/80 sec. This is case when the shutter speed dial is at "A" manually set to 1/125 sec. and above. However if the dial is manually set to 1/80 sec. (X) below, the flash unit synchronizes with shutter speed selected.
 |
|
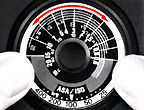
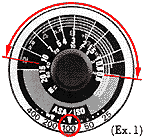
Each f/stop determines
the usable distance range in which you can obtain the correct automatic exposure.
The automatic shooting range for each f/stop is indicated by a colour-coded line.
When the subject distance remains the same, the larger the aperture selected, the
less the depth of field in the final photograph, and the maximum shooting distance
is greater, but the recycling time of the speedlight is shorter. On the other hand,
the smaller the aperture, the greater the depth of field, but the recycling time
is longer and the maximum shooting distance is less. Therefore, in choosing an f/stop,
all these factors should be taken into consideration.
The following two examples explain how to use the exposure calculator dial:
 |
|
|
f-stop |
Film sensitivity (ASA/ISO) |
AUTO
shooting range |
||||
|
400 |
200 |
100 |
50 |
25 |
||
|
2 |
- |
- |
- |
- |
4-15 (13.1-49.2) |
|
|
2.8 |
2 |
- |
- |
- |
3 - I 5 (9.8 - 49.2) |
|
|
4 |
2.8 |
2 |
- |
- |
2-12 (6.6-39.4) |
|
|
5.6 |
4 |
2.8 |
2 |
- |
1.4 - 8.8 (4.6 - 28.9) |
|
|
8 |
5.6 |
4 |
2.8 |
2 |
1 - 6.2 (3.3 - 20.3) |
|
|
11 |
8 |
5.6 |
4 |
2.8 |
0.8-4.4 (2.6- 14.4) |
|
|
16 |
11 |
8 |
5.6 |
4 |
0.7-3.1 (2.3- 10.2) |
|
|
22 |
16 |
11 |
8 |
5.6 |
0.6 - 2.2 (2.0 - 7.2) |
|
|
- |
22 |
16 |
11 |
8 |
0.6 - 1.5 (2.0 - 4.9) |
|
|
- |
- |
22 |
16 |
11 |
0.6 - 1.1 (2.0 - 3.6) |
|
Example 2 With ASA/ISO 100 film and a subject at 3 meters (approx. 10ft )
away, you can shoot any aperture from f/2 to f/8. If a short recycle time is preferable,
use f/2. If greater depth field is desired, use f/8. A good compromise is f/5.6.
Once you' ve selected the appropriate f/stop the film in use, set this on your lens
and f away. Your pictures should come out properly exposed. For Manual
Operation: Simply read off the f/stop which is opposite distance from camera
to subject; then set this aperture on your lens.
Note: When using the Wide-Flash Adaptor SW-4 attached to the SB-12, the guide number (value to determine the power of the flash) will be diluted with the flash intensity being disperse to cover a wider angle of flash coverage, you have to refer to another section of the value on exposure calculator dial when with SW-4.
 |
|
|
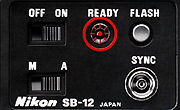
Another readylight also appears inside the camera's viewfinder at the same time. Thus, without removing your eye from the eyepiece, you can tell when the flash unit is ready for the next shot. Both ready-lights also blink to warn you of the following conditions: 1) when the SB-12 is not attached properly to the F3's accessory shoe; 2) when the ASA/ISO dial on the camera is not set between ASA/ISO 25 and 400; or 3) when the speedlight fired at its maximum output indicating that the light might have been insufficient for correct exposure. The warning blink is approx. 2 seconds in duration. Note: The white plastic plate fauna in new cameras not only serves to protect the shutter curtains, but also can be used when making test shots with the speedlight. Without film or the white plastic plate in place, the ready-lights blink even if the camera and flash unit are at the correct setting.
Open-Flash/Test Button Located on the back of the SB-12, the red open-flash button is used to fire the flash unit manually without having to trip the camera's shutter.
 |
|
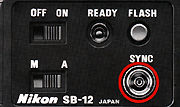
Sync Socket/Multiple Flash Connection
Plug one end of the optional SC-11 Sync Cord into this socket and the other end into
the camera's sync terminal.
 |
|
Example 1 If you are using ASA/ISO 100 film, you can shoot subjects at distances from 0.6m to 8.8m (approx. 2ft to 29ft) at the respective f/stops shown in the table.
Example 2 With ASA/ISO 100 film and a subject three meters (approx. 10ft) away, you can shoot at apertures from f/2 to f/5.6.
For manual operation, simply read off the f/stop in the same way as without the wide flash adaptor attached.
|
f-stop |
Film sensitivity (ASA/ISO) |
AUTO
shooting range |
||||
|
400 |
200 |
100 |
50 |
25 |
||
|
2 |
- |
- |
- |
- |
2.5 - 15 (9.2-49.2) |
|
|
2.8 |
2 |
- |
- |
- |
2.l - 12 (6.9-39.4) |
|
|
4 |
2.8 |
2 |
- |
- |
1.4 - 5.5 (4.6 - 25.9) |
|
|
5.6 |
4 |
2.8 |
2 |
- |
1.0 - 6.2 (3. 3 - 20.3) |
|
|
8 |
5.6 |
4 |
2.8 |
2 |
0.7 - 4.4 (2. 3 -14.4) |
|
|
11 |
8 |
5.6 |
4 |
2.8 |
0.6 - 3.1 (2.0-10.2) |
|
|
16 |
11 |
8 |
5.6 |
4 |
0.6 - 2.2 (2.0-7.2) |
|
|
22 |
16 |
11 |
8 |
5.6 |
0.6 - 1.5 (2. 0-4.9) |
|
|
- |
22 |
16 |
11 |
8 |
0.6 -1.1 (2.0-3.6) |
|
|
- |
- |
22 |
16 |
11 |
0.6 - 0.8 (2.0-2.6) |
|
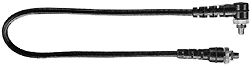 Sync Cord
SC-11 For off-camera or multiple-flash lighting setups.
Sync Cord
SC-11 For off-camera or multiple-flash lighting setups.
1. Brighten the room to minimize the opening of the subject's pupils.
2. Instruct the subject not to look straight into the camera.
3. Keep the flash unit as far away as possible from the camera by means of a sync cord.
Note: that once "red eye" appears, there is no way of retouching the negatives other than remove them after digitize the shoot by scanning or manually retouch them off in the print.
|
| Basic Flash Setup | Controls
in Detail | | Specifications | Back to Index of Nikon F3 Models |
|
|||||
|
|||||||
