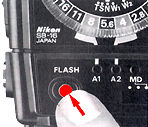
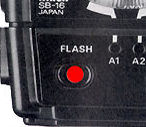
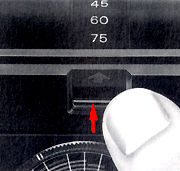
Open Flash Button The ready-light on the SB-16 can be used as an open flash button to fire the flash unit manually without having to trip the camera's shutter.
 |
 |
|
In this case, make sure that the flash unit is not connected to the camera. The open-flash button is also useful for test-firing the SB-16 to determine whether the illumination from the flash was sufficient for proper exposure in the non-TTL automatic mode. With the shooting mode selector set at one of the colour-coded dots (A1 or A2), push the " FLASH " button; if it starts blinking, then you know the amount of light might have been insufficient for the subject. In this case, reset the selector to A1 if it was set at A2, or move closer to the subject. This test-firing is especially useful when the flash head is tilted and/or rotated for bounce flash. In the TTL mode, test-firing must be performed by tripping the shutter. Note that, without film loaded in the camera, the ready-light will blink even if the correct exposure is obtainable. As a substitute for loaded roll film, you can use a strip of cut film (provided it is not too old) or a piece of grey paper.
 |
 |
 |
|
 |
|
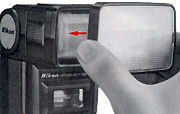
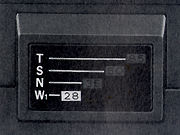
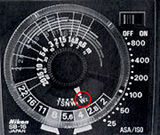
Wide Flash Adaptor SW-7 The Wide-Flash Adaptor attached in front of the SB-16's main flash head with the zoom head set at W1 (for a 28mm lens) increases the angle of coverage from the 70° horizontal and 53° vertical to 78° and 60° respectively, allowing the SB-16 to be used with a 24mm wideangle lens. With the SW-7 attached. remember to set the zoom head knob on the exposure calculator dial at W2. Because the SW-7 diffuses the light emitted from the SB-16, the guide number is reduced to 19 at ASA/ISO 100 and meters, and the auto shooting ranges are less.
 |
 |
 |
|
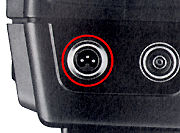
TTL
Multiple
Flash Terminal
& Sync/Multiple Flash Terminal
 |
|
 |
|
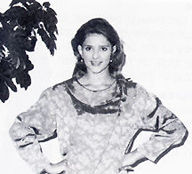
Synchro-Sunlight fill-in Flash Photography A backlit subject, such as a person outside with his/her back to the sun or indoors in front of a window, may come out almost as a silhouette if the background is correctly exposed. On the other hand, if exposure compensation is made to give the correct exposure for a backlit subject, the background may be washed out. To fill in the shadows and balance the illumination levels of the subject and background, you can use an electronic flash unit even in daytime.
|
|
|
|
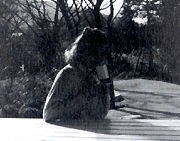

One important fact to remember in balancing the exposure for both subject and background is this: Exposure with a flash unit is determined only by the aperture selected, whereas exposure for ambient daylight is determined by a combination of shutter speed and aperture.
 |
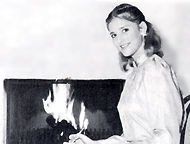
With fill-in flash: both the subject and the background come out properly exposed |
Synchro-sunlight
fill-in flash
photography is possible with the SB-16's shooting mode selector set to the TTL-automatic,
non-TTL automatic, or manual mode. Operation in the manual mode assures you of good
results in virtually all cases, so we will describe this procedure first.
In the manual mode 1) Set the shutter speed on
the camera manually. Set the camera manually to the highest synchronization speed
for electronic flash or a slower one. 2)Take a meter reading of the background.
Frame the background in the camera's viewfinder, so that the backlit subject is not
included. Turn on the camera's exposure meter to determine the proper f/stop for
the shutter speed you have set. 3) Determine the flash-to-subject distance.
Using the equation below, calculate the flash-to-subject distance using the guide
number for the film in use and the f/stop set on the lens:
flash-to-subject distance = Guide number divided by f/stop 4) Position the
SB-16 at the correct distance. Set the flash-to-subject distance on the lens distance
scale; then move in and out until the subject appears sharp in the camera's viewfinder.
To vary the composition, you can use a wideangle-to-telephoto zoom lens. As an alternate
method, remove the flash unit from the camera using a separate sync cord and position
it at the correct distance; then you can shoot from any position. 5)Take the
picture. Set the SB-16 for manual operation, turn it on and wait until it is fully
recycled before taking the shot. This procedure balances the exposure for the subject
with that of the background. However, in synchro-sunlight fill-in flash photography,
it is a good idea to use the light from the flash unit as a secondary light by decreasing
the flash illumination by approx. one or two stops to eliminate harsh shadows caused
by the ambient daylight. There are two ways of decreasing flash illumination. One
is to use an aperture that's one or two f/stops smaller than that determined in step
2) in combination with a shutter speed that should be slower by one or two steps
to give the background a correct exposure; the other is to use a flash-to-subject
distance 1.4 or two times longer than that determined through the equation. You will
obtain more natural-looking results with either method. You can also combine the
two methods. Some photographers prefer to overexpose the background by one stop in
order to create an intentionally backlit effect by using a shutter speed that's slower
by a further one step.
In the TTL-automatic mode 2) Same as Steps 1) and 2)
in the manual mode. 3)Take the picture. With the SB-16 set at TTL and turned on,
just take the picture.
Notes: 1) With a strongly
backlit subject (such as a scene containing the sun), the desired exposure balance
may not be obtained In this case, use the SB- 16 on manual. 2) To give different
exposures to the subject and background, you can reset the camera's shutter speed
dial and exposure compensation dial accordingly. For example, use a slower shutter
speed to make the background overexposed and turn the exposure compensation dial
in the direction to make the subject underexposed.
In the non-TTL automatic mode 1)Set a shooting aperture
on the lens. Read off the two usable apertures from the exposure calculator dial
and set one of them on the lens. 2) Take a meter reading of the background.
Frame the background in the camera's viewfinder and turn on the camera's meter to
determine the proper shutter speed for the aperture you have set. Note that the shutter
speed should be within the flash synchronization range for the camera you are using.
3)Take the picture. With the SB-16 set at A1 or A2 and turned on, take the
picture only if a proper synchronization speed is available. Notes: 1) Exposure is more
easily affected by the brightness of the background in the non-TTL automatic mode
than it is in the TTL-automatic mode. 2) Because the usable apertures are
limited In the non-TTL automatic mode, a proper shutter speed to match the shooting
aperture may not be available.
Synchronization with slow
shutter speeds
If you are using the SB-16 at a high shutter speed under dim light, the background
may come out too dark. To avoid this, use a slower shutter speed. The procedure for
synchronization with slow shutter speeds is the same as that described before; however,
you should mount the camera on a tripod to avoid camera shake at speeds of 1/30sec.
and below. Also, it is recommended that you make the background somewhat underexposed.
Note:
When
using colour film, especially transparency film, unnatural colour casts may occur when
the ratio of flash illumination to ambient light is low.
|
|
|
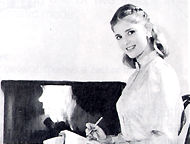
Fast synchronization speed: the background is too dark |


|
|
|
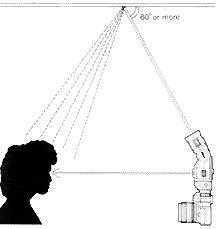
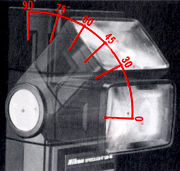
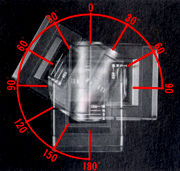
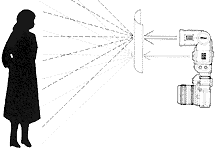
Bounce flash photography With the SB-16's main flash head tilted back and/or rotated, the light travels directly to the ceiling or wail and then bounces back to the subject.
 |
 |
|
Notes: 1) In general, there is a two or three f/stop loss of illumination because of the absorption of light by the reflective surface. 2) Unless the surface of the reflector you are bouncing the light off of is white or silver, your colour photographs will come out with an unnatural colour cast similar to that of the reflecting surface 3) When the flash head is tilted back 45° or less, some amount of light from the flash head may reach the subject directly, causing unevenness of illumination. To avoid this, make sure the head is tilted back 60° or more. 4) In bounce flash, the angle of incidence is equal to the angle of reflection.
 |
|
 |
 |
|
|
| Part
I | Part
II | Part III | Part IV | Part V | Part V | Back to Index of Nikon Flash Back to Index of Nikon SB-16 Back to Index of Nikon F3 Model |
|
|||||
|
|||||||
