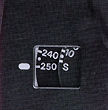
Modern
Classic SLRs Series :
The MF-4 250 Bulk Film Back Part IV |
Frame Counter
After making the blank exposures, set the MF-4's frame counters. The magazine back is equipped with two frame counters, a subtractive type and an additive type. Each graduation on the frame counters represents five frames. When film is not loaded, the counters will not operate.
Subtractive Frame CounterThe subtractive counter shows the number of unexposed frames left. It is on the left side within the frame counter window. When the subtractive counter shows "O," the motor drive stops automatically.
To reset the counter, turn the counter reset ring in the direction indicated by the white arrow so that it shows either the number of frames of the loaded film or any desired number of frames. While turning the reset ring, the knob under the reset ring should be pushed to prevent it from being rotated. If the knob is rotated, the scale of the additive counter will also be moved.Additive Frame Counter
The additive frame counter on the right side within the frame counter window shows the number of exposures made. The reading automatically returns to "S" (for start) when the rear cover is opened.
Note: "5" on the additive frame counter coincides with the index (the white line) before making the blank exposures after the film is loaded. After the five blank exposures are made, the counter shows "0" (the line above "S").
Taking Pictures
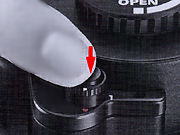
Shutter Release Button(s)
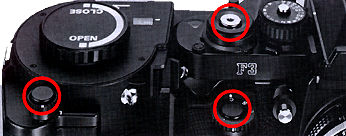
Note: When the camera's shutter release button is used, depressing the button releases the shutter and releasing the finger from the button advances the film in the single frame mode even if the S-C mode selector is set at the "C" position. Three shutter release buttons, one on the magazine back, one on the motor drive and another one on the camera body, can all be used. When you use the shutter release button on either the magazine back or motor drive, the selection between the single frame and continuous shooting modes should be made with the S-C mode selector on the motor drive.
When the subtractive counter comes to show "0" the motor drive stops automatically and you cannot release the shutter by depressing the shutter release button of either the magazine back or the motor drive. But you can do so as many times as desired by using the shutter release button on the camera. In this case, the camera's power switch should be turned on.
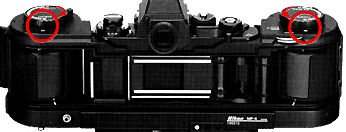
Exposure Meter in the Camera
By halfway depressing the shutter release button on the magazine back, like that of the motor drive and camera, you activate the light metering circuit and an exposure reading is displayed in the camera's viewfinder.
Depress the button further to release the shutter. Even if you release your finger from the button after activating the light measuring circuit, the circuit will stay on for approximately 16 seconds for confirmation of the exposure display.
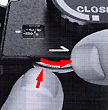
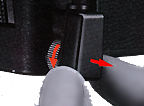
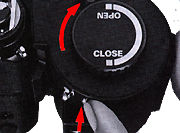
Unloading the Cassettes
When a roll of film is completely exposed and the subtractive frame counter reads "0," the motor drive stops automatically. However, because the last exposed frame is at the centre of the camera, do not open the camera back immediately, but make more than five blank exposures.To make blank exposures, set the subtractive counter to a reading of more than five frames or depress the camera's shutter release button more than five times.
When the supply cassette runs out of film, the cassette spindle knob on the supply side ceases to rotate. Set the open l close knobs on both the supply and takeup sides to the "OPEN" position and open the rear cover. Pull out the cassette spindle on each cassette chamber and press the cassette ejector lever to lift the cassette up far enough to grip easily; then lift out each cassette. (Keep pulling on the cassette spindle until each cassette is removed from the chambers).Note: When the film end will not come out of the supply cassette, the motor drive detects the tension in the film and stops automatically. Because the last exposed frame is near the centre of the camera in this case, open the rear cover in a darkroom to wind the film onto the takeup cassette.
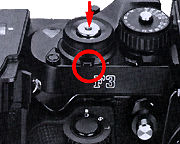
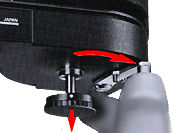
Detaching the Magazine Back
To detach the magazine back, first pull out the plug connected to the magazine back terminal on the motor drive.
Then set the open/close knob on the supply cassette side of the magazine back to the "OPEN" position and turn the camera clamp lever clockwise while pressing the camera clamp lock release button.
| Previous | Next | 4/6 Power Source and Accessories
NavBar | | |
Back to Index of Nikon F3 Models
Back to Pictorial History of Nikon SLRs
About this photographic site Contributions and Credits
Home - Photography in Malaysia
| Back to Index Page | of Instruction Manual of 250 Bulk Film Backs
| Back to Main Index Page | of Film Backs for Nikon F3
| Back to Nikon F3 Site |
About this photographic site Contributions and Credits
Home - Photography in Malaysia
Modern
Classic SLRs Series : The MF-4 250 Bulk Film Back Part IV |