Basic Camera Operations This section of the site features the settings
for most common picture-taking situations when using the standard Multi-Meter Finder
DP-30 and a D-type AF Nikkor lense (including AF-S and AF-1 as a template.(The performance
of other combination may be different). The shooting modes explained in this section
cover most of your shooting situations. Shooting modes/functions explained in this
section are as follows:
Film advance mode: Single frame
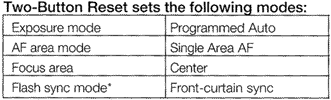
AF area mode: Single Area AF*
Focus area: Center *
AF mode: Single Servo Autofocus
Exposure metering: 3D Color Matrix Metering
Exposure mode: Programmed Auto*
Lens attached: D-type AF Nikkor
* Can be set using the
Two-Buttons Reset.
Handling Shutter Release and Composing a Picture
 |
 |
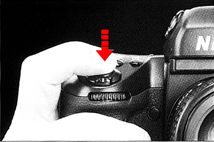
Lightly pressing shutter release button Lightly press shutter release button to start autofocus operation and switch the exposure meter on. Indications inside the viewfinder and LCD turn on. |
They remain on for approximately 8 seconds after you take your finger off the shutter release button, then automatically turn off. Fully depressing shutter release button Fully depress the shutter release button to release shutter. Depress the shutter release button slowly as depressing the shutter release button abruptly may result in camera shake.
 |
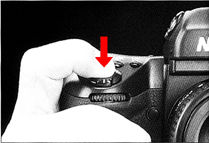
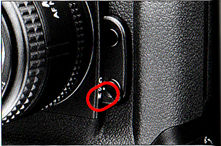
AF start button Autofocus can be set not to start when the shutter release button is lightly pressed using Custom Setting #4. To start autofocus in this case, press the AF start button. To release the shutter, fully depress shutter release button while pressing the AF start button. Also, use AF start button when it is difficult to focus on the subject by lightly pressing the shutter release button. |
To set the meter for automatic switch-off after 4 sec., 16 sec. or 32 sec. as desired, use Custom Setting #15. To deactivate autofocus when shutter release button is lightly pressed, use Custom Setting #4. |
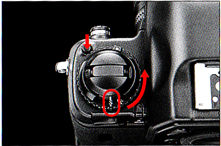
Hold camera properly Stand with one foot forward a half step to balance your body. Grasp the camera hand grip with your right hand. Use your left hand to cradle the camera with your elbow propped against Your body for support as you look through the viewfinder. Use your right index finger to press the shutter release button. A vertical-shooting shutter release button is also provided for smoother shutter release in vertical-format shooting. To use the vertical-shooting shutter release button, turn the lock lever for vertical-shooting shutter release button to
 |
Notes: * Do not block the lens with your hair or hand. * When taking a picture without looking through the viewfinder, make sure nothing (such as your camera strap) is between your camera and the subject, * Do not block the flash or AF-assist illuminator LED during flash photography. |
Basic Shooting
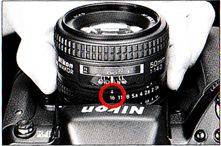
1. Make sure that the lens aperture is set to its minimum position.
2. Set the film advance mode selector to S for Single-frame shooting
3. Set the focus mode selector to "S" for Single Servo AF.
 |
 |
 |
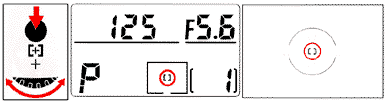 |
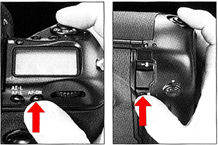
4. Select Single Area AF mode by rotating the Main-Command Dial while pressing the AF area mode ( |
 |
* The selected focus area of the top LCD displays |
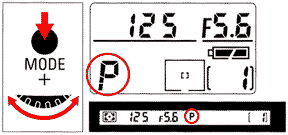
6. Select Programmed Auto exposure mode by rotating the Main-Command Dial while pressing the exposure mode (MODE) button so P appears in the top LCD panel and P in the viewfinder.
 |
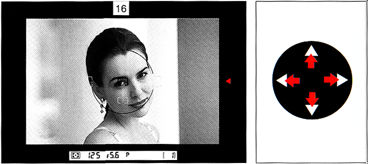 |
7. Compose picture. Position the focus brackets on your main subject by pressing the focus area selector. |
You can change the focus brackets position
as long as the exposure meter is on. When the exposure meter is off, lightly press
the shutter release button before selecting the focus area. Slide film images may
be partially cropped by the mount. Also, the edges of negative film are partially
cropped by most labs.
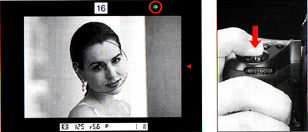
8 Lightly press the shutter release button.
9. Confirm ![]() appears inside the viewfinder and fully depress the shutter release button
to take the picture. The camera automatically advances the film by one frame, and
LCD frame counter increases by one.
appears inside the viewfinder and fully depress the shutter release button
to take the picture. The camera automatically advances the film by one frame, and
LCD frame counter increases by one.
 |
|
If |
Shutter cannot be released when:
 |
|
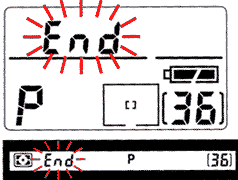
10. At the end of the film roll, |
 |
|
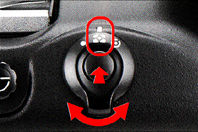
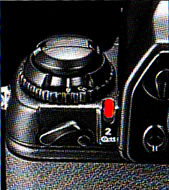
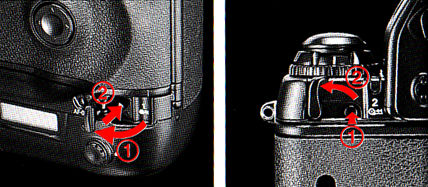
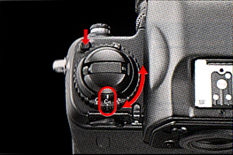
11. To rewind film, first open the film rewind button cover and press the film rewind button |
Film advance can be set to stop automatically at the 35th or 36th frame using Custom Setting #12. |
 |
|
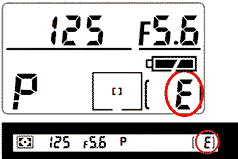
12. Confirm " |

NOTE: * If film rewind
does not start, check battery power. * If film rewind has stopped at mid roll, check
the battery power. If battery power is insufficient, turn the power switch off, replace
batteries with a fresh set, turn power on, then press ![]() button and
turn
button and
turn ![]() lever to restart film rewind. * If you accidentally press
lever to restart film rewind. * If you accidentally press ![]() button,
lightly press the shutter release button. The film advances one frame without exposure
and
button,
lightly press the shutter release button. The film advances one frame without exposure
and ![]() button pops up.
button pops up.
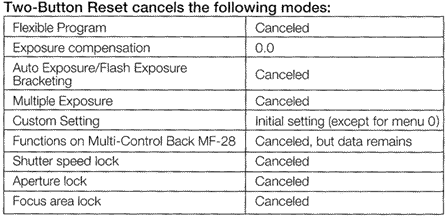
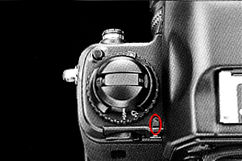
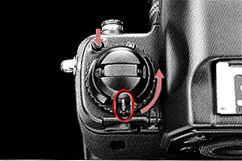
About Two-Button Reset Pressing ![]() buttons simultaneously for more
than two seconds resets various modes to their initial settings.
buttons simultaneously for more
than two seconds resets various modes to their initial settings.
 Note: When using SB-18, SB-27, SB-26, SB-25 or SB-24 or other equivalent Nikon Speedlights, Speedlight settings will override camera settings. |
 |
Film Advance Mode There are four (4) automatic film advance modes in the Nikon F5. To choose a mode, rotate the film advance mode/self-time( selector while pressing the film advance mode selector lock release. Set S for Single-frame shooting, CL for Continuous low-speed shooting, CH for Continuous high-speed shooting or Cs for Continuous silent-low-speed shooting,
Single-Frame Shooting With the film advance mode at S, fully depressing the shutter release button takes one picture and automatically advances the film by one frame. Film advances immediately after the shutter closes whether you remove your finger from the shutter release button or keep the button depressed.
 |
 |
To take the the next shot, lift your finger from the button, then fully depress It again. Use Single-frame shooting for stationary subjects or subjects that do not require several frames of rapid firing. |
Continuous Shooting Shoots are taken continuously as long as you keep the shutter release button fully depressed. You have a choice of shooting speeds up to approx. 7.4 fps (frames per second) in CH mode,up to approx. 3 fps in CL mode and approx. 1 fps in Cs mode with fresh AA-type alkaline or lithium batteries at normal temperature 20 degrees C or 68 degrees F) and a shutter speed of 1/250 sec. or higher In Manual exposure and Continuous Servo AF modes. With shutter speeds slower than 1/250 sec., the framing rate becomes progressively slower in proportion to the shutter speed(s) In use.
 |
 |
 |
Note: Film advance speed using fully charged optional rechargeable Ni-MH Battery Unit MN-30 is up to approx. 8 fps in CH mode, up to approx. 3 fps in CL mode and approx. 1 fps in Cs mode. |
In CH and CL modes, the shooting speeds can be changed using Custom Setting #9. |
| previous | NEXT | 318 Basic Camera operations
| Back to Index Page | Instruction Manual for Nikon F5
| Back | Main Index Page - Nikon F5 Professional SLR camera
The Camera - Background,
Issues & Summary
Basic
Features | Focusing | Metering Systems | Exposure Control | Reliability Issues | Nikkor lens Compatibility
Prisms/Finders - Index page
- 2 parts
Film Backs: Index
Page - 1 parts
Focusing Screens - Index
Page - 1 part
Flash System - Index
Page
- 3 parts
System Accessories: | Power Sources | Cases | Remote
Control | Miscellaneous
Macro
Photography
- Related info on Micro-Nikkor lenses
Technical Specification for Nikon F5
Main
Reference Map
/ Nomenclature
Resource Centre:
Instruction Manuals
Nikon
F5 Camera Body
- 18
parts
MF-28
Multi-Function Back
HTML - 8
parts
PC
Links - Photo Secretary
- 2
parts
AF-TTL Speedlights:
SB-28 / SB28DX | SB29(s) info | SB30 | SB50DX | SB80DX | SB600 info | SB800
Variants: F5 50th Anniversary Model | Nikon/Kodak DCS-620 | DCS-720 Digital Still SLR camera
| Nikon F | Nikon F2 | Nikon F3 | Nikon F4 | Nikon F5 | Nikon F6 | Nikkormat / Nikomat | Nikon FM | Nikon FE/ FA | Nikon EM/FG/FG20 | Nikon Digital SLRs | Nikon - Other models |
The Eyes of Nikon:-
Nikon Auto Focus Nikkor lenses:- Main
Index Page
Nikon Manual Focus Nikkor lenses:- Fisheye-Nikkor Lenses - Circular | Full Frame |
Ultrawides Lenses - 13mm15mm18mm20mm | Wideangle Lenses - 24mm28mm35mm | Standard Lenses - 45mm 50mm 58mm | Telephoto
Lenses - 85mm105mm135mm180mm & 200mm | Super-Telephoto Lenses - 300mm 400mm 500mm 600mm 800mm 1200mm |
 Index Page |
Special
Application lenses: Micro-Nikkor Lenses - 50mm~55mm -60mm 85mm -105mm 200mm Micro-Zoom 70-180mm Perspective Control (PC) - 28mm 35mm PC-Micro 85mm Dedicated Lenses for Nikon F3AF: AF 80mm f/2.8 | AF 200mm f/3.5 EDIF Depth of Field Control (DC): 105mm 135mm Medical Nikkor: 120mm 200mm Reflex-Nikkor Lenses - 500mm 1000mm 2000mm Others: Noct Nikkor | OP-Nikkor | UV Nikkor 55mm 105mm | Focusing Units | Bellows-Nikkor 105mm 135mm Nikon Series E Lenses: 28mm35mm50mm100mm135mm | E-Series Zoom lenses: 36~72mm75~150mm70~210mm |
MF Zoom-Nikkor Lenses: 25~50mm | 28~45mm | 28~50mm | 28~85mm | 35~70mm | 36~72mm E | 35~85mm | 35~105mm | 35~135mm | 35~200mm | 43~86mm | 50~135mm | 50~300mm | 70~210mm E | 75~150mm E | 80~200mm | 85~250mm | 100~300mm | 180~600mm | 200~400mm | 200~600mm | 360~1200mm | 1200~1700mm
Tele-Converters: TC-1 | TC-2 | TC-200 | TC-201 | TC-300 | TC-301 | TC-14 | TC-14A | TC-14B | TC-14C | TC-14E | TC-16 | TC-16A | TC-20E
Recommended links to understand more technical details
related to the Nikkor F-mount and production Serial Number:
http://rick_oleson.tripod.com/index-153.html by: my
friend, Rick Oleson
http://www.zi.ku.dk/personal/lhhansen/photo/fmount.htm by: Hansen,
Lars Holst
http://www.mir.com.my/rb/photography/hardwares/nikonfmount/lens2.htm
http://www.photosynthesis.co.nz/nikon/serialno.html
| Back | Index Page of Digital
Nikon SLR cameras
|
Back | Main Index Page of Pictorial
History of Nikon SLR cameras
![]()
 |
| Message Board | for Nikon F5 Series SLR model(s) | |
HOME - Photography in Malaysia |
![]()
A resource dedicated to my kids, Alvin Foo & Esther Foo- one day,
BOTH might need to use all these information for his/her Nikon F5A camera.
Volunteered Maintainer(s) for the Nikon F5 Message Board: Tony Davies-Patrick, UK; Rick Oleson, US; Koh Kho King, Malaysia.
Credit: Mr. Chuck Hester, US for his text re-editing skill for this site; Our staff, HowKiat® who created the 3D-Nikon F5 logo. Mr. Lew Chee Wai of YL camera for lending his F5 for me to take some shots appeared in this site. All those nice folks who have contributed their images, in particular Mr. Mike Long, Edwin leong, Palmi Einarsson, Sergio Pessolano, Fred Kamphues, Harry Eggens, Curtis Forrester, Nick (Natures Moments), Sandra Bartocha; fellow countrymen, Vincent Thian, Koh Kho King, Philip Chong, CY Leow etc. and contributions from a few nice folks from Photo Malaysia Forum. Disclaimers & acknowledgments: Certain content and images appeared in this site were either scanned from official marketing leaflets, brochures published by Nikon and/or contribution from surfers who claimed originality of their own work for public publishing in this website, where majority of the extracted information are used basing on educational merits. The creator of this site will not be responsible for any discrepancies that may arise from any possible dispute except rectifying them after verification from respective source. Neither Nikon or its associates has granted any permission(s) in using their public information nor has any interest in the creation of this site. "Nikon", "Nikkormat", "Nippon Kokagu KK" "Silent Wave", "Focus Tracking Lock-on", "Nikkor" & other applicable technical/business terms are registered trade name(s) of Nikon Corporation Inc., Japan. Site made with an Apple G5 IMac.