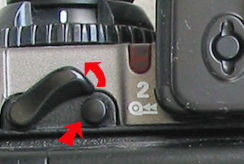
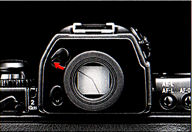
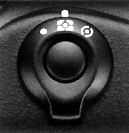
Electronically controlled depth-of-field preview ("DOF") Function. One of the most important aspects for depth of field conscious photographers is the depth of field preview. It is incredibly useful in portraiture, landscapes and close-up photography. When you use a lens with an automatic diaphragm, the viewfinder image is set to maximum aperture. The depth-of-field preview button stops the lens down electronically to the aperture set in any exposure mode, enabling you to verify the focusing situation of the composition.
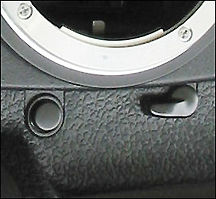 |
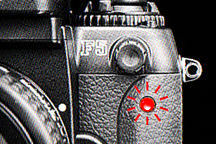
For decades, virtually all Nikon SLRs have this as a standard feature. The F5's DOF-preview button is located conveniently on the right hand side, just next to the lense. Once activated, the viewfinder will dim and while you rotate the aperture from the maximum value to the minimum, the viewfinder will dim-out. But you will also notice the depth of field will increase proportionally. As the Nikon F5 is entirely controlled electronically and manipulates the aperture is via the Sub-Command dial, you can still check the DOF if you are in manual mode by turning the aperture ring for varying the aperture settings. Located under the DOF preview button is the Mirror Lock Up lever. As one is a button while another is a lever, you won't get confused as with the Nikon F4's three congested functions at this location - you don't need to remove your eye from viewfinder to verify during shooting. The streamlined arrangement here is a great improvement. NOTE: Use other Metering system other than Spot meter, |
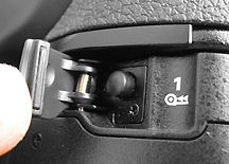
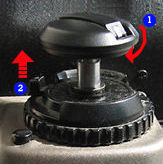
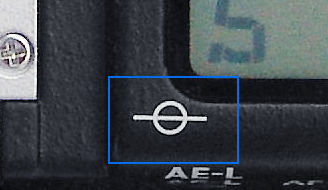
Mirror lock up ("MLP") lever Even though Nikon F5 employs a revised mirror bounce damping mechanism which greatly improves slow shutter speed shooting. In certain situations such as using vibration-sensitive super-telephoto tenses or doing extreme high magnification photomicrography in less than desirable ambient light. It is always advisable to reduce camera vibration to the absolute minimum.
 |
Notre Voie Lactée avec un invité, la planète Mars |
The Mirror-Lock-Up feature is another standard feature found in all the Nikon F bodies and is available for photographers to use to counter these sensitive shooting requirements (best used with Self Timer). To lock the reflex viewing mirror in the "up" position, rotate the mirror lockup lever until it stops. (In the mirror up position you can no longer view the metering or your composition in the view finder. So do your composition, focus and meter BEFORE you use this function). Compared to any of the earlier Nikon F's, the camera MLP is not entirely easy to operate, it may require some force to lift the mirror (I'm not sure but it may become easier the more it is used). This is an essential feature for many (including me) and it is better to have it than letting Nikon omit it.
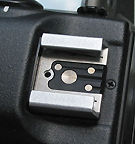 |
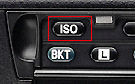
In MOST cases, when using a speedlight for flash photography, you should consider using a dedicated flash to take advantage of Nikon's superior TTL flash exposure capability. The Speedlight is mounted on the accessory shoe - which is located at the top of the Multi-Meter Finder DP-30 (or AE DA-30 Action Finder). This ISO type hot shoe allows direct mounting of a wide range of Nikon dedicated electronic Speedlights, including SB-800, SB-600, SB-80(DX), SB-28(DX), SB-27, SB-26, SB-25, SB-24, SB-23, SB-22s, SB-22, SB-20, SB-18, SB-16B and SB-15 (or other Nikon equivalent). Note: Other Nikon Speedlights may be mounted with a compatible Nikon flash unit coupler. |
 |
 |
ISO film speed setting DX automatic operation is the "default" for Nikon F5 because most of the commercially available films have adopted this industrial standard for quite sometime now. |
NOTE: With
non-DX coded film, rotate the Main-Command Dial while pressing the (![]() ) (film speed)
button to set film's ISO number in the rear LCD panel The usable range for manual
film speed setting is ISO 6 to 6400 in 1/3 steps. If DX-coded film
is loaded but manual film speed setting is selected, the camera gives priority to
the manually set ISO number.
) (film speed)
button to set film's ISO number in the rear LCD panel The usable range for manual
film speed setting is ISO 6 to 6400 in 1/3 steps. If DX-coded film
is loaded but manual film speed setting is selected, the camera gives priority to
the manually set ISO number.
Film Load / Fast film rewind / Manual Film Rewind / Multiple Exposure Film loading can never be easier, just pull the film leader to the red tab, those days of the slot in the film-take-up spool is not require anymore. The film is automatically advanced to the first frame and ready for shooting - precise & fast ! Due to user habits, many seasoned photographers may prefer to squeeze a few Xtra frames prior to shooting. Nikon has provided an option in the #8 Custom Setting Manual to disable the auto film advance frame 1 feature. You can then advance the film one by one (loading sequence still remains the same). The film transport mechanism of the Nikon F5 is excellent - something that has made them famous even in the Nikon F2 & F3 era. For example, with the a straight forward F3/MD-4 combination and only using Alkaline batteries it can deliver in upwards of a 140 rolls of film. This is absolutely world class in power efficiency management ! The Nikon is not short of surprises, the optional Ni-MH Battery Unit MN-30 enables fast film advance rate of 8 fps and power rewind of merely 4 seconds (6 sec. with eight AA-type batteries) ! You can also rewind the film by hand, ideal when extra silence is required. For information on its power efficiency and performance with various power sources, you can refer to the Technical Specification Section.
 |
 |
 |
 |
Manually Rewind Film. To rewind film manually, press the film rewind button
 |
 |
Multiple Exposure is a FEATURE rather than termed it as an exposure mode. For more information and how to operate this, CLICK HERE. Once activates, it automatically disabled film advance after two exposures and the film will advance one frame. RELATIVE: For EXTRA LONG TIME EXPOSURE, CLICK HERE. |
There are a few buttons at he Shutter Release Button area that need a quick explanation:
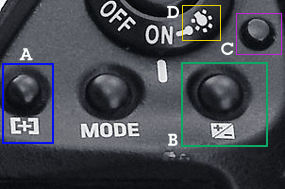
| The Exposure Compensation Button (B, as shown), allows fine-tuning of exposure, CLICK HERE for more detailed info as well as how to operate this feature. For the center located MODE button, read above (Command Dial Section). | ||
| The button is for you to quickly turn the Dynamic AF ON or OFF. Simply press the AF area mode button (A) and dial a step. The (C) Button is the lock for ON/OFF switch to avoid accidental release of shutter. | ||
| Illumination Switch (D) Permits you to view LCD panels in the dark or In dim light. It works for both top and rear LCD panels. Illumination will be on as long as the camera's meter is on, after shutter is released, the illumination automatically turns off. | ||
| Self-timer Shutter release in countdown action. It is also useful for shooting high-magnification images and works well in conjunction with Mirror-Lock Up lever. With all auto exposure modes, use the eyepiece shutter before starting the self-timer to prevent stray light from entering the viewfinder and affecting the exposure. The default timer is 10 sec. Duration can be changed by the Custom Setting #16 where delay timing of 2 - 60 sec. is available. |
When fully depressing the shutter release button. The self-timer LED starts blinking and shutter will be released after 10 sec. During the final two seconds, the LED quits blinking and stays on warning you to get ready for the shot.
 |
|
 |
To cancel self-timer operation, turn the film advance mode selector/self-timer to another position. |
NOTE:In Single Servo AF with Focus Priority, self-timer operates only when the in-focus indicator
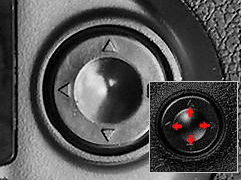 |
The Focus Area Selector is to supplement the 5 focus areas. Located at the rear section of the standard film back OR on the optional MF-28 Multi-Control Function Back. To select your desired focus area, press the button on the top or bottom or the left or right to select the desired focus area. Corresponding focus areas appear in the viewfinder and top LCD panel. Arrows or top ( |
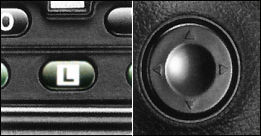 |
Shutter speed / Aperture / Focus Area Lock Button You can lock the focus area, selected shutter speed and/or selected aperture to prevent any accidental change of settings. This is especially useful for photographers who prefer to keep using the same settings. For example, shooting a fixed value photographic subject or working in studio photography. Quick View of MF-26's Focus Area selector. |
 |
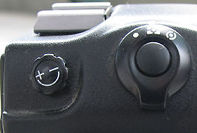 |
Metering Selector Various metering systems can be selected on BOTH standard Multl-Meter prism DP-30 as well as Action Finder DA-30 (This feature is not available on the Waist level nor 6X High Magnification Finder). Just next to the meter selector is the built-in Dioptre adjustment knob. It enables near- or far-sighted photographers to adjust the eyepiece dioptre within a range of -3 to +1.0. This feature is ONLY available with standard DP-30 multi-meter prism. |
 |
|
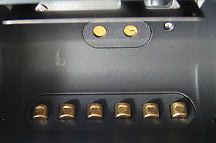
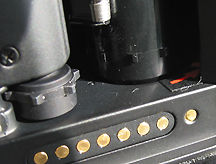
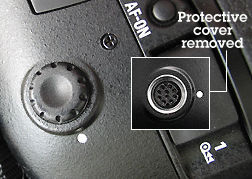
10-pin remote terminal One of the radical changes in the F5 from its predecessor is the adoption of the 10 pin remote terminal. |
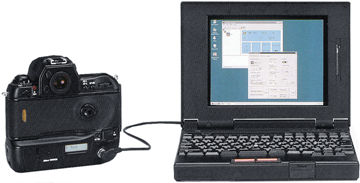
This change has made many of the older remote accessories unusable with this camera. Rather than pursuing with the 10-pin spec Remote Cord MC-20 or MC-30, Modulite Remote Control Set ML-3 and other accessories, it also accepts Personal Computer Connecting Cord MC-33/34 for linkage to a PC/Mac via Personal Secretary software | MORE info relating to these |
Life saving Two button reset- By simultaneously pressing the green Bracketing
and Custom Setting Menu (CSM) buttons for over two seconds, you can reset the camera
to its factory default settings including Custom Settings (A or B settings specified
at Custom Setting #0). Simultaneously pressing the green ![]() buttons for over 2 sec., will revert
to its factory default settings).
buttons for over 2 sec., will revert
to its factory default settings).
 |
Film plane Index ? What the hell is this ? It is the location of the film plane inside the camera when you need to calculate the exact distance of the camera to subject distance for extreme high magnification photography. It is a rarely used feature in modern SLR photography, but most cameras still offer this index as a visual guide. HAVE I MISSED SOMETHING in the comprehensive features list of Nikon F5 ? If yes, you can search them at the Index Page of the Nikon F5's User Manual Section. Sorry.. |
| Previous | 2/2 NEXT | The incredibly fast, precise Auto/Manual Focusing of the Nikon F5
| Back | Main Index Page - Nikon F5 Professional SLR camera
The Camera - Background,
Issues & Summary
Basic
Features | Focusing | Metering Systems | Exposure Control | Reliability Issues | Nikkor lens Compatibility
 |
|
Prisms/Finders
- Index
page - 2 parts
Film Backs: Index
Page - 1 parts
Focusing Screens - Index
Page - 1 part
Flash System - Index
Page
- 3 parts
System Accessories: | Power Sources | Cases | Remote
Control | Miscellaneous
Macro
Photography
- Related info on Micro-Nikkor lenses
Technical Specification for Nikon F5
Main
Reference Map
/ Nomenclature
Resource Centre:
Instruction Manuals
Nikon
F5 Camera Body
- 18
parts
MF-28
Multi-Function Back
HTML - 8
parts
PC
Links - Photo Secretary
- 2
parts
AF-TTL Speedlights:
SB-28 / SB28DX | SB29(s) info | SB30 | SB50DX | SB80DX | SB600 info | SB800
Variants: F5 50th Anniversary Model | Nikon/Kodak DCS-620 | DCS-720 Digital Still SLR camera | NASA-modified Nikon F5
| Nikon F | Nikon F2 | Nikon F3 | Nikon F4 | Nikon F5 | Nikon F6 | Nikkormat / Nikomat | Nikon FM | Nikon FE/ FA | Nikon EM/FG/FG20 | Nikon Digital SLRs | Nikon - Other models |
The Eyes of Nikon:-
Nikon Auto Focus Nikkor lenses:- Main
Index Page
Nikon Manual Focus Nikkor lenses:- Fisheye-Nikkor Lenses - Circular | Full Frame |
Ultrawides Lenses - 13mm15mm18mm20mm | Wideangle Lenses - 24mm28mm35mm | Standard Lenses - 45mm 50mm 58mm | Telephoto
Lenses - 85mm105mm135mm180mm & 200mm | Super-Telephoto Lenses - 300mm 400mm 500mm 600mm 800mm 1200mm |
 Index Page |
Special
Application lenses: Micro-Nikkor Lenses - 50mm~55mm -60mm 85mm -105mm 200mm Micro-Zoom 70-180mm Perspective Control (PC) - 28mm 35mm PC-Micro 85mm Dedicated Lenses for Nikon F3AF: AF 80mm f/2.8 | AF 200mm f/3.5 EDIF Depth of Field Control (DC): 105mm 135mm Medical Nikkor: 120mm 200mm Reflex-Nikkor Lenses - 500mm 1000mm 2000mm Others: Noct Nikkor | OP-Nikkor | UV Nikkor 55mm 105mm | Focusing Units | Bellows-Nikkor 105mm 135mm Nikon Series E Lenses: 28mm35mm50mm100mm135mm | E-Series Zoom lenses: 36~72mm75~150mm70~210mm |
MF Zoom-Nikkor Lenses: 25~50mm | 28~45mm | 28~50mm | 28~85mm | 35~70mm | 36~72mm E | 35~85mm | 35~105mm | 35~135mm | 35~200mm | 43~86mm | 50~135mm | 50~300mm | 70~210mm E | 75~150mm E | 80~200mm | 85~250mm | 100~300mm | 180~600mm | 200~400mm | 200~600mm | 360~1200mm | 1200~1700mm
Tele-Converters: TC-1 | TC-2 | TC-200 | TC-201 | TC-300 | TC-301 | TC-14 | TC-14A | TC-14B | TC-14C | TC-14E | TC-16 | TC-16A | TC-20E
Recommended links to understand more technical details
related to the Nikkor F-mount and production Serial Number:
http://rick_oleson.tripod.com/index-153.html by: my
friend, Rick Oleson
http://www.zi.ku.dk/personal/lhhansen/photo/fmount.htm by: Hansen,
Lars Holst
http://www.mir.com.my/rb/photography/hardwares/nikonfmount/lens2.htm
http://www.photosynthesis.co.nz/nikon/serialno.html
| Back | Index Page of Digital
Nikon SLR cameras
|
Back | Main Index Page of Pictorial
History of Nikon SLR cameras
![]()
 |
| Message Board | for Nikon F5 Series SLR model(s) | |
About this photographic site.
HOME - Photography in Malaysia |
![]()
A resource dedicated to my kids:- Alvin Foo & Esther Foo- one day,
BOTH might need to use all these information for his/her Nikon F5A camera.
Volunteered Maintainer(s) for the Nikon F5 Message Board: Tony Davies-Patrick, UK; Rick Oleson, US; Koh Kho King, Malaysia.
Credit: Mr. Chuck Hester, US for his text re-editing skill for this site; Our staff, HowKiat® who created the 3D-Nikon F5 logo. Mr. Lew Chee Wai of YL camera for lending his F5 for me to take some shots appeared in this site. All those nice folks who have contributed their images, in particular Mr. Mike Long, Edwin leong, Palmi Einarsson, Sergio Pessolano, Fred Kamphues, Harry Eggens, Curtis Forrester, Nick (Natures Moments), Sandra Bartocha; fellow countrymen, Vincent Thian, Koh Kho King, Philip Chong, CY Leow etc. and contributions from a few nice folks from Photo Malaysia Forum. Disclaimers & acknowledgments: Certain content and images appeared in this site were either scanned from official marketing leaflets, brochures published by Nikon and/or contribution from surfers who claimed originality of their own work for public publishing in this website, where majority of the extracted information are used basing on educational merits. The creator of this site will not be responsible for any discrepancies that may arise from any possible dispute except rectifying them after verification from respective source. Neither Nikon or its associates has granted any permission(s) in using their public information nor has any interest in the creation of this site. "Nikon", "Nikkormat", "Nippon Kokagu KK" "Silent Wave", "Focus Tracking Lock-on", "Nikkor" & other applicable technical/business terms are registered trade name(s) of Nikon Corporation Inc., Japan. Site made with an Apple G5 IMac.