Extreme Low-Light Metering
The Photomic finder allows you to meter a light level requiring 2- to 10-second exposure time at the maximum aperture of the lens in use. First set the shutter-speed scale at "B". Turn the shutter-speed selector while depressing the locking button in the center of the ASA film-speed dial until both signal lights glow. Read off the number on the extra-long shutter-speed scale which appears opposite the white dot.
 |
Then set the shutter at the indicated time using the self-timer on the camera (see the Nikon F2 or F2 Photomic instruction manual). When measurement is made in this way, the shutter speed visible in the viewfinder rests at "B" regardless of the number on the extra long shutter scale appearing opposite the white dot. |
Remember
that at lighting levels lower than EV 0 (e.g., 2 seconds at f/I.4 with ASA 100 film),
the exposure meter takes 2 to 3 minutes to reach a steady reading.
Metering Range
If the two signal lights do not light up even after all possible lens-aperture/shutter-speed
combinations have been tried, then the available light is too bright or too dim for
the meter's range. Switch to a new film that matches the available light; or mount
a neutral density filter onto the lens to cut down on the amount of light; or use
artificial lighting to increase luminosity, whatever the case may be. With the 50
mm f/1.4 lens and a film speed of ASA 100, the meter's effective range extends from
f/1.4 at 8 seconds to f/8 at 1/2000 second.
Unusual Lighting Situations
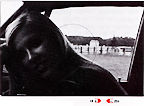
When there are severe brightness differences between the subject and the background,
you will often obtain better results by setting up the camera so that the subject
fills the central part of the viewfinder during exposure measurement. For example,
if the picture includes an unusually bright source of light, such as a light bulb,
move the camera to center the subject for reading, or if accessible, move in on the
subject to take a close-up reading of the part you want to emphasize, and then move
back until the desired composition appears in the viewfinder.
* For landscapes which include an expanse of sky, tilt the camera downward during
measurement to prevent underexposure caused by the bright skylight.
** For backlighted subjects, move up close to and include dark areas of the subject
in your reading.
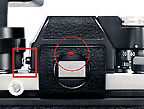
PROPER
METERING. The finder is designed to minimize the effect of light entering through
the finder eyepiece under normal conditions. However, in the following situations,
the use of a finder eyecup is recommended to insure complete exclusion of stray light.
When the camera is in sunlight and the subject is in shade.
 |
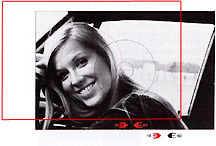 |
| <<<<<<<----- Measuring the bright area in the center of the screen will cause underexposure of the main subject. |
When the stop-down method is used at small apertures.
When a shaft of sunlight falls between the eye and the eyepiece.
When the signal lights on top of the finder is used to determine exposure, the eyepiece should be covered with the hand to prevent extraneous light from entering the finder.
EXPOSURE
MEASUREMENT: Special
cases
Stop-Down Exposure Measurement
With the following lenses and accessories, full-aperture exposure measurement is
not possible, either because the lens has no auto-diaphragm or because the diaphragm
will not couple with the meter. Therefore, the stop-down method must be used.
 |
This means measuring exposure with the lens aperture diaphragm stopped down to the taking aperture. First, push the coupling pin up into the Photomic finder with a coin or similar object so that the f/number 5.6 appears in the maximum aperture indicator window. Mount the lens or lens/accessory setup on the camera and switch on the meter in the usual way. |
Bellows
focusing attachment, extension rings and focusing unit. To determine exposure,
select the desired shutter speed and stop down the lens manually until the two signal
lights glow.
Preset lenses Use the same procedure as above for lenses having a preset diaphragm,
such as the PC-Nikkor 35 mm f/2.8.
Auto lenses without coupling prong Some lenses, like the Zoom-Nikkor Auto
200-600 mm f/9.5, have auto diaphragms but no coupling prongs. Use the depth-of-field
preview button to stop down the lens until the two signal lights glow.
Reflex-Nikkor lenses Older Reflex-Nikkor 500 mm f/8, 1000 mm f/11, 2000 mm
f/11 lenses have no aperture diaphragms. Adjust the shutter speed until both signal
lights glow.
Note: Since focusing
may be difficult or impossible at small apertures due to image darkening on the screen,
first open the lens to full aperture to focus. Then determine the correct exposure
by the stop-down method.
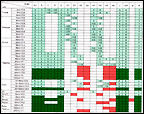
Exposure Correction for Special Lens/Focusing-Screen Combinations
Because
the light-transmitting properties of some focusing screens differ from those of ordinary
screens, certain lens/screen combinations require exposure correction to compensate
for the influence of the screen.
 |
The numbers in the table on the opposite page show the exposure corrections in f/stops. With the Photomic finder, the method used is to set the film speed (ASA) against the proper compensating mark engraved on the film-speed index ring. |
|
Repro-Copying, Slide-Copying and Photo-micrography
 |
Some exposure correction may be necessary depending on the type of film and the subject or the original slide. The numbers in the tables below show the exposure correction in f/stops. Readjust either the shutter speed or the lens diaphragm according to the indicated numbers, or reset the film speed. Three marks on the film-speed scale are equivalent to one f/stop. If the table indicates a one-stop increase with a film rated at ASA 100, reset the red arrow opposite the number 50. |
|
Original/Type of Film |
Repro/Slide Copying |
|||
|
B/W/Color |
Letters/Figures on Light Background |
Letters/Figures on Dark Background |
Photomicrography |
|
|
Panchromatic Film for general use |
No Compensation required |
+ 1-1/2 Stop |
- 1/2 Stop |
+ 1 Stop |
Viewfinder Ready-Light
READY- LIGHT (Check the SF-1 Ready light Attachment)
 |
The Photomic finder has a built-in ready-light for use with Nikon Speedlight units. The lamp lights up to let you know, without removing your eye from the viewfinder, when the Speedlight is fully charged and ready to fire. It goes out after the Speedlight has fired. The ready-light connects with flash such as older Nikon Speedlight SB-2 or some of those dedicated units that came with the Nikon F2 special accessory shoe. |
Care,
Maintenance and Handling
Your F2S Photomic Finder DP-2 is durable. However, it also deserves the same care
you would give any precision instrument. Follow the simple precautions given on the
opposite page and the finder will give you many years of dependable performance.
Always attach
or remove the finder properly. Do not use excessive force in either case.
When not in use,
store the finder with a prism guard in a case. Avoid storing it where it is liable
to excessive heat, cold or dampness.
Avoid fingerprints
and dust on the prism surface. Brush away grit or dust with a soft brush or use a
rubber syringe. Do not use cloth or ordinary tissue. If smudges or finger marks persist,
use a lens tissue sparingly dabbed with a professionally recommended lens cleaner.
Wipe with a circular motion and gentle pressure. (Even an approved lens cleaner can
cause damage if it seeps into the prism mount.)
When it is not
being used for a long period, check the finder periodically to see that it operates
properly.
Before leaving
for a holiday, make a few trial exposures and allow at least two or three weeks'
time for film processing and making any needed repairs or adjustment.
ACCESSORIES for Finder
In combination with the EE Aperture-Control Attachment DS-1, the F2S Photomic Finder provides the Nikon F2 camera with a shutter priority automatic exposure control in which the shutter-speed setting has priority over the aperture setting.
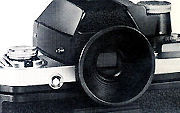 |
The soft rubber finder eyecup screws directly onto the finder eyepiece to Prevent extraneous light from entering the viewfinder. When using an eyepiece correction lens with a finder eyecup, it is recommended to use the Nikkormat type eyecup. First, fit the lens into the eyecup in advance. Then screw the assembly onto the finder eyepiece. |
Eyepiece Correction Lenses
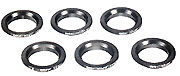 |
The nine eyepiece correction lenses are designed to permit nearsighted and farsighted users to view and focus without their glasses. Available in -2, -3, -4, -5, 0, +0.5, +1, +2 and +3 diopters, each representing the combined dioptre of the lens and the finder. Simply screw into the finder eyepiece. |
Specifications:
Light measuring method: TTL center-weighted, full aperture measurement.
Exposure indication: Two light-emitting diodes inside viewfinder and in window
atop prism housing.
Film-speed range: ASA 12-6400.
Metering range: EV -2-17 at ASA 100
(8 sec. at f/1 .4 to 1/2000 sec. at f/8.0 with 50mm f/1.4 lens).
Aperture coupling range: f/1.2-f/32.
Shutter-speed coupling range: 1-1/2000 sec., plus B, on direct coupling; 10
to 2 sec. with manual override.
Maximum aperture setting range: f/1.2 - f/5.6.
Meter switch: Camera film-advance lever switches meter on and off.
Battery check: Provided.
Ready-light contact: Provided
Batteries: Two 1.5V silver-oxide batteries.
Weight: 270g
| Previous | 3 / 3
| Back |
Main Index Page - Interchangeable Viewfinders
System
Accessories:
Motor
Drives
/ Prisms / Screens / Macro / Film
Backs
/ Flash
Other Accessories:
DS-1 / DS-2 / DS-12 / eyepiece / DH-1 / cases / Cable releases / Miscellaneous
| History
& Background
| Semi-FAQ | Various Features and Functions - 6 Parts |
| Message Board | for
your favourite Nikon
F2 Series SLR model(s)
| Message Board | for your Nikon Optics in a shared environment
| Message Board | Specifically for Dispose or Looking for Nikon/Nikkor Photographic
Equipment
| Back | to Main Index Page of Nikon F2 Series SLR models
| Back |
Main Index Page of Pictorial History of Nikon SLRs
 |
The Eyes of Nikon:- |
Fisheye-Nikkor Lenses - Circular | Full Frame | Ultrawides Lenses - 13mm15mm18mm20mm | Wideangle Lenses - 24mm28mm35mm |
Standard Lenses - 45mm 50mm 58mm | Telephoto Lenses - 85mm105mm135mm180mm & 200mm |
Super-Telephoto Lenses - 300mm 400mm 500mm 600mm 800mm 1200mm |
Special Application lenses:
Micro-Nikkor Lenses - 50mm~55mm -60mm 85mm -105mm 200mm Micro-Zoom 70-180mm
Perspective Control (PC) - 28mm 35mm PC-Micro 85mm
Dedicated Lenses for Nikon F3AF: AF 80mm f/2.8 | AF 200mm f/3.5 EDIF
Depth of Field Control (DC): 105mm 135mm
Medical Nikkor: 120mm 200mm
Reflex-Nikkor Lenses - 500mm 1000mm 2000mm
Others: Noct Nikkor | OP-Nikkor | UV Nikkor 55mm 105mm | Focusing Units | Bellows-Nikkor 105mm 135mm
Nikon Series E Lenses: 28mm35mm50mm100mm135mm | E-Series Zoom lenses: 36~72mm75~150mm70~210mm
MF Zoom-Nikkor Lenses: 25~50mm | 28~45mm | 28~50mm | 28~85mm | 35~70mm | 36~72mm E | 35~85mm | 35~105mm | 35~135mm |
35~200mm | 43~86mm | 50~135mm | 50~300mm | 70~210mm E | 75~150mm E | 80~200mm | 85~250mm |
100~300mm | 180~600mm | 200~400mm | 200~600mm | 360~1200mm | 1200~1700mm
Tele-Converters: TC-1 | TC-2 | TC-200 | TC-201 | TC-300 | TC-301 | TC-14 | TC-14A | TC-14B | TC-14C | TC-14E | TC-16 | TC-16A | TC-20E
![]()
Nikon F
| Nikon F2 |
Nikon
F3
| Nikon F4 |
Nikon
F5
| Nikon F6 |
Nikkormat / Nikomat |
Nikon FM
| Nikon FE/ FA | Nikon EM/FG/FG20 | Nikon Digital SLRs | Nikon - Other models
MIR Supports for Photographic Community: Various Message Boards/Community
Forums
Nikon
F-series|
Nikon
F2-series|
Nikon
F3-series|
Nikon F4-series| Nikon
F5-series|Nikkormat/Nikomat-series
Nikon FM-series|Nikon
FE-series|Nikon
FA|Nikon
Digital
SLR
series|Various
Nikon
Models|Nikkor
Optic
-shared
Others:- Free Trade Zone - Photography| Free Trade Zone - Business Community |Free To Zouk - Photographic Community
Apple's Mac Public Community Message Board | Windows based PC &
Apple/Mac
Public Community Trade Exchange Centre
Recommended links to understand
more technical details related to the Nikkor F-mount and production Serial Number:
http://rick_oleson.tripod.com/index-153.html by: my friend, Rick Oleson
http://www.zi.ku.dk/personal/lhhansen/photo/fmount.htm by: Hansen, Lars Holst
http://www.mir.com.my/rb/photography/hardwares/nikonfmount/lens2.htm
http://www.photosynthesis.co.nz/nikon/serialno.html
About this photographic site.
HOME - Photography in Malaysia |
Copyright © 2000. leofoo ®. MIR Web Development Team.
In
memory of my friend Com.
Augusto Staut,
Brazil, 1971-2000.
Credit: Chuck Hester, US for his patience, encouragement
and help to setup the various content in this site; Robert Johnson for some of his original
images on the F2H-MD appeared in this site; my ex-staff, KiaSu for his superb
3-D logo appeared in this Nikon F2 site; Marc Vorgers from Holland who
generously provide me with some of his images of F2AS; MCLau®, who has so much time with me to
re-edit the content in this site and not to mention buying a Nikon Coolpix 990 just
for this site. Keat Photo,
Kuala Lumpur for providing
their Nikon F2A to take some images for this site; again, Mr Edward Ngoh the
great camera collector who provides us his collection of F2AS with MD-2; hawkeye.photographic.com
for their images on the Speed Magny film backs; Sean Cranor for his image
on Nikon F2 25th Anniversary Model; Ted Wengelaar®, Holland for his continuous
flow of input on some of the early Nikon bodies; CYLeow ® , photo editor of the Star
newspaper, Malaysia for some of his images used in this site. Ms Rissa Chan, Sales manager from
Shriro Malaysia who has helped to provide some of the very useful input. HiuraShinsaku®,
Nikomat ML, Japan for some of his images on various F2 models; my staff, Wati, Maisa, Mai and my nephew, EEWyn®, who volunteered and helping me
did so many of the film scanning works. Contributing photographers or resellers:
Jen Siow, Foo KokKin, Arthur Teng, Mark Fallander, John
Ishii, Ed Hassel, YoonKi Kim, Jean-Louis, M.Dugentas (Dell Corner.com.), Mr "Arsenall" and a few images mailed
in from surfers with no appropriate reference to their origin. Dedicated to KU Yeo, just to express our mutual regrets over the outcome of
a recent corporate event. Made with a PowerMac, broadcast with a Redhat Linux powered server.
![]()
![]()