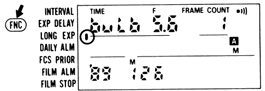
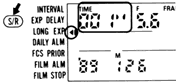
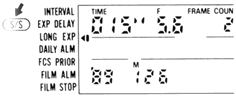
LONG TIME EXPOSURE FUNCTION
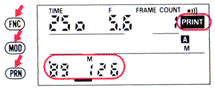
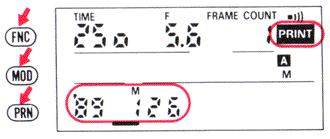
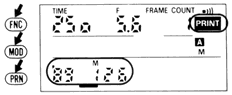
To imprint data during Long Time Exposure operation: Select desired display using FNC and MOD buttons, !hen push PRN button so Data Imprint set indicator appears. Releasing the shutter while PRINT is showing causes data selected in Between-Frames and/or in Frame Data Imprint function to be imprinted, even when the function indicator does not appear. Data is imprinted as soon as Long Time Exposure operation starts. in other words, the date and/or time of the start of the Long Time Exposure Operation will be imprinted, not the end.
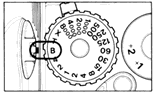
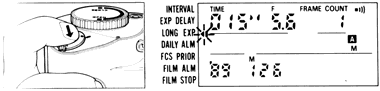
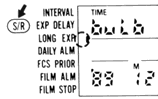
1. Set shutter speed on the camera to 'B' (manual exposure mode).
 |
 |
 |
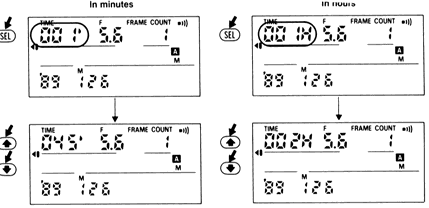
2. Push FNC button so Long Time Exposure function indicator appears. 3.Push SIR button. Long Time Exposure set indicator and numerical indicator for exposure duration appear in LCD.
4. Set exposure duration. Using the SEL button, select desired time unit , second, minute or hour), Then, using adjust buttons, set desired number. Exposures can be performed for up to 999 hours, 999 i iutes or 999 seconds. Note that exposure duration depends on power source (Nikon High-Speed Battery pack MB-21 with alkaline -manganese batteries, approx. 6 hours; with NiCd batteries, approx. 3 hours; with Nikon External Power Regulator MB-22, approx. 40 hours.)
Data to be imprinted can be changed or set after otting Long Time Exposure. Push FNC button to Idect Data Imprint function, then change and/or set the data as desired. Exposure duration cannot be imprinted, even when displayed in the LCD.
5. Start Long Time Exposure operation. Depress shutter release button on the
MF-24 or camera body to start Long Time exposure, The Long Time Exposure set indicator
blinks for as long as you are in Long Time exposure operation.
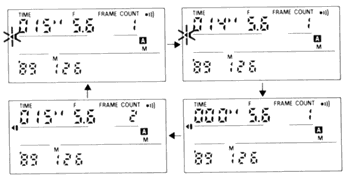
During operation, exposure duration display counts down until it reaches 0. When
shutter closes to complete the Long Time Exposure, the exposure duration display
reverts to your previously set time and Long Time Exposure set indicator stops blinking.
6. Push S/R button to cancel Long Time Exposure set. Long Time Exposure set
indicator turns off. To stop exposure before preset time: Push S/S button.
Shutter closes and Long Time Exposure set indicator stops blinking. Exposure duration
display reverts to your previously set time. If you start a Long Time Exposure by
depressing the shutter release button but hold the button down longer than the duration
you have set, the shutter will remain open as long as you hold the button, regardless
of setting.
 |
 |
 |
* Shifting camera shutter speed from 'bulb' to another setting cancels the Long Time Exposure set.
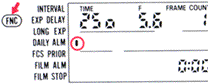
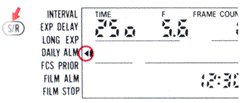
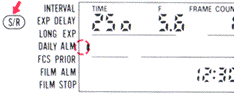
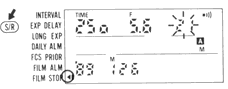
DAILY ALARM The Daily Alarm function lets you set the alarm to sound every day at a given time.
To imprint data during Daily Alarm operation: Select display using FNC and MOD buttons, then push PRN button so Data Imprint set indicator appears. Releasing the shutter while PRINT is showing causes data selected in Between-Frames and/or In-Frame Data Imprint function to be imprinted, even when the function indicator does not appear.
 |
 |
 |
 |
1. Push FNC button so LCID shows Daily Alarm indicator.
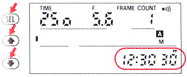
2. Set the time for alarm. For practice, set time to 12 30 - 30. Using SEL and adjust buttons, set display to the desired time using same method described for setting date and time.
 |
3. Confirm alarm indicator. If it does not appear in the LCD, push the alarm button. |
To confirm imprinted data. push MOD button to change display. To change or cancel imprinted data, push the FNC button to select Data Imprint function.
5. Alarm will sound at the time set. And continue for approx. 20 seconds. To stop the alarm, push Alarm button
 |
 |
6. Push S/R button to cancel Daily Alarm set. Daily Alarm set indicator disappears. |
*The alarm time cannot be imprinted, even when displayed in the LCD.
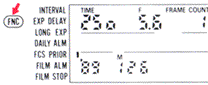
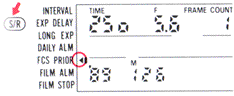
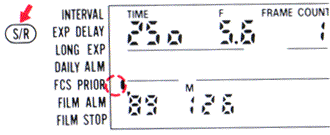
FREEZE FOCUS (FOCUS PRIORITY) FUNCTION The MF-24's Freeze Focus function automatically releases the shutter when the subject is in a preset focus position in manual focus mode.
To imprint data during Freeze Focus operation: Select desired display using FNC and MOD buttons, then push PRN button so Data Imprint set indicator appears. Releasing the shutter while PRINT is showing causes data selected in Between-Frames and/or In-Frame Data Imprint function to be imprinted, even when the function indicator does not appear.
 |
 |
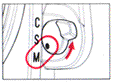 |
1. Push FNC button so Freeze Focus function indicator appears in LCD. 2. Set camera's focus mode selector to M. Use a lens that enables manual focus with the electronic rangefinder. If lens has an A-M switch, set to M. 3. Push S/R button to set Freeze Focus function. Freeze Focus set indicator appears. Data to be imprinted can be changed or set after setting Freeze Focus function. Push FNC button to
select Data Imprint function, then change and/or set data as desired. Freeze Focus set indicator will remain on. 4. Rotate focus ring manually to set focus position at desired distance. 5. Depress shutter release button. Shutter will be released when subject enters a preset focus position. With camera's film advance mode selector at S, shutter will be released each time you depress the shutter release button.
 |
 |
 |
* With camera's film advance mode selector at CH, CL or CS, shots are taken continuously as long as the shutter release button remains depressed. Freeze Focus shooting cannot be performed when the camera's film advance mode selector is set at the self-timer (
6. Remove finger from shutter release button to stop Freeze Focus shooting. *
Optional cable release and remote cords are available ~for remote control operation.
The maximum duration for a single shooting in remote operation depends on power source,
(For Nikon High Power Battery Pack MB-21 with alkaline-manganese batteries, approx.
7 hours, with NiCd batteries, approx. 4 hours.)
 |
 |
7. Push S/R button to cancel Freeze Focus set. Freeze Focus set indicator turns off. With shutter release button depressed, rotate focus
ring. When in-focus indicator appears, shutter will be released. Autofocus mode cannot be selected, even when using an AF Nikkor lens. It the focus mode selector is set to S or C, the Freeze Focus set indicator blinks twice and turns off, and the alarm sounds (it set).
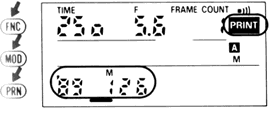
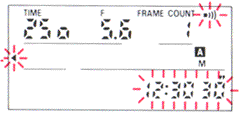
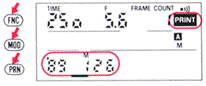
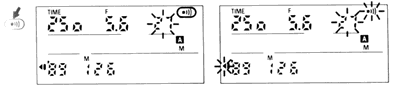
FILM ALARM With Film Alarm active,
when film reaches a preset frame number, the alarm will sound.
To imprint data when Film Alarm is set: Select desired display using FNC and MOD
buttons, then push PRN button so Data Imprint set indicator appears. Releasing the
shutter while PRINT is showing causes data selected in Between-Frames and/or In Frame
Data Imprint function to be imprinted, even when the function indicator does not
appear.
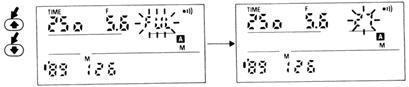
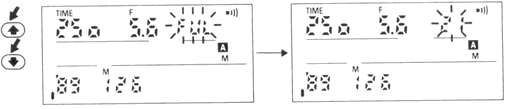
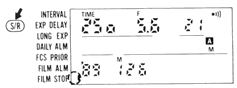
1. Push FNC button so LCD shows
Film Alarm indicator Frame count indicator disappears and 'FUL' or frame number blinks.
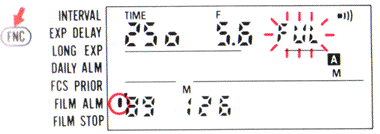 |
 |
2. Set the number of frames. Using adjust buttons, set display to desired number. Pushing MOD button changes display to FRAME COUNT.
 |
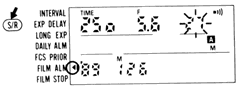 |
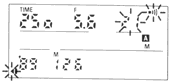
3. Push S/R button. Film Alarm set indicator appears. 4. Confirm alarm indicator. It it does not appear, push alarm button. Data to be imprinted can be changed or set after setting Film Alarm. Push FNC button to select Data Imprint function, then change and/or set data as desired. Film Alarm set indicator remains on. 5. Alarm sounds when frame count reaches specified preset number. Film Alarm set indicator, frame number and alarm indicator blink. Alarm continues for approx. 20 seconds. 6. Push S/R button to cancel Film Alarm set. Film Alarm set indicator disappears.
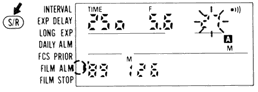
FILM STOP With Film Stop function active, when film reaches preset frame number, the shutter locks and the alarm sounds.
To imprint data while Film Stop is set: Select desired display using FNC and MOD
buttons, then push the PRN button so Data Imprint set indicator appears. Releasing
the shutter while PRINT is showing causes data selected in Between-Frames and/or
In Frame Data Imprint function to be imprinted, even when the function indicator
does not appear.
 |
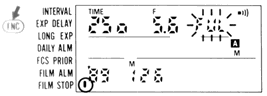 |
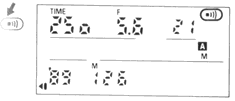
Push FNC button so LCD shows Film Stop indicator. Frame count indicator disappears and 'FUL' or frame number blinks. |
To stop the alarm, push Alarm button or S/R button.
You can release the shutter while alarm sounds.
2. Set the number of frames. Using adjust buttons, set display to desired number 3. Pushing MOD button changes display to FRAME COUNT. Push S/R button. Film Stop set indicator appears. 4. Confirm alarm indicator. It it does not appear, push alarm button.
Note: Data to be imprinted can be set after you set Film ,lop function. Push FNC button to select Data print function, then change and/or set data as desired. Film Stop set indicator remains on.
5. Alarm sounds and shutter locks when frame count reaches preset number. Film Stop set indicator, frame number and alarm indicator blink. Alarm continues to sound for approx. 20 seconds. * To stop alarm, push Alarm button or S/R button. *To unlock shutter, cancel Film Stop set.
Auto Exposure Bracketing
1. set the number of frames. Using adjust buttons, set display to desired
number. * Pushing MOD button changes display to FRAME COUNT.
3. Push S/R button. Film Stop set indicator appears.
4. Confirm alarm indicator. If it
does not appear, push alarm button. Data to be imprinted can be set after you
set Film ,lop function. Push FNC button to select Data imprint function, then change
and/or set data as desired. Film Stop set indicator remains on.
5. Alarm sounds and shutter locks when frame count reaches preset number.
Film Stop set indicator, frame number and alarm indicator blink. Alarm continues
to sound for approx. 20 seconds. * To stop alarm, push Alarm button or S/R button.
To unlock shutter, cancel Film Stop set.
6. Push S/R button to cancel Film Stop set. Film Stop set indicator disappears.
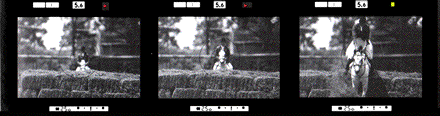
AUTO EXPOSURE BRACKETING When it is difficult to obtain a proper exposure
( i.e. when shooting a sunset), you can use MF-24's Auto Exposure Bracketing function
to shoot the same subject with up to 19 different exposures.

To select the number of frames to be shot, choose any odd number from 3 to 19: for
exposure compensation degree, choose any setting from 0.3 to 2 EV (0.3, 0.5, 0.7,
1.0, 1.3, 1.5, 1.7, or 2.0 EV). The center value for exposure compensation can also
be selected from 0 to ± 7-2/3 EV. Depending on the exposure compensation and
center value set, the number of frames available may be limited.
Be sure to set exposure compensation
so it meets the following conditions:
1. Number of frames at either + side or - side should not exceed 9.
2. (Absolute value of center value)+
![]()
It it does not meet both conditions, the number of frames will be automatically reset
to 3.
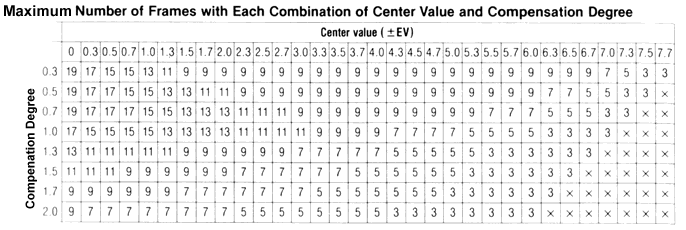
Note: 1. If Setting is impossible After setting center value, compensation degree
and number of frames according to the above chart- you try to shift the center value
or compensation degree and the earlier setting for number of frames exceeds the maximum
number possible for your combination, the number of frames will be automatically
reset to 3. 2. If you try to shift the center value to within the x zone, the number
of frames will be automatically reset to 3 and the compensation will be reset to
the maximum degree possible for your chosen center value.

To imprint data during Auto Exposure Bracketing operation: Select desired
display using FNC and MOD buttons, then push PRN button so Data Imprint set indicator
appears. Releasing the shutter while PRINT is showing causes data selected in Between-Frames
and/or In-Frame Data Imprint function to be imprinted, even when the function indicator
does not appear.
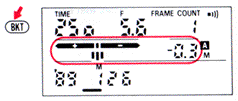
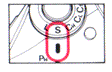
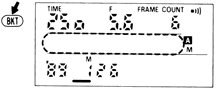
1. Push BKT button so Auto Exposure Bracketing displays appear In the LCD.
Exposure compensation mark appears in the camera' viewfinder. 2. Set center value,
compensation degree and number of frames. 3. Push SEL button so CENTER and
center value appear. Using adjust buttons, Select desired value. The value changes
as follows: 0 0 - 0.3 - 0.5 - 0.7- 1.0....... -7.5 -7.7-7.7 -7.5 ..... -0.7- -0.5-
-0.3- 0.0
 |
Push SEL button again so STEP and compensation degree appear. Using adjust buttons, select desired value. The value changes as follows: 0 3 - 0 5 - 0.7 - 1.0 ......... -2.0 - 0.3 |
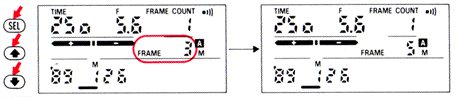
Push SEL button again so FRAME and frame number appear. Using adjust buttons, select
desired number.
 |
3. Push SEL button to complete Auto Exposure Bracketing setting. The Indicators showing number of frames, compensation and compensation value for first frame will appear. |
Once Auto Exposure Bracketing function is selected, the SEL and adjust buttons cannot be used to set imprinted data. To change data to be imprinted, push BKT button to cancel Auto Exposure Bracketing, then use SEL and adjust buttons. After adjusting, push BKT button again to activate Auto Exposure Bracketing function. (Previous setting will appear.)
By selecting the
Auto Exposure Bracketing function, you can imprint the exposure compensation value
of each frame between frames. Select Between Frames Data Imprint function and push
the MODE button so the LCD shows the exposure compensation value.
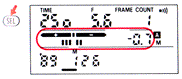
4. Depress shutter release button on the MF-24 or camera body to release shutter
and start Auto Exposure Bracketing operation. The operation progresses from underexposed
to overexposed. With each release of the shutter, the frame indicators disappear
one by one and the compensation value is displayed, When all shots are taken, display
will revert to previous setting.
With camera's film advance mode at CH, CL or CS and focus mode at manual or
continuous servo autofocus: Depressing the shutter release button triggers
as many shots as the number of frames set. When the set number of shots are taken,
remove finger from shutter release button to prepare for the next shooting. If you
remove your finger from the shutter release button before the set number of shots
are taken, the operation does not stop.
With camera's film advance mode at CH, CL or CS and focus mode at single-servo
autofocus: on an in-focus image is obtained for the first shot, depressing
the shutter release button and holding it in triggers as many shots as the number
of frames set. If you remove your finger from shutter release button tore the set
number of shots are taken, the operation stops. To take the remaining shots, depress
and holds the shutter release button again.

With camera's film advance selector at S: Camera takes as many shots
as set-one shot each time you depress the shutter release button.
5. Push BKT button
to cancel Auto Exposure Bracketing set.
Auto Bracketing display turns off. If Auto Exposure Bracketing is used with exposure
compensation on the F4/F4s and/or SB-24 Speedlight, any compensation value can be
added. *With camera's exposure mode at M for manual, exposures will not be compensated.
However, you will still be able to take as many shots as the number of frames set.
* When TTL auto flash photography in auto exposure mode, both camera's exposure and
flash output will be compensated; in manual exposure mode, only flash output will
be compensated.
In single-servo autofocus, shots will not be taken when the subject is out of focus.
Be sure to set the number of frames so it does not exceed the number of frames
remaining on the film in the MF-24. If film reaches end of roll during shooting,
push BKT button to stop operation. While pushing the camera's R1 lock button, pull
out the R film rewind lever, then push the MF-24's film take-up button to wind the
entire roll of film onto the take-up cassette. Opening the rear cover to change film
automatically cancels Auto Exposure Bracketing setting. After loading a new film
and making blank
| Previous | NEXT
| 5/7 Setup the Filmback and Operation Sequences
| Click Open a new window for MAIN REFERENCE MAP on the Multi-Control databack MF-24 |
| MF-22 Databack | MF-23 Multi-Control Function Databack | MF-24 250 Exposures Multi-Control Function Databack (overview) | NPC Polaroid Back | Relative: | MB-21 High Speed Power Pack | MB-22 External Power Regulator | MB-23 Multi-Power High Speed Power Pack |
Relative: Prisms for Nikon F Series | Finders Group for Nikon F2 Series | Viewfinders for Nikon F3 Series | Nikon F3AF's DX-1 AF finder
The Camera Body - Features | Reliability | Focusing | Metering | Exposure Control | Lense Compatibility | Interchangeable Prisms | Data Film Backs | Various Power Sources | Focusing Screens | Flash Photography | Other system accessories | Cases for Nikon F4 Series | Remote Control |
| Specification | Main Reference Map | Instruction Manual: PDF (4.5M) - External Link
| BACK | to Main Index Page of 250 exp. Multi-Control
databack MF-24
| BACK
| to Main Index Page Nikon F4 Series SLR camera
Models
| Message
Board
| for Nikon F4 Series SLR model(s)
| Message
Board
| for your Nikon
Optics in a shared environment
| Message
Board
| Specifically
for Dispose or Looking for Nikon/Nikkor
Photographic Equipment
| Nikon F | Nikon F2 | Nikon F3 | Nikon F4 | Nikon F5 | Nikon F6 | Nikkormat / Nikomat | Nikon FM | Nikon FE/ FA | Nikon EM/FG/FG20 | Nikon Digital SLRs | Nikon - Other models |
Nikon Auto Focus Nikkor lenses:- Main
Index Page
Nikon Manual
Focus
Nikkor lenses:- Fisheye-Nikkor Lenses - Circular | Full Frame |
Ultrawides Lenses - 13mm15mm18mm20mm | Wideangle Lenses - 24mm28mm35mm | Standard Lenses - 45mm 50mm 58mm | Telephoto
Lenses - 85mm105mm135mm180mm & 200mm | Super-Telephoto Lenses - 300mm 400mm 500mm 600mm 800mm 1200mm |
 Index Page |
Special
Application lenses: Micro-Nikkor Lenses - 50mm~55mm -60mm 85mm -105mm 200mm Micro-Zoom 70-180mm Perspective Control (PC) - 28mm 35mm PC-Micro 85mm Dedicated Lenses for Nikon F3AF: AF 80mm f/2.8 | AF 200mm f/3.5 EDIF Depth of Field Control (DC): 105mm 135mm Medical Nikkor: 120mm 200mm Reflex-Nikkor Lenses - 500mm 1000mm 2000mm Others: Noct Nikkor | OP-Nikkor | UV Nikkor 55mm 105mm | Focusing Units | Bellows-Nikkor 105mm 135mm Nikon Series E Lenses: 28mm35mm50mm100mm135mm | E-Series Zoom lenses: 36~72mm75~150mm70~210mm |
MF Zoom-Nikkor Lenses: 25~50mm | 28~45mm | 28~50mm | 28~85mm | 35~70mm | 36~72mm E | 35~85mm | 35~105mm | 35~135mm | 35~200mm | 43~86mm | 50~135mm | 50~300mm | 70~210mm E | 75~150mm E | 80~200mm | 85~250mm | 100~300mm | 180~600mm | 200~400mm | 200~600mm | 360~1200mm | 1200~1700mm
Tele-Converters: TC-1 | TC-2 | TC-200 | TC-201 | TC-300 | TC-301 | TC-14 | TC-14A | TC-14B | TC-14C | TC-14E | TC-16 | TC-16A | TC-20E
Recommended links to understand more technical details
related to the Nikkor F-mount and production Serial Number:
http://rick_oleson.tripod.com/index-153.html by: my
friend, Rick Oleson
http://www.zi.ku.dk/personal/lhhansen/photo/fmount.htm by: Hansen,
Lars Holst
http://www.mir.com.my/rb/photography/hardwares/nikonfmount/lens2.htm
http://www.photosynthesis.co.nz/nikon/serialno.html
HOME - Photography in Malaysia |
![]()
Credit: Chuck Hester, US for his patience, encouragement and help to setup the various content in this site; Robert Johnson for some of his original images on the F2H-MD appeared in this site; my ex-staff, KiaSu for his superb 3-D logo appeared in this Nikon F2 site; Marc Vorgers from Holland who generously provide me with some of his images of F2AS; MCLau®, who has so much time with me to re-edit the content in this site and not to mention buying a Nikon Coolpix 990 just for this site; Paul Armstrong (pkared@ameritech.net) for his explantion of the FF2 Slidemagic and Nikon F2 Pin Camera Keat Photo, Kuala Lumpur for providing their Nikon F2A to take some images for this site; Mr Edward Ngoh the great camera collector who provides us his collection of F2AS with MD-2; hawkeye.photographic.com for their images on the Speed Magny film backs; Sean Cranor for his image on Nikon F2 25th Anniversary Model; Ted Wengelaar®, Holland for his continuous flow of input on some of the early Nikon bodies; Genesis-Camera for granting permission to use an image of the SS-F2 camera; Mr Sover Wong, Australia for those great images of his rare F2 Gold;CYLeow ®, photo editor of the Star newspaper, Malaysia for some of his images used in this site. Ms Rissa Chan, Sales manager from Shriro Malaysia who has helped to provide some of the very useful input. HiuraShinsaku®, Nikomat ML, Japan for some of his images on various F2 models; my staff, Wati, Maisa, Mai and my nephew, EEWyn®, who volunteered and helping me did so many of the film scanning works; Hong-sien Kwee of Singapore for all the Nikon F2 Pin camera images appeared in this site; Luigi Crescenzi for many of his images on the Nikon F2 Titan; John for two of his images of the Nikon F2/T used in this site; Contributing photographers or resellers: Jen Siow, Foo KokKin, Arthur Teng, Mark Fallander, John Ishii, Ed Hassel, YoonKi Kim, Jean-Louis, M.Dugentas (Dell Corner.com.), Mr "Arsenall", Yang Zi Xiong and a few images mailed in from surfers with no appropriate reference to their origin. Note:certain content and images appeared in this site were either scanned from official marketing leaflets, brochures published by Nikon and/or contribution from surfers who claimed originality of their own work to publish in this site based on educational merits. The creator of this site will not be responsible for any discrepancies that may arise from such possible dispute except rectifying them after verification."Nikon", "Nikkormat", "Nippon Kokagu KK" & "Nikkor" are registered tradename of Nikon Corporation Inc., Japan. A site made with an Apple IMac.