SETTING UP POWER SOURCE Use
Nikon High-Speed Battery Pack MB-21, MB-23 or External Power Regulator MB-22. In
both cases, be sure to replace the MB-21G (grip with the MF-24's grip (MF-24G). For
instructions on detaching grip, see the F4/F4s instruction manual.
With MB-21 Install six AA-type alkaline -manganese or NiCd batteries-three
in the MF-21's battery holder (MS-21) and three in the MF-24G. Then set the battery
selector inside MF-24G to "LR6" for alkaline -manganese batteries, or to
"KR-AA" for NiCd batteries. For details, see the F4/F4s camera's instruction
manual. * The performance of dry cell batteries deteriorates at low temperatures.
When shooting at low temperatures. use NiCd batteries.
When using Nikon Multi-Power High
Speed Battery Pack MB-23
Attaching the MF-24 to the F4 camera with the MB-23 |
Note: With the MB-23, the grip MF-24G
(provided with the MF-24) is not used.
1. Remove the MB-23 from the F4 camera body.
2. Remove camera back and attach the MF-24 (see steps 2 to 6, "SETTING UP, 57
on pages 14 to 16 of the MF-24's instruction manual).
3. Reattach the MB-23 to camera body.
4. Plug the MF-24 power cord to the terminal on the MB-23.
To detach the MF-24, follow the procedure in reverse order: Disconnect the MF-24
from the MB-23 and remove the MB-23 from camera body. Then remove the MF-24 and reattach
camera back and the MB-23.
Exposure duration for Long Time Exposure When powered by the MB-23 exposure
duration for Long Time Exposure is approx. 6 hours with alkaline-manganese batteries
or approx. 9 hours with NiCd battery Unit MN-20
Battery life with the MB-23 Number of cassettes per fresh battery set or fully
charged NiCd battery units are*:
Type of battery |
At 20° C (68° F) |
At - 10° C (14° ) |
Alkaline-manganese |
approx. 9 |
approx. 1 |
NiCd battery unit MN-20 |
approx. 25 |
approx. 10 |
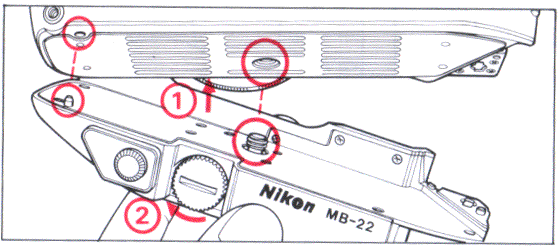
With MB-22
Set the battery selector inside MF-24G
to "KR-AA." Use Nikon AC/DC Converter MA-4 as a power supply. To connect
MB-22 and MAA use *the Nikon Connecting Cord MC-11 (optional). Note that the MA-4'
s release button cannot be used to release the shutter. *Connect MB-22 and MA-4 after
loading film cassette. *Other fixed-voltage power sources with an output voltage
of DC 9V to DC 20V and an output current of 3A or higher can be also used. (Refer
to MB-22's instruction manual) This instruction manual uses the MB-22 (with additive-type
frame counter) for demonstration purposes.
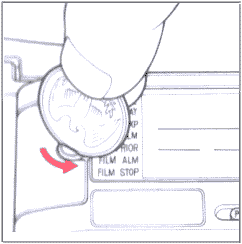
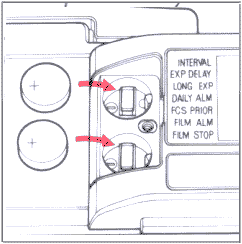
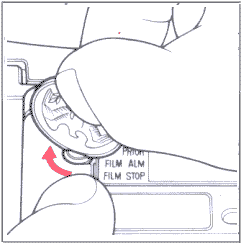
Note: For Multi- Control Section If possible, install
batteries for Mull Control section before attaching MF-24 to camera body.
 |
 |
 |
 |
1) Open battery chamber. |
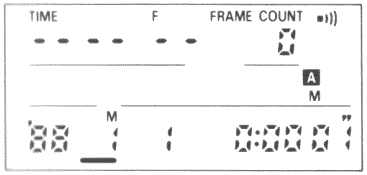
* When batteries for camera body are exhausted, the display may turn off immediately. Replace batteries. If LCID blinks, replace batteries for multi-control section. ** Changing batteries during shooting automatically causes the reading of frame counter to "0"
 |
 |
SETTING UP:
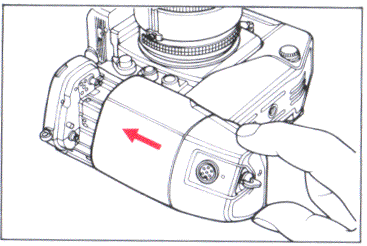
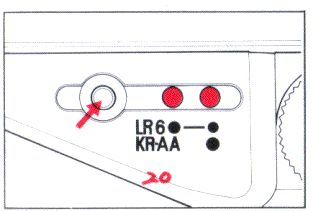
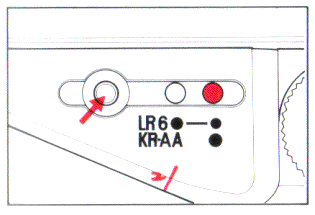
1) Attach the MB-22B or MB-21B to the camera body, then attach the MF-24G. For details, Also Check the F4/F4s instruction manual. With MB-21, check battery power Push the MB-21's battery check button. LED indicators will light up to indicate battery condition.
 |
 |
 |
| With alkaline -manganese batteries: Both LED indicators light up to indicate sufficient power. It only one LED lights up (or if neither LED lights up), replace batteries with a fresh set as soon as possible. |
With NiCd batteries: If one LED (at right side) lights up, battery power is sufficient. If neither LED lights up, replace batteries with a fresh set as soon as possible. |
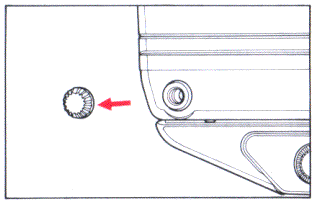
If you want to use a cable release, make sure to remove the cover from the release terminal on the back of the camera body before attaching MF-24 to camera body. |
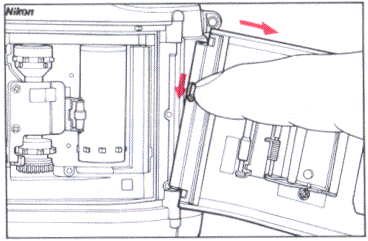 |
2. Remove camera back. Open the back of the camera, then depress the locking catch on the hinge to remove. *Take care not to touch the film pressure plate. |
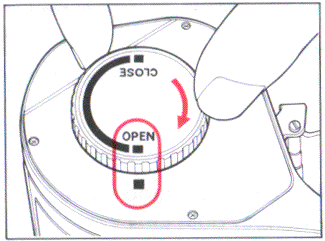 |
3-Set the open/close knob to "OPEN * " Turn the MF-24's supply side open/close knob to "OPEN, " so it clicks in place and the word "OPEN" aligns with the open/close knob index (orange square). |
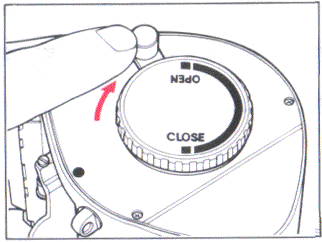 |
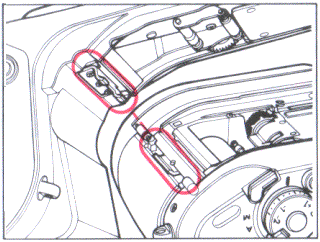
4. Release camera clamp. Turn the camera clamp lever clockwise to release the clamp. |
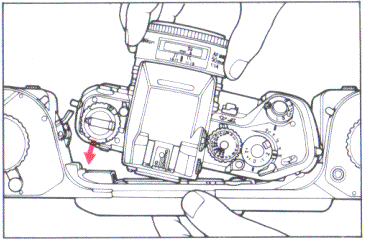
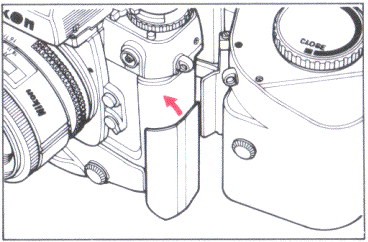
5. Attach MF-24 to camera body.
Taking care to keep both camera neck strap eyelet from getting caught between the
camera and MF-24, insert the camera holder hook into the groove on the back of the
camera body. Then, using this hook as a guide, gently ease the MF-24 into place.
e Do not touch the camera's shutter curtains.
 |
 |
 |
To prevent the MF-24's camera clamp from damaging your F4's camera body surface, insert the protection plate between the clamp and the camera body. (Two protection plates are provided, one of which is a spare.) |
 |
6. Lock camera clamp. While pushing the MF-24 against the back of the camera body, turn the camera clamp lever counterclockwise until it stops. Be sure to turn the camera clamp lever to the white index until it clicks. If the camera clamp lever cannot be turned to the white index, make sure the camera holder hook is correctly fit into the groove. |
 |
|
 |
FILM CASSETTES (OPTIONAL) The MF-24 uses two reloadable Nikon 250-Exp. Film cassette MZ-1's at a time-the cassette loaded with film is the supply spool, the empty cassette is the take-up spool. These cassettes are the same as those used with Nikon 250 Exposure Magazine Back MF-4 for Nikon F3-series cameras and with the 250 exp. Magazine MF-1 for Nikon F2 series cameras. (Any number of cassettes can be purchased.) Cassettes consist of an outer shell, inner shell and spool. |
 |
To open the cassette. hold with the "Nikon" name facing up and the cutout of the outer shell facing you. While depressing the release pin on top, turn the inner shell. When the outer shell's cutout aligns with the cutout of the inner shell. the inner shell slips free for easy spool removal. |
![]()
![]()
1. Cut the film. Trim- the end
of a length of bulk film to make a film leader about 3cm (1.2in.) long by 2cm (0.8in.)
wide at the end. *Roll the film back on itself to take the curl out.
2. Insert film into the spool. Holding the spool in your left hand and the
end of the film in your right, insert the leader into either of the two slits in
the spool with the emulsion side down. Do not fold the film after inserting the leader
into the slit. If you do so, the film end may damage the shutter curtains when winding.
3. Wind the film onto the spool. Wind the film onto the spool, taking care
not to touch the emulsion side with your finger. For fast, easy film loading, use
the Nikon Bulk Film Loader, an optional accessory.

 |
4. Replace the spool into the inner shell. When the film has been transferred to the spool, slip the spool into the inner Shell with the film end protruding. The film end should protrude toward you with the emulsion side facing down if you hold the inner shell in your right hand. |
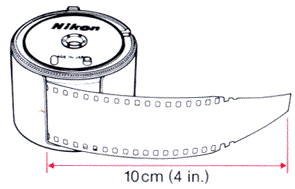 |
5. Slip the outer shell onto the inner shell. Slip the outer shell onto the inner shell so the two cutouts are aligned. Next, gently turn the inner shell clockwise until it stops with two clicks. The catch on the inner shell will now fall into the recess of the outer shell to close the cassette and seal it against light. The loaded supply cassette can now be taken out into the light. *The film end should protrude approximately 10cm (4 in.) |
 |
6. Wind film onto the other cassette. Remove the spool from the second cassette. Cut a leader at the film end protruding from the supply cassette and insert into one of the slits in the spool. With the emulsion side down, wind the film around the spool two or three times. Slip the spool into the inner shell so it aligns symmetrically with the supply cassette. Next, slip on the outer shell and turn the inner shell counterclockwise until the catch falls into position. |
 |
* To prevent the film from slipping out of the slit in the take-up spool. told the film back before winding around the spool. Do not use adhesive tape to attach the film to the spool The adhesive could damage the shutter curtains. |
* It is also possible to wind the film end onto the take-up cassette after the supply cassette has been loaded into the cassette compartment.
|
Previous | NEXT
| 2/7 Setup the Filmback and Operation Sequences
| Click Open a new window for MAIN REFERENCE MAP on the Multi-Control databack MF-24 |
| MF-22 Databack | MF-23 Multi-Control Function Databack | MF-24 250 Exposures Multi-Control Function Databack (overview) | NPC Polaroid Back | Relative: | MB-21 High Speed Power Pack | MB-22 External Power Regulator | MB-23 Multi-Power High Speed Power Pack |
Relative: Prisms for Nikon F Series | Finders Group for Nikon F2 Series | Viewfinders for Nikon F3 Series | Nikon F3AF's DX-1 AF finder
The Camera Body - Features | Reliability | Focusing | Metering | Exposure Control | Lense Compatibility | Interchangeable Prisms | Data Film Backs | Various Power Sources | Focusing Screens | Flash Photography | Other system accessories | Cases for Nikon F4 Series | Remote Control |
| Specification | Main Reference Map | Instruction Manual: PDF (4.5M) - External Link
| BACK | to Main Index Page of 250 exp. Multi-Control
databack MF-24
| BACK
| to Main Index Page Nikon F4 Series SLR camera
Models
| Message
Board
| for Nikon F4 Series SLR model(s)
| Message
Board
| for your Nikon
Optics in a shared environment
| Message
Board
| Specifically
for Dispose or Looking for Nikon/Nikkor
Photographic Equipment
| Nikon F | Nikon F2 | Nikon F3 | Nikon F4 | Nikon F5 | Nikon F6 | Nikkormat / Nikomat | Nikon FM | Nikon FE/ FA | Nikon EM/FG/FG20 | Nikon Digital SLRs | Nikon - Other models |
Nikon Auto Focus Nikkor lenses:- Main
Index Page
Nikon Manual
Focus
Nikkor lenses:- Fisheye-Nikkor Lenses - Circular | Full Frame |
Ultrawides Lenses - 13mm15mm18mm20mm | Wideangle Lenses - 24mm28mm35mm | Standard Lenses - 45mm 50mm 58mm | Telephoto
Lenses - 85mm105mm135mm180mm & 200mm | Super-Telephoto Lenses - 300mm 400mm 500mm 600mm 800mm 1200mm |
 Index Page |
Special
Application lenses: Micro-Nikkor Lenses - 50mm~55mm -60mm 85mm -105mm 200mm Micro-Zoom 70-180mm Perspective Control (PC) - 28mm 35mm PC-Micro 85mm Dedicated Lenses for Nikon F3AF: AF 80mm f/2.8 | AF 200mm f/3.5 EDIF Depth of Field Control (DC): 105mm 135mm Medical Nikkor: 120mm 200mm Reflex-Nikkor Lenses - 500mm 1000mm 2000mm Others: Noct Nikkor | OP-Nikkor | UV Nikkor 55mm 105mm | Focusing Units | Bellows-Nikkor 105mm 135mm Nikon Series E Lenses: 28mm35mm50mm100mm135mm | E-Series Zoom lenses: 36~72mm75~150mm70~210mm |
MF Zoom-Nikkor Lenses: 25~50mm | 28~45mm | 28~50mm | 28~85mm | 35~70mm | 36~72mm E | 35~85mm | 35~105mm | 35~135mm | 35~200mm | 43~86mm | 50~135mm | 50~300mm | 70~210mm E | 75~150mm E | 80~200mm | 85~250mm | 100~300mm | 180~600mm | 200~400mm | 200~600mm | 360~1200mm | 1200~1700mm
Tele-Converters: TC-1 | TC-2 | TC-200 | TC-201 | TC-300 | TC-301 | TC-14 | TC-14A | TC-14B | TC-14C | TC-14E | TC-16 | TC-16A | TC-20E
Recommended links to understand more technical details
related to the Nikkor F-mount and production Serial Number:
http://rick_oleson.tripod.com/index-153.html by: my
friend, Rick Oleson
http://www.zi.ku.dk/personal/lhhansen/photo/fmount.htm by: Hansen,
Lars Holst
http://www.mir.com.my/rb/photography/hardwares/nikonfmount/lens2.htm
http://www.photosynthesis.co.nz/nikon/serialno.html
HOME - Photography in Malaysia |
Credit: Chuck Hester, US for his patience, encouragement and help to setup the various content in this site; Robert Johnson for some of his original images on the F2H-MD appeared in this site; my ex-staff, KiaSu for his superb 3-D logo appeared in this Nikon F2 site; Marc Vorgers from Holland who generously provide me with some of his images of F2AS; MCLau®, who has so much time with me to re-edit the content in this site and not to mention buying a Nikon Coolpix 990 just for this site; Paul Armstrong (pkared@ameritech.net) for his explantion of the FF2 Slidemagic and Nikon F2 Pin Camera Keat Photo, Kuala Lumpur for providing their Nikon F2A to take some images for this site; Mr Edward Ngoh the great camera collector who provides us his collection of F2AS with MD-2; hawkeye.photographic.com for their images on the Speed Magny film backs; Sean Cranor for his image on Nikon F2 25th Anniversary Model; Ted Wengelaar®, Holland for his continuous flow of input on some of the early Nikon bodies; Genesis-Camera for granting permission to use an image of the SS-F2 camera; Mr Sover Wong, Australia for those great images of his rare F2 Gold;CYLeow ®, photo editor of the Star newspaper, Malaysia for some of his images used in this site. Ms Rissa Chan, Sales manager from Shriro Malaysia who has helped to provide some of the very useful input. HiuraShinsaku®, Nikomat ML, Japan for some of his images on various F2 models; my staff, Wati, Maisa, Mai and my nephew, EEWyn®, who volunteered and helping me did so many of the film scanning works; Hong-sien Kwee of Singapore for all the Nikon F2 Pin camera images appeared in this site; Luigi Crescenzi for many of his images on the Nikon F2 Titan; John for two of his images of the Nikon F2/T used in this site; Contributing photographers or resellers: Jen Siow, Foo KokKin, Arthur Teng, Mark Fallander, John Ishii, Ed Hassel, YoonKi Kim, Jean-Louis, M.Dugentas (Dell Corner.com.), Mr "Arsenall", Yang Zi Xiong and a few images mailed in from surfers with no appropriate reference to their origin. Note:certain content and images appeared in this site were either scanned from official marketing leaflets, brochures published by Nikon and/or contribution from surfers who claimed originality of their own work to publish in this site based on educational merits. The creator of this site will not be responsible for any discrepancies that may arise from such possible dispute except rectifying them after verification."Nikon", "Nikkormat", "Nippon Kokagu KK" & "Nikkor" are registered tradename of Nikon Corporation Inc., Japan. A site made with an Apple IMac.