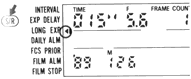
Exposure Delay/Freeze
Focus (Focus Priority) Combination
1. Set Exposure Delay and Freeze Focus as desired. Exposure Delay set indicator
and Freeze Focus set indicator appear. 2. Shifting the camera shutter speed to
'B' or 'T' cancels the Exposure Delay setting.
3. Cancel the settings. Use FNC button and S/R button. Be sure to cancel the
Interval Timer setting before canceling the Long Time Exposure setting.

To stop the operation before all exposures have been taken, push the S/S button
twice. Depressing shutter release button during intervals will trigger the Long
Time Exposure as set, if the subject is in focus. If subject does not enter the
preset focus position within approx. 8 seconds, camera will omit that shooting and
resume operation from the next shooting time.
Exposure Delay and Freeze Focus Combinations 1. Set Exposure Delay and
Freeze Focus as desired. Exposure Delay set indicator and Freeze Focus set indicator
appear. Shifting the camera shutter speed to 'B' or 'T' cancels the Exposure Delay
setting.
2. Push S/S button. Long Time Exposures can be performed in freeze focus function
for any number of frames set, when the delay time reaches 00:00:00. Exposure Delay
set indicator blinks throughout the operation; Long Time Exposure set indicator blinks
each time the shutter opens. After all exposures are complete, the operation stop
automatically and both Exposure Delay set indicator and Long Time Exposure set indicator
stop blinking.
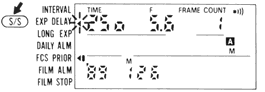
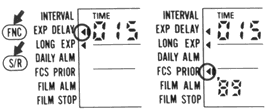
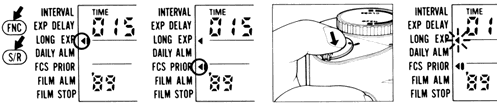
3. Cancel the settings. Use FNC button and SIR button. * Pushing the S/S button
while the Exposure Delay set indicator is blinking cancels the Exposure Delay shooting
that was set. If subject does not enter the preset focus position within approx.
8sec., shutter cannot be released.
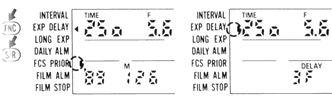
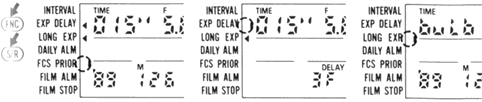
Exposure Delay/Long Time Exposure Combination
1. Set Long Time Exposure function as desired. Long Time Exposure set indicator will appear. Be sure to set Long Time Exposure prior to setting Exposure Delay. 2. Set Exposure Delay. Exposure Delay set indicator will appear. * Shifting camera shutter speed to a setting other than 'B' cancels the Long Time Exposure setting.
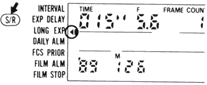
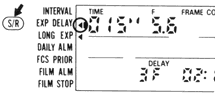
3. Push S/S button. Long Time Exposures are performed for as many Ii nes as
desired, when the delay time reaches 00.00:00. Exposure Delay set indicator blinks
throughout the operation; the Long Time Exposure set indicator blinks each time the
shutter opens. After all exposures are complete, the operation automatically stops
and both Exposure Delay set indicator and Long Time Exposure set indicator Stop blinking.
4. Cancel the settings. Cancel settings using the FNC and S/R buttons.
To stop the operation before all exposures have been taken, push the S/S button
twice. Depressing the shutter release button during the operation triggers a Long
Time Exposure at the duration set. If Long Time Exposure is canceled first, 'buLb'
appears in the LCD and Exposure Delay is canceled.
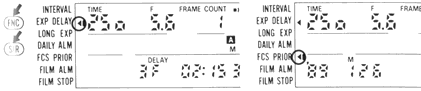
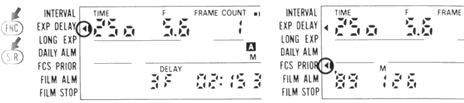
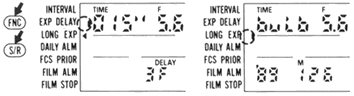
Exposure Delay/Freeze Focus (Focus Priority)/Long Time Exposure Combination
1. Set Long Time Exposure function as desired. Long Time Exposure set indicator
appears. Be sure to set Long Time Exposure prior to setting exposure Delay. 2.
Set Exposure Delay and Freeze Focus. Exposure Delay set indicator and Freeze
Focus set indicator appear. * Shifting camera shutter speed to a setting other than
'B' cancels the Long Time Exposure setting.
3. Push S/S button. Long Time Exposures can be performed in freeze focus function for any number of frames set, when the delay time reaches 00:00:00. Exposure Delay set indicator blinks throughout the operation; Long Time Exposure set indicator blinks each time the shutter opens. After all exposures are complete, the operation stop automatically and both Exposure Delay set indicator and Long Time Exposure set indicator stop blinking.
4. Cancel the settings. Cancel settings using the FINIC and S/R buttons. *
To stop the operation before all exposures have been taken, push the S/S button twice.
Depressing the shutter release button during the operation triggers a Long Time
Exposure at the duration set, if subject is in focus. If Long Time Exposure is
canceled first, 'buLb' appears in the LCD and Exposure Delay is canceled. If subject
does not enter the preset focus position within approx. 8sec., shutter cannot be
released.
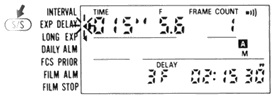
Long Time Exposure/Freeze Focus (Focus Priority) Combination
1. Set Long Time Exposure and Freeze Focus as desired. Long Time Exposure
set indicator and Freeze Focus set indicator appear. Shifting camera shutter speed
to a setting other than 'B' cancels the Long Time Exposure setting.
2. Start the operation. Start the operation by depressing the shutter release
button. The Long Time Exposure set will blinks throughout Long Time Exposure operation.
With shutter release button depressed, when subjects enters the preset focus position,
the shutter opens for a Long Time Exposure. Note that shutter will remains open for
as long as you hold the shutter release button down. When shooting is complete, the
Long Time Exposure set indicator stops blinking.
3. Cancel the settings. Cancel settings using the FNC and S/R buttons. Pushing
S/S button while Long Time Exposure set indicator is blinking cancels the Long Time
Exposure shooting set.
Auto Exposure Bracketing/Long Time Exposure Combination
In TTL auto flash photography,
flash output will be compensated. Without flash, exposures will not be compensated,
but you will still be able to take as many shots as the number of frames set.
LIQUID CRYSTAL DISPLAY (LCD)
1. Avoid using the MF-24 at high temperatures (60OC/ 140OF or above),- the entire
display turns black, making it hard to read display information. 2. Avoid storing
the MF-24 in an excessively hot place such as the trunk of a car parked in the sun:
it could shorten the LCD's life. 3. When the temperature drops below freezing, the
LCD's response time slows, and improper imprint may occur. When the temperature rises,
the display works normally. 4. The MF-24's LCD is of the highest quality. After seven to ten years of
normal use, however,
contrast may deteriorate and display information may begin to fade. Should this occur,
contact an authorized Nikon dealer or service facility to have the display replaced
at a nominal charge.
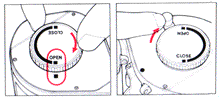
UNLOADING CASSETTES
When you reach the end of a roll of film, the film advance automatically stops and
the camera's alert lights up. Because the last exposed frame is at enter of the camera,
however. do not open the MF-24 rear cover immediately. Proceed as follows: With the
MB-22, at low temperature (below freezing point), the alert LED at the end of film
may not lights up.
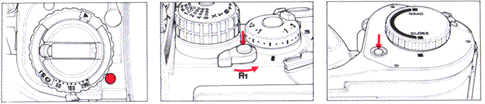
1. Set the film advance mode selector to L (Lock), then , while pushing the camera's R1 lock button, pull out the R1 film rewind lever.
2. Push the MF-24's film take-up button entire roll of film onto the take-up cassette.
Note: If you push the MF-24's film take-up button without setting the camera's R1
lever. film transport stops and the alert LED lights up. In this case, first set
the camera's film advance mode selector to L to turn
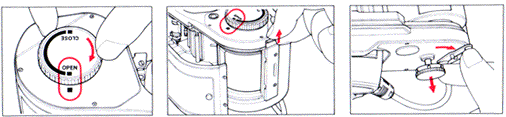
3. After the film is completely wound onto the take-up cassette, set the open/close
knobs on both supply and take-up sides to "OPEN," then open the rear cover.
Pull out the cassette spindle from both cassette chambers and press the cassette
eject lever to lift the cassette up far enough so you can grip it easily, then lift
out each cassette. (continue pulling cassette spindle until it comes out of the chamber.)
If you have inserted the film end too deeply into the spool, it may not come out
of the supply cassette. In this case, the camera detects the film tension and automatically
stops. The camera's alert LED will then lights up to warn you that the last exposed
It is possible to unload
both cassettes before you reach the end of the film. While pushing the camera' R1
lock button, pull out the R1 film rewind lever, the open the rear cover to take out
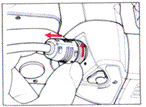
the cassettes. If you feel tension makes it too difficult to rotate the open/close
knob, pull out the cassette spindle knob to loosen the film roll. If it is still
too tightly wound, rotate the spindle knob inward. Be sure to unload the cassette
in a darkroom.
Detach the MF-24
First pull out the
plug connected ,! terminal on the grip MF-24G. If a cable release is used, remove
it before detaching the MF-24. Next, set the open/close knob on the supply side of
the MF-24 to "OPEN" and turn the camera clamp lever clockwise.
BATTERY LIFE WITH MB-21B
Battery life varies with the type of batteries used. The table below shows number
of cassettes per set of fresh batteries*:

Note:
With film advance mode at CH, shutter speed at 1/250 sec. and an AF-Nikkor 35-70mm
f/3.3~f/4.5 completing one autofocus cycle (from infinity to the closest focus distance
and back) for each exposure.
FIRING RATE
The firing rate in continuous shooting mode is 5 fps with CH (continuous high speed) or 2.5 fps with CL (continuous low speed)*
Note: The above figures
are for an AF Zoom-Nikkor 35-70mm f/3.3~f/4.5 lens, with a shutter speed of 1/250
sec., at 20° C (68 °
F). They may vary according to conditions. With the camera's film advance mode selector
at CS, the actual film advance speed
will correspond to Continuous Low (CL). *
Note: Regardless of the type of batteries used in the MB-21B, the firing rate does
not vary.
TIPS ON MF-24 CARE
Do not use cassettes which have been deformed or damaged through long use: doing
so could cause a malfunction such as varying frame intervals or overlapping frames.
The rear cover is individually adjusted to each MF-24- when you open, detach or
replace the cover, be sure to handle with care.
After loading cassettes, be sure to take up the film slack to prevent overlapping
frames or inadequate film advance.
At low temperatures, film perforations might tear due to fast winding speed. making
it impossible to advance the film. Do not expose film (cassettes) to low temperatures
for long periods. Load cassettes in the MF-24 immediately before shooting.
Below freezing point. for Single Servo Autofocus operation, set the film advance
mode to S (single-frame shooting) or CL (continuous low speed). For continuous Servo
Autofocus operation, continuous shooting is not recommended.
Do not subject the MF-24 to shock or apply any sort of pressure to the LCD panel.
Do not use cleaning fluids to clean the MF-24.
Use the MF-24 at a temperature between - 10°C (14°F)
and +40°C (104°F).
When the MF-24 is not attached to a camera body, do not put it down (on a desk.
etc.) with the front side facing up.
ABOUT BATTERIES
For MB-21- Do not use any battery other than AA-type alkaline- manganese (LR6) or
NiCd (KR-AA) batteries.
* When not using the camera for a long period, remove the batteries. * Battery power
falls off in extremely low temperatures; when shooting in such an environment, make
sure the batteries you use are fresh, and wrap the camera body in something warm.
For better performance in low temperatures, use NiCd batteries. * When replacing
batteries, be sure to replace all batteries at the same time. Always use fresh batteries
of the same brand.
Do not throw used batteries into a fire.
If the battery chamber is contaminated by battery leakage, take the camera and
MF-24 to an authorized Nikon dealer. For Multi-Control Section If batteries become
weak, the Data Imprint function indicator (PRINT) blinks each time the shutter is
released. In this case, you can imprint data but imprinted data may appear too light.
If the MF-24's LCD begins to blink*, the batteries must be replaced with a fresh
set. After replacing batteries, reset data, With the LCD blinking. the MF-24 may
not function properly. If you want to continue shooting but do not have new batteries,
remove the battery from the MF-24 and shoot without MF-24 functions. *At tempe~atures
of - 100C (MoF) or colder, the LCD ma blink, even with new batteries. due to insufficient
battery strength. When the temperature rises, batteries will return to normal capacity.
* When using the MF-24's multi-control function are not using it for a long period,
be sure to check the LCD. If it resets to the original display (as shown on page
11), this indicates the batteries for the multi-control function are exhausted. Replace
with new ones.
Do not install batteries in strong sunlight or bright illumination.
Do not dispose of batteries by burning. and do not disassemble batteries. Keep
batteries away from infants and small children if a battery is accidentally swallowed,
call the doctor immediately, the material inside batteries can cause Serious injury.
SPECIFICATIONS
Usable camera: Nikon F4/F4s - with bottom portion (MB-22B) of Nikon External
Power Regulator MB-22 or bottom portion (MB-21B) of Nikon High-Speed Battery Pack
MB-21
Film Cassettes: Two Nikon MZ-1 Film Cassettes
Usable film speed: ISO 25 - ISO 3200
Imprint exposure Four steps; automatic adjustment according to manual film
speed setting on the camera body; manual adjustment also available
Maximum No. of frames: 250 frames, for single-frame and continuous shooting
Firing Rate: 5.0 fps with CH
(continuous high
speed) or 2.5 fps with CL (continuous low speed)* The
above figures are for an AF Zoom-Nikkor 35-70mm f/3.3~f/4.5 lens. with a shutter
speed of 1/250sec.. at 20°C (68°F).
They may vary according to conditions.
Automatic film take-up stop: Film advance stops automatically when film end
comes out of supply cassette spool; if film end fails to come out of spool, camera
automatically detects tension and stops automatically - in both cases, the camera's
alert LED lights up
Battery check: By pushing battery check button (only for MB-21) on the MB-21:
with alkaline-manganese batteries, two lit LED's indicate sufficient battery power,
one or no lighting LED warns batteries should be replaced with fresh set; with NiCd
batteries, one lit LED (right side) indicates sufficient battery power-, no lit LED
warns batteries should be replaced with fresh ones
Power sources: For the MB-21, six AA-type alkaline manganese (LR6) or NiCd
(KR-AA) batteries- for the MB-22, Nikon AC/DC Converter MA-4 or other fixed-voltage
power supply with output voltage of DC 9V to DC 20V and output current of 3A or higher
Remote control: Possible via Nikon Remote Cord MC-12/MC-12A, Nikon Radio Control
Set MW-2, etc.
Rear cover lock mechanism: On the take-up side open/close knob: with the open/close
knob set at CLOSE, the rear cover is locked and cannot be opened.
Tripod sockets: Two sockets provided on the front the MF-24
Dimensions: 329.5mm (W) x 98.5mm (H) x 87mrn (D)
Weight: Approx. 1,315g
Multi-Control
Section
Data imprint type: 7-segment. 8-digit LED (between frames), 7-segment. 6-digit
LED (in frame)
Imprinted data: Between frames: Year/Month/Day. Day/ Hour/ M inute/(second).
Fixed Number, Frame Count (additive or subtractive frame counter, as selected). Shutter
Speed/Aperture. Exposure Compensation Value In frame.- Year/Month/Day, Month/Day/Year,
Day/ Hour/ Minute. Hour/Minute/Second, Frame Count (additive or subtractive frame
counter. as selected). Sequence Number, Fixed Number
Imprint area: Between frames: 0.65mm (height) x 9.4mm (width) In frame: 0.7mm
(height) x 4.0mm (width)
Data imprint option: By pushing PRN button
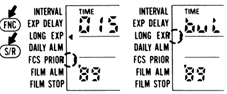
Interval Timer function: Intervals can be set for up to 99 hours 59 minutes and 59
seconds: up to 99999 shots can be taken between intervals, up to 99999 times.
Long Time Exposure Function: Exposures duration available from 1 to
999 seconds, 1 to 999 function minutes or 1 to 999 hours, with camera's shutter speed
set at 'B' (may depend on life of batteries if MB-21 is used)
Freeze Focus (Focus Priority) : Controls shutter release with
focus signals from camera (with function camera's focus mode set at M)
Auto Exposure Bracketing function: Up to 19 frames can be taken of the same
subject using a variety of exposure (increments of 1/3 to 2 EV between frames. with
a maximum compensation range of ±8 EV)
Exposure Delay function: Remaining time before exposure can be set for up
to 99 hours 59 minutes 59 seconds. takes up to 99999 shots
Daily Alarm function: Alarm can be Set to Sound at a given time every day (hour/minute/second)
Film Alarm function: Alarm sounds when film reaches a preset number of frames
Film Stop function: Locks shutter and sounds alarm when film reaches a preset
number of frames
Speedlight charge control: For Interval Timer or Exposure Delay operation.
turn on Speedlight (with standby switch) 30 seconds before releasing shutter
Data imprint signal: Transferred by camera body contacts
Power source: Two 1.55V silver-oxide (SR-44 type)
Batteries Life: Approx. 10 months * at 20°C (68°
F) * May vary depending on extent of data imprint use, him speed and functions
Timing accuracy: Within + 30 seconds a month (20°C/68°F)
Temperature: - 10°C (14'F)- + 40°C
(104°F) for usage. - 20°C WF) - + 55°C
(131°F) for storage
Note: design are subject to change without notice.
TROUBLE SHOOTING:
If Film Advance Stops during Shooting:
(Normally,, alert LED lights up when you reach the end of a roll) If the film advance
stops before you reach the end of a roll or preset frame number, check the camera's
alert LED and follow the procedures below: When alert LED does not light up - Battery
power is insufficient. Detach the MF-24 in a dark room, and replace batteries. Do
not pull out the R1 film rewind lever, otherwise a few frames will automatically
advance by pressing shutter release button after replacing batteries.
If you pull out R1 film rewind lever:
1. Pull out the plug from the terminal on the bottom portion.
2. Press the camera's shutter release button to release R1 film rewind lever.
3. Set the camera's film advance mode selector to L (lock).
4. And set the film advance mode selector to the desired place again.
When alert LED lights up (LED stays on approx. 16 sec.) Rotation of cassette
spindle knobs is disturbed or film is crammed inside. Set the camera's film advance
mode selector to L (lock). Then, set it to S and press the shutter release button.
If it works normally, continue shooting with the film advance mode selector set as
desired. If it does not work, film may be crammed inside. In this case, open the
rear cover in a dark room and reload the film cassette and make blank-exposures.
Opening the rear cover resets the film counter to "0" in additive-type
and to "FUL" in subtractive-type.
For Multi-Control Section
When batteries start to weaken, the data imprint set indicator (PRINT) will turn
off each time the shutter is released to warn that imprinted data may be too light
to read. Other functions will continue to operate correctly. When batteries are almost
exhausted, all indicators on the LCD panel start blinking. Replace batteries with
afresh set (this resets counters to 0) and reset data. If you don't have fresh batteries,
remove the old batteries anyway; leaving them in could result in malfunctions.
If counters or modes are reset when you turn on the MF-24 again, batteries are
exhausted. Replace with a fresh set.
At temperatures of -10°C (14°F) or colder, the LCD may blink, even with
new batteries, due to insufficient battery strength. In this case, remove batteries
and resume shooting. When the temperature rises, batteries will return to normal
capacity.
Do not install the batteries in strong sunlight or bright illumination.
Do not dispose of batteries by burning, and do not disassemble batteries. Keep
batteries away from infants and small children. If a battery is accidentally swallowed,
call a doctor immediately; the material inside batteries can cause serious injury.
The film list for imprint exposure level on the content in this site may include
films that are not available as bulk film. For details, consult your photo supplies
dealer. To imprint data in following cases, consult one of the Nikon service facilities
listed on your "Nikon Worldwide Service Warranty."
With the camera's film advance mode selector set at CH.
With the camera's film advance mode selector set at S or CH, when you want to take
two or more shots for one shooting in Interval Timer function, two or more shots
in Exposure Delay function or use a combination of Interval Timer and Auto Exposure
Bracketing functions.
| Previous | BACK
| 7/7 to Main Index Page of MF-24
| BACK |
to Main Index Page Nikon F4 Series Models
| Click Open a new window for MAIN REFERENCE MAP on the Multi-Control databack MF-24 | Relative: | MB-21 High Speed Power Pack | MB-22 External Power Regulator | MB-23 Multi-Power High Speed Power pack || Relative: | MB-21 High Speed Power Pack | MB-22 External Power Regulator | MB-23 Multi-Power High Speed Power Pack |
| MF-22 Databack | MF-23 Multi-Control Function Databack | MF-24 250 Exposures Multi-Control Function Databack (overview) | NPC Polaroid Back
Relative: Prisms for Nikon F Series | Finders Group for Nikon F2 Series | Viewfinders for Nikon F3 Series | Nikon F3AF's DX-1 AF finder
The Camera Body - Features | Reliability | Focusing | Metering | Exposure Control | Lense Compatibility | Interchangeable Prisms | Data Film Backs | Various Power Sources | Focusing Screens | Flash Photography | Other system accessories | Cases for Nikon F4 Series | Remote Control |
| Specification | Main Reference Map | Instruction Manual: PDF (4.5M) - External Link
| BACK | to Main Index Page Nikon F4 Series SLR camera Models
| Message
Board
| for Nikon F4 Series SLR model(s)
| Message
Board
| for your Nikon
Optics in a shared environment
| Message
Board
| Specifically
for Dispose or Looking for Nikon/Nikkor
Photographic Equipment
| Nikon F | Nikon F2 | Nikon F3 | Nikon F4 | Nikon F5 | Nikon F6 | Nikkormat / Nikomat | Nikon FM | Nikon FE/ FA | Nikon EM/FG/FG20 | Nikon Digital SLRs | Nikon - Other models |
Nikon Auto Focus Nikkor lenses:- Main
Index Page
Nikon Manual
Focus
Nikkor lenses:- Fisheye-Nikkor Lenses - Circular | Full Frame |
Ultrawides Lenses - 13mm15mm18mm20mm | Wideangle Lenses - 24mm28mm35mm | Standard Lenses - 45mm 50mm 58mm | Telephoto
Lenses - 85mm105mm135mm180mm & 200mm | Super-Telephoto Lenses - 300mm 400mm 500mm 600mm 800mm 1200mm |
 Index Page |
Special
Application lenses: Micro-Nikkor Lenses - 50mm~55mm -60mm 85mm -105mm 200mm Micro-Zoom 70-180mm Perspective Control (PC) - 28mm 35mm PC-Micro 85mm Dedicated Lenses for Nikon F3AF: AF 80mm f/2.8 | AF 200mm f/3.5 EDIF Depth of Field Control (DC): 105mm 135mm Medical Nikkor: 120mm 200mm Reflex-Nikkor Lenses - 500mm 1000mm 2000mm Others: Noct Nikkor | OP-Nikkor | UV Nikkor 55mm 105mm | Focusing Units | Bellows-Nikkor 105mm 135mm Nikon Series E Lenses: 28mm35mm50mm100mm135mm | E-Series Zoom lenses: 36~72mm75~150mm70~210mm |
MF Zoom-Nikkor Lenses: 25~50mm | 28~45mm | 28~50mm | 28~85mm | 35~70mm | 36~72mm E | 35~85mm | 35~105mm | 35~135mm | 35~200mm | 43~86mm | 50~135mm | 50~300mm | 70~210mm E | 75~150mm E | 80~200mm | 85~250mm | 100~300mm | 180~600mm | 200~400mm | 200~600mm | 360~1200mm | 1200~1700mm
Tele-Converters: TC-1 | TC-2 | TC-200 | TC-201 | TC-300 | TC-301 | TC-14 | TC-14A | TC-14B | TC-14C | TC-14E | TC-16 | TC-16A | TC-20E
Recommended links to understand more technical details
related to the Nikkor F-mount and production Serial Number:
http://rick_oleson.tripod.com/index-153.html by: my
friend, Rick Oleson
http://www.zi.ku.dk/personal/lhhansen/photo/fmount.htm by: Hansen,
Lars Holst
http://www.mir.com.my/rb/photography/hardwares/nikonfmount/lens2.htm
http://www.photosynthesis.co.nz/nikon/serialno.html
HOME - Photography in Malaysia |
![]()
Credit: Chuck Hester, US for his patience, encouragement and help to setup the various content in this site; Robert Johnson for some of his original images on the F2H-MD appeared in this site; my ex-staff, KiaSu for his superb 3-D logo appeared in this Nikon F2 site; Marc Vorgers from Holland who generously provide me with some of his images of F2AS; MCLau®, who has so much time with me to re-edit the content in this site and not to mention buying a Nikon Coolpix 990 just for this site; Paul Armstrong (pkared@ameritech.net) for his explantion of the FF2 Slidemagic and Nikon F2 Pin Camera Keat Photo, Kuala Lumpur for providing their Nikon F2A to take some images for this site; Mr Edward Ngoh the great camera collector who provides us his collection of F2AS with MD-2; hawkeye.photographic.com for their images on the Speed Magny film backs; Sean Cranor for his image on Nikon F2 25th Anniversary Model; Ted Wengelaar®, Holland for his continuous flow of input on some of the early Nikon bodies; Genesis-Camera for granting permission to use an image of the SS-F2 camera; Mr Sover Wong, Australia for those great images of his rare F2 Gold;CYLeow ®, photo editor of the Star newspaper, Malaysia for some of his images used in this site. Ms Rissa Chan, Sales manager from Shriro Malaysia who has helped to provide some of the very useful input. HiuraShinsaku®, Nikomat ML, Japan for some of his images on various F2 models; my staff, Wati, Maisa, Mai and my nephew, EEWyn®, who volunteered and helping me did so many of the film scanning works; Hong-sien Kwee of Singapore for all the Nikon F2 Pin camera images appeared in this site; Luigi Crescenzi for many of his images on the Nikon F2 Titan; John for two of his images of the Nikon F2/T used in this site; Contributing photographers or resellers: Jen Siow, Foo KokKin, Arthur Teng, Mark Fallander, John Ishii, Ed Hassel, YoonKi Kim, Jean-Louis, M.Dugentas (Dell Corner.com.), Mr "Arsenall", Yang Zi Xiong and a few images mailed in from surfers with no appropriate reference to their origin. Note:certain content and images appeared in this site were either scanned from official marketing leaflets, brochures published by Nikon and/or contribution from surfers who claimed originality of their own work to publish in this site based on educational merits. The creator of this site will not be responsible for any discrepancies that may arise from such possible dispute except rectifying them after verification."Nikon", "Nikkormat", "Nippon Kokagu KK" & "Nikkor" are registered tradename of Nikon Corporation Inc., Japan. A site made with an Apple IMac.