Loading film into
the OM-2 Camera
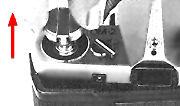 |
[1] Open the camera back. Pull the rewind knob up. A slight resistance may be felt before the camera back snaps partially open. * At the purchase of your OM-2, you may find a piece of paper on the film plane, Remove the paper before loading the camera. * Your camera uses standard 35mm cartridges of 12, 24 or 36 exposures, negative or slide film. When use specialize film like Infrared, refer to the film instruction, high level of precaution is necessary. |
|
Avoid direct sunlight when you load or unload the camera. |
 |
[2]. Load the camera. Insert a film cartridge into the film chamber and push the rewind knob back into its original position. It may be necessary to turn the rewind knob slightly before it will lock securely in place. |
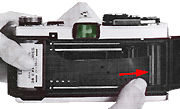 |
[3]. Attach the film end to the take-up spool. Draw out the film leader and insert it into one of the slots in the film take-up spool. Make sure that the film is evenly placed between the film guide pins. * The take-up spool has five slots in it. Make sure the film perforation has engaged on the spool properly before closing the camera back. |
Warning: When pulling the film across to the film take up spool on the right, always remember the shutter curtain is underneath the film, avoid at all means to touch the surface of the shutter curtain. |
WARNING: The use of a Motor Drive or Power Winder is always recommended to turn the power Switch to "OFF" before loading.
 |
[4]. Advance the film. |
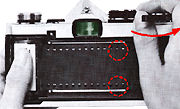
Advance the film using the film advance lever, Make sure that the film perforations engage on the sprockets on both sides. [5]. Close the camera back until it clicks into place. [6]. Tighten the film. After closing the back, fold out the rewind crank and turn it clockwise slowly until you feel a slight resistance. This will take up any slack in the film.
 |
[7]. Check the exposure counter. Advance the film and press the shutter release button. Continue advancing the film until "1" appears in the exposure counter window. Prior to the incorporation of AUTO DX coding during the mid-eighties, virtually all SLR will require you to handle loading film winding, and setting ASA/Film speed manually. There is no way to confirm whether the film has been loaded correctly inside the camera. However, you may use the opposite rotation of the rewind knob when you attempt to wind the film and the feel of the slight resistance to determine the process has been correctly set. |
* While advancing the film, the rewind knob rotates in a counterclockwise direction indicating that the film is advancing properly. |
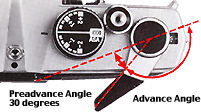 |
Operating the Film Advance Lever [1] Gently pull the film advance lever away from the camera body. [2] Advance the lever to the right as far as it will go. This can be accomplished in a single stroke or in multiple short strokes.* Avoid touching the rewind release lever while advancing the film to make sure the film advance mechanism operates smoothly and without interruption. |
* In the flow chart of such mechanism: In one full stroke, the film advance lever will (1) advances the film one full frame, (2) advances the exposure counter, (3) cocks the shutter, (4) sets the instant return mirror, (5) activates the automatic diaphragm mechanism, and; (6) activates the double advance and double exposure prevention mechanism.
Exposure/Frame Counter The exposure counter is designed to indicate the total number of frames exposed on the film. Each time the film is advanced by the film advance lever, the exposure counter automatically adds one frame to the total.
 |
The counter is indexed in even numbers up to 36 plus "S" (Start) and "E" (End). For easy reference, "S", "E", and numbers"12", "20", and "36" are indicated in gold. Whenever the camera back is opened, the exposure counter automatically returns to "S". |
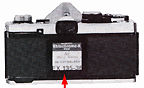 |
The Memo Holder |
A seldom used feature nowadays, but it was a handy feature during those days. A memo holder is provided on the camera back of the camera to provide a convenient reminder of the type of film being used. The holder is designed to accept the end flap from most 35mm. film packages, which can be inserted in the holder at the bottom as shown in the photo. |
Unloading film from the Camera When the entire roll of film has been exposed (indicated by the numbers "12", "20", or "36" on the exposure counter depending upon the film length), rewind the film.
 |
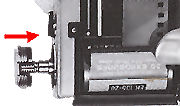
[1] Turn the rewind release lever counterclockwise until the red dot points towards the "OM-2" marking.[ 2] Fold out the rewind crank and wind it in the direction of the arrow. While rewinding, you will feel tension. When the tension stops and the crank turns freely, the film has been completely rewound back into the cartridge. |
 |
 |
[3] Open the camera back by pulling up on the rewind crank and remove the film cartridge. Keep camera and film out of direct sunlight while unloading. * The rewind release lever will automatically return to the original position with movement of the film advance lever when reloading with film, etc., * Do not force the film advance lever if the film has been fully exposed. If you feel any resistance in advancing the film, rewind the film to prevent tearing. |
Making
Multiple/Double Exposures As
compared with many other cameras, I don't regard the multiple exposure operation
in the OM cameras very convenient - except when you compared it with some professional
class cameras like Nikon F2 or Canon F-1 or even many automatic cameras available
during the late seventies, because generally the drawback is - it didn't provide
a dedicated multiple exposure lever (like the Nikon FM or Nikon FE of 1977/78) for more simplify operation. However,
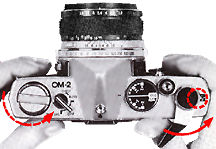
the good news is, for OM SLR owners, the film rewind button is unconventionally placed
in front of the camera body (In OM3 and OM4, the button is at the top), so at least
you don't have to flip the camera upside down to handle that task. Should you wish
to make more than one exposure on the same frame:
[1] After the first exposure, take up any slack
in the film by slowly turning the rewind knob in a clockwise direction until it stops. [2] Turn the rewind release counterclockwise until
the red dot points towards the "OM-2" marking. [3] Hold
both the rewind knob and rewind release lever to prevent them from turning and advance
the film advance lever. The shutter will then be cocked for the next exposure without
advancing the film.
[4] Press
the shutter release button with a slow, steady pressure. [5] The film counter will advance
with each exposure,
[6] After
completing the multiple exposures, put the lens cap on your lens, advance the film,
and shoot a blank frame to avoid overlapping.
* You
can make as many multiple exposures as you like by repeating the above procedure.
With each exposure on the same frame, the possibility of slippage is increased. Practice
is required to obtain good results.
Further,
theoretically, you would need to compensate (reduced) exposure for multiple exposures
by more than once.
| previous | Next | 2/10
| Back | to Index Page of OM2(n) Instruction Manual
| Back |
to Index Page of OM2(n)
| Back |
to Main Index Page of OM1(n) & OM2(n)
Olympus
OM-2(n):
Camera
Operations
(9
Parts)
| Other
Issues
(5
Parts)
Specifications: HTML | PDF (48k) Main Reference
Map: HTML | PDF (203k)
Olympus
OM-2 SP:
Camera
Operations
| Other Issues
Specifications: HTML | PDF | Main Reference Map: HTML | PDF
Olympus
OM-1(n): Camera Operations (6 Parts) | Other
Issues
(5
Parts)
Specifications: HTML | PDF | Main Reference Map: HTML | PDF (217k)
Shared
Resources:
Supplementary
articles:
TTL
Metering,
Depth
of Field,
Shutter
Speed
& Aperture
Motor
Drive and Power Winder: Main Index Page (4 Parts)
Motor
Drive 1
| Motor
Drive 2
| Winder
1
| Winder
2
Flash Photography: Main
Index Page
(4
Parts)
T45 | T32 | T20 | F280 | S20 | Qucik AUTO 310 | QA300, 200, 200S
Macro-Photography: Main
Index Page
(3
Parts)
Macro Flash Units: T10 Ring Flash, T28 Twin, T28 Single,
T8 Ring Flash
Accessories: Databack
1-4
| Screens | Finder Accessory | Remote | Cases
Zuiko Lenses: UPLOADED !!
| Message Board | for
your favourite
Olympus
OM-1(n)
and OM-2(n)
series
SLR Camera models
| Message Board | for your Zuiko Optics in a shared environment
| Message Board |Specifically for Dispose or Looking for OM Photographic Equipment
Home - Photography in Malaysia |
Copyright © 2000. leofoo ®. MIR Web Development Team.
Site
& Message Board Maintainers:
Mr. Bruce hamm <bhamm@magma,ca>; Mr. Rick
Oleson <rick_oleson@yahoo.com>; Mr. Simon
Evans <ruralwales@yahoo.com>; Mark Dapoz
<md@dementia.org>;Mr. Rick Oleson
<rick_oleson@yahoo.com>
My
old time buddy, Ahmad
Ikram,
Dr of Rubber Research Institute (RRI), Malaysia
who shares the same passion with me and also left his collection of OM-1n, OM-4 bodies
alsong with a Motor Drive 1 preparing some images appeared in this site. Mr Poon
of Foto Poon, Ipoh, Mr Richard, Ampang Park, Mr Lim and Miss
Jenny of Foto Edar for their generosity for their OM1(n), OM2n camera and some
Zuiko lenses. Mr KKLow for some of his earlier images on the OM-1. Miss Wati and Mirza for helping me
to convert this Operation Manual into a HTML format. Mr MCLau for rectifying
some mistakes made on the earlier preview sites. Site created 'unfortunately' again
with a PowerMac
A
personal tribute to the creator of the OM system and also a site dedicated to all
the fans of Olympuses and Zuiko Optics worldwide. Olympus
is a registered tradename of Olympus Inc, Japan.