 |
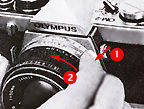
Focusing The OM-2 is equipped with the standard Microprism-matte Focusing Screen (1-1 ) which is designed for quick, easy focusing.To focus, look through the viewfinder and turn the lens focusing ring in either direction until your subject appears sharpest. The shimmering effect in the central spot of the Focusing Screen will disappear when critical focusing has been achieved. |
 |
 |
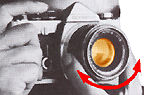
* You can determine the distance between the subject and the film plane by reading the distance scale on the focusing ring after you achieve critical focusing. The actual distance is indicated opposite the red central index mark on the lens mount ring; the white scale indicates this distance in meters and the orange scale indicates this distance in feet. |
 |
 |
* One of the most amazing experience when you view through the eyepiece of any OM1 or OM2 SLR cameras is its unconventional viewfinder magnification ( 0.92 X at infinity with 50mm standard lens). Image is large and bright and it is a joy to use, despite the fact it has a relatively high magnification, the OM-2 viewfinder still takes in 97% of the actual picture area for added convenience, when composing your pictures. Frankly, other than the Pentaxes like the ME super and also the MX, I seldom came across similar spec bodies that provide such comfortable experience. |
Mounting and changing lenses Most likely when you bought a OM camera regardless of new or used, you must have already have a lens mounted on the camera body. But one of the great advantage of the 35mm SLR system is its interchangeably of lenses. So, you must learn and go through these process of proper lens handling to enable you to change lenses in the future. Like the OM series camera bodies, the Zuiko lenses are designed to supplement the bodies with both compactness and lightweight as the core concept. It is indeed very unusual to note that the Zuiko lenses has its aperture ring and values on the outside of the lens instead of the conventional design of most SLR manufacturers. That perhaps explain why the DOF lever is not provided on any of the camera bodies and instead the lens diaphragm stopped down lever is incorporated in the lens. As far as ease of handling, the Zuiko has been designed with a single handed operation for mounting and removal of any lens.
 |
|
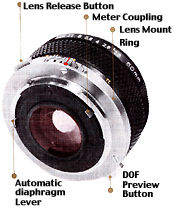
1) Aperture Index Mark, 2) aperture value(s) ,3) Focusing ring, 4) distance scale (orange for ft, white for meter), 5) Focusing and shutter speed index, 6) depth of field scale, 7) lens release button, 8) focal length indicator, 9) infrared focusing index mark and 10) lens stop down lever (hidden behind the lens) |
 |
 |
(Remove the body cap from the OM-2 by turning it counterclockwise.) To mount the lens, grasp it firmly and align the red dots on the lens flange and the camera mount ring.Turn the lens clockwise until it locks in place. The lens release button will spring up and you will hear a positive "click" when the lens has been fully engaged. * Do not apply pressure to the lens release button during the mounting procedure to assure proper coupling between the lens and the meter. To detach the lens, press down on the lens release button and turn the lens counter-clockwise. |
 |
Front Lens Cap * Protect your lens and camera! Always attach the front and rear lens caps when the lens is removed from the body to prevent any possibility of damage. Never leave the camera body in direct sunlight with the lens removed and, if you plan to store the camera without the lens, use a body cap. |
To remove
or attach the front lens cap, press the spring-loaded clips on both sides of the
cap. The cap fits into the accessory thread of the lens. If a filter is attached,
the cap will fit directly into the filter's accessory thread.
Infrared Photography The
OLYMPUS OM System Lenses are provided with an infrared index mark engraved in red
on the depth of field scale to the right of the reference dot. When shooting with
infrared film,focus normally on your subject without the red filter on and read the
subject distance on the distance scales.
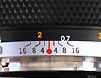 |
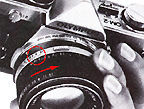
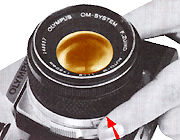
Then, turn the focusing ring to the right until the distance reading is opposite the infrared index mark. Your lens will then be in focus for average infrared photography. Shoot with the red filter on. In the above picture, the red index is set at infinity. |
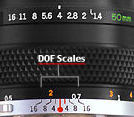 |
Depth of Field Scale The double series of numbers engraved on the depth of field scale represents F stops: F4, F8, and F16. Once you have focused on your subject, all objects within the distance range indicated on the lens distance scale between the marks for the F stop you have selected will have acceptable sharpness. |
For example,
in the above picture, the camera-to-subject distance is 3m (10 feet) and the lens
is set at F16. If you read the distance scale at the points opposite the engraved
"16" on both sides of the reference dot, you will find that the depth of
field is from 1.9m (6 feet) to 7m (23 feet). The depth of field can be visually verified
by pressing the depth of field preview button and observing the image in the viewfinder.
Generally, if you have more experience, the depth of field scale can be used to "pre-focus"
any subject (works best with wideangle lenses) - select an aperture that can provide
a reasonably wide zone of sharpness and just position yourself within the distance
falls within the zone of sharpness and fire at will without the need to adjust focus
by turning the focusing ring.
 |
Helper: Depth of field is the area of acceptable sharpness in front of and behind the subject in focus. This depth is determined by the F stop you have selected and the distance from the subject in focus to the film plane. As you get closer to your subject or as you open your lens (e. g. from F22 to F2.8) the depth of field becomes shallower. By stopping your lens down (e. g. from F2.8 to F22) or getting farther away from your subject this depth of field or zone of acceptable sharpness can be increased. |
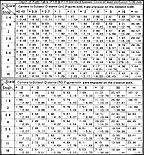
Another factor
in determining depth of field is the focal length of your lens. As a rule the shorter
the focal length, the greater the zone of acceptable sharpness. The longer the focal
length, the shall lower th is zone becomes. < PDF Format (140k) > The table above shows that when the camera-to-subject
distance is 3m (10ft), the depth of field at F16 ranges from 1.93m (6ft) to 6.93m
(23ft).
Relative: Interlocking factors affecting Depth of Field, Shutter
Speed and Aperture values.
 |
Depth of Field Preview Button/Lens diaphragm Stopped Down lever When you wish to see which objects fall within the acceptable zone of sharpness (depth of field), press the preview button on your lens. The diaphragm of the lens will stop down to the preset F stop enabling you to see the depth of field in the camera viewfinder.* If you jerk the preview button while depressing the shutter release button halfway down, the shutter might get released. Make sure you press the preview button gently to avoid accidentally releasing the shutter. |
Holding and handling the camera: Quick tip: Hold your breath at the moment of shutter release and ONLY use your finger to depress.
| Proper camera handling is important in assuring the sharpest possible pictures. Even slight camera movement can result in "blurred" photographs. To hold the camera properly, support the camera/lens combination with most of the weight resting in the palm of your left hand, while applying your right hand to the camera's side. Transport the film advance lever with your right thumb and squeeze the release button smoothly using the cushion, not the tip, of your index finger. The aperture ring, focusing ring and shutter speed ring are so arranged as to enable you one hand operation with left fingers right up to the moment the shutter is released. |  |
 |
 |
* When holding the camera
horizontally, keep both elbows close to the body. *
For vertical shooting, keep one elbow close to your body and press the camera tightly
against your forehead.
* Steady yourself against
any nearby support (such as a tree, fence, or wall) whenever possible. * When hand-holding a telephoto
lens, camera shake is magnified as the focal length increases. Always try to use
the fastest possible shutter speed lighting conditions will allow. * When shooting under 1/30 of a second, using
a stable platform or tripod with a cable release is recommended. This eliminates
the possibility of jarring the camera and is particularly important with telephoto
lenses. * For telephotography,
or slow shutter speed photography, it is recommended to use a tripod and hold the
camera steady with your hands.
| Previous | Next | 5/10
| Back | to Index Page of OM2(n) Instruction Manual
| Back |
to Index Page of OM2(n)
| Back |
to Main Index Page of OM1(n) & OM2(n)
Olympus
OM-2(n):
Camera
Operations
(9
Parts)
| Other
Issues
(5
Parts)
Specifications: HTML | PDF (48k) Main Reference
Map: HTML | PDF (203k)
Olympus
OM-2 SP:
Camera
Operations
| Other Issues
Specifications: HTML | PDF | Main Reference Map: HTML | PDF
Olympus
OM-1(n): Camera Operations (6 Parts) | Other
Issues
(5
Parts)
Specifications: HTML | PDF | Main Reference Map: HTML | PDF (217k)
Shared
Resources:
Supplementary
articles:
TTL
Metering,
Depth
of Field,
Shutter
Speed
& Aperture
Motor
Drive and Power Winder: Main Index Page (4 Parts)
Motor
Drive 1
| Motor
Drive 2
| Winder
1
| Winder
2
Flash Photography: Main
Index Page
(4
Parts)
T45 | T32 | T20 | F280 | S20 | Qucik AUTO 310 | QA300, 200, 200S
Macro-Photography: Main
Index Page
(3
Parts)
Macro Flash Units: T10 Ring Flash, T28 Twin, T28 Single,
T8 Ring Flash
Accessories: Databack
1-4
| Screens | Finder Accessory | Remote | Cases
Zuiko Lenses: UPLOADED !!
| Message Board | for
your favourite
Olympus
OM-1(n)
and OM-2(n)
series
SLR Camera models
| Message Board | for your Zuiko Optics in a shared environment
| Message Board |Specifically for Dispose or Looking for OM Photographic Equipment
Home - Photography in Malaysia |
Copyright © 2000. leofoo ®. MIR Web Development Team.
Site
& Message Board Maintainers:
Mr. Simon Evans <ruralwales@yahoo.com>; Mr. Rick Oleson
<rick_oleson@yahoo.com>; Mark Dapoz
<md@dementia.org>;Mr. Rick Oleson
<rick_oleson@yahoo.com>; Mr. Bruce
hamm <bhamm@magma,ca>
My
old time buddy, Ahmad
Ikram,
Dr of Rubber Research Institute (RRI), Malaysia
who shares the same passion with me and also left his collection of OM-1n, OM-4 bodies
alsong with a Motor Drive 1 preparing some images appeared in this site. Mr Poon
of Foto Poon, Ipoh, Mr Richard, Ampang Park, Mr Lim and Miss
Jenny of Foto Edar for their generosity for their OM1(n), OM2n camera and some
Zuiko lenses. Mr KKLow for some of his earlier images on the OM-1. Miss Wati and Mirza for helping me
to convert this Operation Manual into a HTML format. Mr MCLau for rectifying
some mistakes made on the earlier preview sites. Site created 'unfortunately' again
with a PowerMac
A
personal tribute to the creator of the OM system and also a site dedicated to all
the fans of Olympuses and Zuiko Optics worldwide. Olympus
is a registered tradename of Olympus Inc, Japan.