Basic camera's features D. Features around the Camera at the Right Section / Side (from photographer position)
Modern SLR can be a very complex tool, one of the main task for camera designers is aimed to design and simplify the exterior without making a camera looks uninviting for new users, which may be clustering with numerous buttons, levers or dials. In the case of EOS-1N, all secondary camera features as well as additional image control functions are bulk-located under a spring-loaded palm door on the right hand side of the camera body. The adoption of this design has made the EOS-1N less complex in its exterior appearance, and actually improves its handling, despite within, it can deliver thousands of combination in various means in enhancing image control during photography.
 |
|
The palm door was designed as fixed component on the Canon EOS-1N body. Even if you mount the Booster Drive which only affects the overall dimension of the setup but not access to the palm door. |

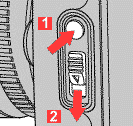
To open the palm door, just use your finger to lift it. Inside you will see an array of control buttons. In the hands of an experienced photographer, features hidden under the palm door provide a series of features that help expanding capabilities of the Canon EOS-1N - which includes ways in personalizing the camera to your specific preference.
 |
 |
I would expect any modern photographers have to equip with some knowledge in manipulating a digital device prior to use a camera of this type. |
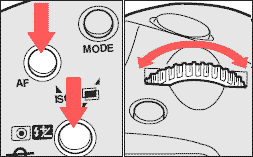
In order to save some download time, I arrange the photos horizontally for this discussion. The first button that imprinted with a word, "CF" signifies CUSTOM FUNCTION. There are a total of 14 individual functions for you to select or configure the EOS-1N. Unlike other buttons (except for the CLEAR button), the CF button is slightly recess a little to avoid accidental execution of other function. When press, you use the main dial to rotate to your selected preference CF number.
 |
Jackson Rose by Jeremy Novak |
The second button with
an universal icon is for checking battery status. The display of the status is only
shown at the LCD panels at the top right hand side of the camera. The third is the
camera film advance mode (DRIVE). It also acts as the self timer duration adjustment
selection (2 or default 10 sec shutter release timer). But the most frequently used
function for photographer is for toggle between Single-frame ("S") or continuous
film advancing ("C"); the user-selected or default setting for the film
advance mode is also display via the top panel LCD. Linking between the DRIVE and
Battery Check button with the AEB word with the white outline means when you depressed
BOTH buttons simultaneously, AEB (auto Exposure Bracketing) is executed. When activated,
you can make use of the Main Dial near the shutter release button to regulate the
number of insurance buying auto shooting which brackets in -1/3 stops, up to a maximum
of +/- 3 f-stops. Canon designs in such a way where if any of the execution of this
(or AEB), a duration of active selection is limiting to approx. 6 sec. other wise,
you have to reactivate again for new selection. The last white button that marked
"CLEAR" is to reset any chosen setting back to factory default (Program
AE, One-Shot AF/single frame advance, 16 multi-zones evaluative metering* system) but it will not affect or revert the
preset Custom Functions you have chosen.
Note: Since CF will not be affected
via this one touch CLEAR button; the metering will not be revert to factory default
(16 zones evaluative). When custom
function F-8 is set for center-weighted average metering instead of evaluative metering,
and the metering mode is set to partial metering or spot metering, pressing the clear
button will reset all of the camera functions except for the metering mode, which
remains at the current setting.
To reset all Custom
Functions to a
default setting, you have to press the Custom Function set button first and then
press the clear button.
 |
Remote control socket Located just under the spring palm door and usually has it covered with factory supplied cover (see picture at the top of this-page) . Although most would consider it as a seldom use feature for most photographers but since the Canon EOS-1n is designed as a professional tool, every angle in applications has been taken into account for its usage. With the remote socket, you can remotely trigger the camera via few ways in either infrarr-red or the more popular (cheaper) cord connection method. The terminal uses 3-pin dedicated Canon accessories only. The dedicated new accessory Canon specifically designed for the Canon EOS-1N is the LC-3 Remote Control set. Others: At the base section you can find standard tripod mounting socket. |
 |
Basic camera's features D. Features around the Camera at the Rear Section / Interior (from photographer position) |
 |
With the film back cover open or removed, the internal section of the Canon EOS-1n shows a very clean, easy to understand display of its film handling. system The film back is a removable type (with an optional data back version which omit s the Quick Control Dial). Basically, it can be separated into three major sections. i.e. 1. The film compartment, 2. the precision film roll railing system with the shutter curtain at the center and, 3. the film take up spool area. The film transport in the EOS-1N has improved considerably from the previous model - although many of the improvements done are not visible. |
Warning: the center portion of the camera is the multi-blades shutter curtain. Regardless of how rugged the EOS-1N can be, but this section is the most delicate part of the camera. So, always be cautious whenever attempt to load film onto camera. If damage, the cost of replacement of the entire shutter curtain unit can be very painful...for buyer of used camera, this is the first section that you need to pay attention to, even if externally, it may look in absolute perfect state.
 |
|
|
The loading sequence couldn't be more easier. For users new to Canon system, you have to get a little accustom to some small variation. |
||

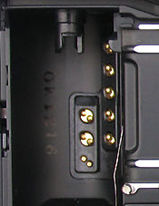 |
In the film chamber, there is n array of gold plated electronic contacts that auto reads the DX-codings imprinted on standard film rolls. The EOS-1N has a slightly different configurations from some of the earlier EOS SLR models (but this is not the topic so, we skip it, as long as you know there are meant for reading encoded data and auto setting the film speed for exposure calculation). Gold plated because in order to improve longitivity of constant use as well as ensures accuracy in data transmission. For photographers who may be migrated from manual focus era, this is a lovely update on modern SLRs via a common standard to enable quick, precise camera setup as well as minimizes human error. |
When the camera senses a DX film is loaded, the film speed is set automatically according to the DX code on the film cartridge. The automatic film speed setting range for the Canon EOS-1N is ISO 25~5000. If a non-DX film is loaded, the ISO indicator and the numbers for the previously-set film speed blink in the LCD panel. HOW to manual set the film ASA/ISO and WHY ? those days, one of the popular way in altering exposure is via manipulation of film speed. But in modern days photography, one of the main reason is manual film speed has a wider range than auto DX film speed setting. In this case, the Canon EOS-1N has a manual film speed working range extended from 6-6400, instead of 25-5000.
 |
To override auto film speed, first: While simultaneously pressing the AF mode selector and metering mode selector/flash exposure compensation button, turn the main dial to the left or right until the desired film speed is displayed in the LCD panel. When the AF mode selector and metering mode selector are pressed simultaneously, ISO and the currently set film speed are displayed in the LCD panel. Next, release the AF mode selector and metering mode selector/flash exposure compensation button to complete the film speed setting. |
Please note: The manually-set film speed is automatically canceled when new DX-coded film is loaded. So, Canon offers an alternative in the EOS-1N by using the Custom Function CF3. This custom function can be used to prevent the camera from automatically setting the film speed according to the film's DX code. When this function is set, the camera does not change the manually set film speed when changing film, handy when using many rolls of the same type of film in succession. The currently set film speed can be checked by simultaneously pressing the AF mode selector and metering mode selector. The ISO indicator and the currently set film speed are displayed in the LCD panel. Refer back to Custom Function Section for detail operations and other related issues.
|
|
 |
After checking that the film tip is aligned with the orange mark and that the film perforations are engaged with the sprockets, close the back cover until it clicks shut. Avoid pull the film tip past the orange mark. Canon claims If the film tip passes the orange mark, advancing the film may damage the film or cause the camera to malfunction. |

 |
|
|

 |
Stun & work. Shanghai Airport China, 2006 |
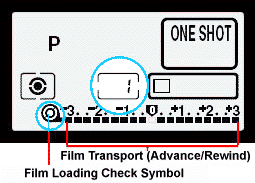
Film winding starts when the exposure completion signal
is detected. The Film winding speed is equally fast and swift, the sequence of operation
as well as the current status of power-rewinding is displayed via a bar mark floating
(--->>>) on the LCD display panel.
One significant improvement made to the camera from older EOS-1 is its operating
noise, the film rewind with Power Booster E-1 is now one eleventh that of the original
EOS-1. Further, with Custom Function CF-1, it can be used to set either High Speed
or Silent Mode on film rewind. This has made the Canon EOS-1n not as offensive during
some situations requires minimal noise disturbances.
 |
Film Roll Removal Sequence. The film automatically rewinds at the end of the roll. When rewinding starts, the film rewind indicator moves from right to left to show that the film is rewinding. At the same time, the LCD panel's frame counter counts down the number of frames. Automatic rewind stops when completed. Film rewind completion blinks in the LCD panel to indicate that you can now safely open the back cover and remove the film. | ||
|
|
 |
||

To remove film during Mid-Roll. Possible. For whatever the reasons if you decide you need to remove the film roll inside, just depress the film rewind button (see above for an illustration of its location) which has been designed slightly recess inward from the camera body and requires a little effort to activate it. The slight inconvenience is aimed to avoid accidental activation of this function Once press, the film immediately starts rewinding.
NOTE:- Due to maintain compactness of the overall dimension of the Canon EOS-1N, limitation on power supply as well as conserving best performance ratio on energy management as well as other basic operations, performance of automatic film advance as well as power film rewind behave differently in their speeds, please check the Film Transport Section for the working principle as well as other details.
| (1)
EOS-1N alone: Continuous exposure (C) mode or single exposure (S) mode. (2) EOS-1N + type AA BP-1: Continuous exposure (C) mode or single exposure (S) mode. (3) EOS 880 + PDB-E1 High-speed continuous exposure (CH) mode, low-speed continuous exposure (CL) mode or single exposure (S) mode. |
| Previous | Main
Index Page
| Next -->>>Next section covers Focuing with
the Canon EOS-1N
Basic Design: - Part 1 | 2 | Basic Camera Features: - Part 1 | 2 | 3 | 4
| Questions, Issues
& Answers
| Canon
EOS-1 Series Message
Board
|
Canon
EF lens Board
| in
a shared environment
|
Free Trade Zone |
shared
environment
| Back | Index Page The Canon EOS-1N
Series Professional SLR camera
|
Back | Main Index Page The Canon EOS-1
Series Professional SLR camera
Background and Various
Issues | The Basic Features & various Setup
Manual &
Auto Focusing |
Metering Systems | Exposure Control | Viewfinder
Optical
System Flash Photography (with Speedlite 540EZ extension & Selective info on Canon TTL Flash Models:-160E | 200E
| 300EZ | 300TL
| 420EZ | 430 EZ | 480EG | MacroLites | Other non-TTL Canon flash model
Reliability Issues:- Body Chassis | Shutter Unit | Electronic Circuitry | Film Transport & film handling Secondary Functions:- Custom Function Part One | Part Two | System Accessories:- Film Back Options - instruction for Command Back E1 | Macro/Close Up Part one | Part two and Part III Flash for Macro-Photography | Power Sources -BP-E1 | PDB-E1 | Focusing Screens | Remote Control with Wireless Remote Set LC-3 | System compatibility
Variants of Canon EOS-1N:- Canon EOS-1N RS | Canon/Kodak Digital DCS-1, 3 -5 & 520/560 Series | Full Technical Specification | Main
Reference Map / Nomenclature
| Resource Centre:- Comparative Charts between EOS-1 &
EOS-1N / or with
its active Competition(s) (Nikon); Quick Operational Reference Card (278k Gif File);
Listings of 7-segment
digital numbers/letters
appeared on LCD display panel/viewfinders (HTML page); External Link:-Instruction Manual (3.3MB
PDF file applicable for both Canon
EOS-1N (RS). | Using EOS system for your photography | Bots & Nuts of EOS System - by Philip Chong |
The Eyes of EOS -
EF Lenses
A little OFF-TOPIC SOME Personal Thought
HOME - Photography in Malaysia |
![]()
Volunteered Maintainer(s) for the Canon EOS-1N Series Message Board: Philip Chong, Editor, Digital Camera Magazine; Vincent Thian, Photo Editor, Malaysian Bureau, Associated Press "AP", CYleow, Ex-photo Editor of local daily, The Star; Gary Rowan Higgins, Australia and other nice folks on the web.
Special Credit:- :Mr. Richard Yeow & Mr. Simon Wong from camera division of ![]() Marketing Malaysia, for their continual effort in
supporting development of this EOS/EF website. Others: All the nice people on earth who have contributed
their photos and pictures of personal works or product shots for the creation of
this site. Certain content and images appeared in this site were either scanned
from official marketing leaflets, brochures published by Nikon and/or contribution
from surfers who claimed originality of their own work for public publishing in this
website, where majority of the extracted information are used basing on educational
merits. The creator of this site will not be responsible for any discrepancies that
may arise from any possible dispute except rectifying them after verification from
respective source. Neither Nikon or its associates has granted any permission(s)
in using their public information nor has any interest in the creation of this site.
"Canon", "EOS",
"EF" "RT", "EOS-1n RS", "Booster
", "Macrolite", "fluorite", "Image Stabilizer"
& other applicable technical/business terms are registered trade name(s) of Canon
Inc., Japan. Site made with an Apple G5 IMac.
Marketing Malaysia, for their continual effort in
supporting development of this EOS/EF website. Others: All the nice people on earth who have contributed
their photos and pictures of personal works or product shots for the creation of
this site. Certain content and images appeared in this site were either scanned
from official marketing leaflets, brochures published by Nikon and/or contribution
from surfers who claimed originality of their own work for public publishing in this
website, where majority of the extracted information are used basing on educational
merits. The creator of this site will not be responsible for any discrepancies that
may arise from any possible dispute except rectifying them after verification from
respective source. Neither Nikon or its associates has granted any permission(s)
in using their public information nor has any interest in the creation of this site.
"Canon", "EOS",
"EF" "RT", "EOS-1n RS", "Booster
", "Macrolite", "fluorite", "Image Stabilizer"
& other applicable technical/business terms are registered trade name(s) of Canon
Inc., Japan. Site made with an Apple G5 IMac.