Exposure Control The Nikon FE2, has four operating modes to control the exposure and three metering sensors to provide metering. 1) Aperture priority AE, 2) Manual Exposure and 3) TTL flash AE and 4) Stop Down Metering. The Nikon FE2 employs a through-the-lens (TTL) center-weighted full aperture exposure metering system which measures the light passing through the lens at maximum aperture. This assures a bright finder image during shooting session. Exposure measurement put a strong emphasis at the 12 mm diameter central area with the standard type K focusing screen (Where two additional screens are available as option), while balance of the viewfinder provide an average reading.
 |
This is commonly referred as the Nikon's way of center weighted average metering. This type of reading is quite adequate to provide reasonably correct exposure since in most cases, the main subject is placed in this central area. The FE2 has quite a number of way to 'manipulate' the metering, since you know the center is the prime area for metering. |
1) Automatic Exposure Mode
(Aperture Priority AE)
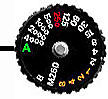
| The aperture-priority automatic exposure mode in the FE2 is a real joy to use. Just set the shutter speed dial to the green 'A' setting and there you are - you are in the Aperture Priority automation mode for total creative depth of field at your finger tips, aided with a host of other features for fine tuning the metering to suit your personal preferences. Additional features available in the FE2 are exposure memory lock, the exposes compensation with 1/3 increments, adjustment of ASA/ISO film setting etc. All these precise measurement are more than sufficient for any general photographic needs. (These will be illustrated in the next section, please digest as much as you can on this part before proceed to those pages) |
|
First, all you need to do is to choose an aperture on your lens and the camera internal computer program will react to a given scene and automatically assign a matching shutter speed to form an exposure. This system lets you select the aperture most suitable for expressing your impression of the subject - which is what creative selective focus is all about. For instance, when you want to pan-focus to get everything in the picture, as in landscape or candid photography, you simply stop down the aperture to f11 or f16. On the other hand, when you want to eliminate a distracting background or foreground in portraiture or you want to emphasize the mood of the subject itself, you simply open the aperture as wide as you want. In either instance, the FE2 selects the appropriate shutter speed for a perfectly exposed picture from its matching stepless speeds of 8 sec. to 1/4000 sec. ("Stepless" means if the aperture value that you have set in your lens demand an accuracy of 1/186 sec or 1/285 sec. the camera's electronically controlled shutter will go precisely to the matching shutter speed to your preset aperture - even if you have set the aperture in mid or variable values). Aperture Priority AE was used in many Nikon camera as the primary exposure control method, shutter priority is more complicated and may involve with many changes both in the methods of communication by ways of a lens mount either mechanical or electronically. The FE2, didn't provide shutter priority AE (as in the case of the Nikon FA launched at the same period together with a new series of Nikkor lenses that incorporated with some additional changes - AI-S Nikkor lenses). However, the earlier FE takes all the new and old Nikkor lenses (including the current latest AF-D Nikkor lenses), but this is not the case with FE2, the FE2 ad FE10 need a minimum lens specification of AI to function 'normally'. All the available exposure control in Aperture Priority AE, Manual Exposure and TTL Flash AE are retained. During camera operation, just pull out the film advance lever that flush along with the body. This will unlock the camera's shutter release button. By lightly depressing he button halfway will activate the camera's internal circuitry (Not quite true if you are fussy enough to pick on something, as I said earlier, the quartz oscillator is always 'active' once battery has been installed in FE2). Lightly press on the shutter release button will activate the metering, the meter stays on for 16 sec. after your finger is lifted off the button, so you can devote your full concentration on your subject. The adjacent film advance lever is hinged to fold neatly into place and lock the shutter release button after use. The FE2 has a very friendly and a informative viewfinder design. It is easy to understand, to focus and in composing. Before we go on into detail of the exposure control in the FE2, it is an essential to understand what the viewfinder can assist and make you a more responsive photographer.
Note: The meter stays on for 16 sec. after your finger is lifted off the button. But it will stay on longer with the motor drive's (MD-12) trigger button (approx. 60 sec.).
 |
 |
| Outside-exposure-range warning marks. Both the upper and lower portions of the shutter speed scale are in red to indicate an exposure that is outside the meter's range. If the black meter needle is located in either of these red areas after metering, adjust the f/stop on the lens until the needle moves out of these areas.; | |
| 'A' (Auto), indicating you are in automatic mode; | |
| Shutter speed scale, corresponding to the speeds at the shutter speed ring; | |
| Shutter speed/mode indication needle, Green needle will rest at 'A' in auto mode; it also moves accordingly as you turn the shutter speed/mode selector dial. | |
| Meter needle, as soon as the shutter release button is depressed halfway to switch on the meter, the black needle automatically swings up to show the correct shutter speed, according to the subject brightness and the f/stop set on the lens. Please note that the needle doesn't move before the frame counter reaches frame " 1 " or when the shutter speed/mode selector dial is set at M250 or B. | |
| M250, used when: a) when the battery is exhausted or fails to function normally in extreme change of temperature, b) other shutter speed modes are not operable, c) override excessive long exposure in auto mode, this work with flash in manual mode as well even though camera doesn't have battery (ies). | |
| B(Bulb), for long time exposure other than what the camera can offers, used best in combination with tripod/cable release. | |
| Aperture value (f-number, eg f5.6, f11 etc.) in use, Aperture Direct Readout (ADR), transfers the aperture value from the lens to the window for your quick reference; | |
| Fine matte/Fresnel field, when taking close-ups or macrophotography or shooting with telephoto lenses of maximum apertures of approx. f/4.5 or smaller, the split-image spot and microprism collar are likely to darken. Therefore, use the matte portion of the screen; turn the focusing ring until the image looks sharp; | |
| 3mm diameter split-image spot, for precise pinpoint focusing on subjects with distinct contours, use the central split-image rangefinder; turn the focusing ring until the split image becomes a sharp, clear, complete and undivided image. | |
| 1mm-wide microprism collar, for rapid focusing and for subjects with indistinct outlines; | |
| 12mm diameter area, serves as the indicator/outline where the Nikon exclusive heavy center weighted metering; | |
| Exposure compensation warning; when you activate the exposure compensation other than '0', a warning light will appear in the viewfinder to alert you to set back to neutral point after an exposure. | |
| Match Needle Exposure Scale (Referred to the above 1-7). The exposure indications appearing on the shutter speed/mode scale at the left-hand side of the viewfinder indicate the necessary information for the correct exposure. Also the f/stop in use appears through the ADR window 20 above the viewfinder frame. | |
| Additional info pertaining to FE2's viewfinder: The shutter speed scale in the viewfinder is color coded black numbers indicate reciprocal shutter speeds: i.e. 60 means 1/60 sec., while red shows actual shutter speeds. The viewfinder magnification is approx. 0.86X. The finder coverage is approx. 93 %. The actual/ image size will be slightly larger than the image seen in the viewfinder. | |
| Next | 5/11 Handling the Auto mode and viewfinder display | The Memory Locks (AE-L)
1 | 2 | 3 | 4 | 5 | 6 | 7 | 8 | 9 | 10 | 11
Additional Technical Info relates to the Nikon FE2 (7 Parts)
| Back to Main Index Page of Nikon FE2 |
| Back to Main Index Page - FE Series
|
| Nikon FE | Nikon
FE2
| Nikon FE10 | * Nikon FA
|
| Nikon FM
series | Nikon FE
series | Nikon FA
|
| Message
Board
| for your favourite Nikon FE Series SLR camera(s)
| Message Board | for your Nikon Optics
in a shared environment
| Message Board | Specifically for Dispose or Looking for Nikon / Nikkor
Photographic Equipment
|
Back | to Pictorial
History of Nikon Rangefinder/SLR/Digital cameras
Shared
Resources: MD-11 | MD-12 | 3rd Party Power Winder Only for FM2(n)/FE2/FA
| Focusing Screens | Titanium Shutter | Flash Units -
| SB-15 | SB-10 | SB-16B & Other Options | Databack | Nikkor lens mount (related
info)
Others:- Nikon AF-TTL Speedlights | SB-20 (1986) | SB-22 (1987) | SB-23 | SB-24 (1988) | SB-25 (1991/2) | SB-26 (1994) | SB-27(1997) | SB-28 (1997) | Nikon SB-29(s) (2000) | Nikon SB-30 (2003) | Nikon SB-600 (2004) | Nikon SB-800 (2003) Nikon AF-TTL Speedlight DX-Series: Nikon SB-28DX (1999) | SB-50DX (2001) | SB-80DX (2002)
Nikon
BC-flash Series |
Original
Nikon Speedlight
SB-2
| SB-3 | SB-4
| SB-5
| SB-6 | SB-7E
| SB-8E
| SB-9 | SB-E
| SB-10
SB-11
| SB-12 | SB-14 | SB-140 UV-IR| SB-15 | SB16A | SB-17 | SB-18, SB-19 | SB-21A (SB-29) Macro flash | Flash Accesories | SF-1
Pilot Lamp
| Nikon F | Nikon F2 | Nikon F3 | Nikon F4 | Nikon F5 | Nikon F6 | Nikkormat / Nikomat | Nikon FM | Nikon FE/ FA | Nikon EM/FG/FG20 | Nikon Digital SLRs | Nikon - Other models |
Nikon Auto Focus Nikkor lenses:- Main
Index Page
Nikon Manual Focus Nikkor lenses:- Fisheye-Nikkor Lenses - Circular | Full Frame |
Ultrawides Lenses - 13mm15mm18mm20mm | Wideangle Lenses - 24mm28mm35mm | Standard Lenses - 45mm 50mm 58mm | Telephoto
Lenses - 85mm105mm135mm180mm & 200mm | Super-Telephoto Lenses - 300mm 400mm 500mm 600mm 800mm 1200mm |
 Index Page |
Special
Application lenses: Micro-Nikkor Lenses - 50mm~55mm -60mm 85mm -105mm 200mm Micro-Zoom 70-180mm Perspective Control (PC) - 28mm 35mm PC-Micro 85mm Dedicated Lenses for Nikon F3AF: AF 80mm f/2.8 | AF 200mm f/3.5 EDIF Depth of Field Control (DC): 105mm 135mm Medical Nikkor: 120mm 200mm Reflex-Nikkor Lenses - 500mm 1000mm 2000mm Others: Noct Nikkor | OP-Nikkor | UV Nikkor 55mm 105mm | Focusing Units | Bellows-Nikkor 105mm 135mm Nikon Series E Lenses: 28mm35mm50mm100mm135mm | E-Series Zoom lenses: 36~72mm75~150mm70~210mm |
MF Zoom-Nikkor Lenses: 25~50mm | 28~45mm | 28~50mm | 28~85mm | 35~70mm | 36~72mm E | 35~85mm | 35~105mm | 35~135mm | 35~200mm | 43~86mm | 50~135mm | 50~300mm | 70~210mm E | 75~150mm E | 80~200mm | 85~250mm | 100~300mm | 180~600mm | 200~400mm | 200~600mm | 360~1200mm | 1200~1700mm
Tele-Converters: TC-1 | TC-2 | TC-200 | TC-201 | TC-300 | TC-301 | TC-14 | TC-14A | TC-14B | TC-14C | TC-14E | TC-16 | TC-16A | TC-20E
Recommended links to understand more technical details
related to the Nikkor F-mount and production Serial Number:
http://rick_oleson.tripod.com/index-153.html by: my
friend, Rick Oleson
http://www.zi.ku.dk/personal/lhhansen/photo/fmount.htm by: Hansen,
Lars Holst
http://www.mir.com.my/rb/photography/hardwares/nikonfmount/lens2.htm
http://www.photosynthesis.co.nz/nikon/serialno.html
W A R N I N G: The New G-SERIES Nikkor lenses have no aperture ring on the lens, they CANNOT ADJUST APERTURES with any of these manual focus Nikon FE series SLR camera models; please ignore some portion of the content contained herein this site where it relates.
|
Back | Main Index Page of Nikkor Resources
|
Back | Main Index Page of Pictorial
History of Nikon SLRs
| Message Board | for your Nikkor optics ("shared" because I do wish some of you to expose to other's perspective as well. Isn't it a sad sate to see photography has to be segmented into different camps from the use of various labels)
about this photographic web site
Home - Photography in Malaysia |
![]()
A contributing effort to Michael C Liu's Classic Nikon Site.
Credit: Chuck Hester for some of his beautiful images used in this site; Ted Wengelaar®, Holland for his continuous flow of input; Lars Holst Hansen, Danish 'Hawkeye' who shares the same passion; Mr Poon from Poon photo for their input; Ms Miss Rissa (Sales Manager) & members of the Technical Service dept. of Shriro Malaysia, local distributor of Nikon cameras in Malaysia & Singapore, in providing so many useful input to make this site possible. Special thanks to Mr MC Lau, who has helped with his images of the MF-12 databack. Michael Tan, Pertama Photo (603-2926505) for lending his original Titanium Shutter Display Unit. Dave Hoyt who has prepared the introductory page and offer some images of his FE2 in this site.. Hiura Shinsaku, Nikomat ML, Japan for his contribution on all the various images; A contributing site to a long lost friend on the Net. Note: Certain content and images appeared in this site were either scanned from official marketing leaflets, brochures published by Nikon and/or contribution from surfers who claimed originality of their own work to publish in this site based on educational merits. The creator of this site will not be responsible for any discrepancies that may arise from such possible dispute except rectifying them after verification."Nikon", "Nikkormat", "Nippon Kokagu KK" & "Nikkor" are registered tradename of Nikon Corporation Inc., Japan. Made witha PowerMac.