Rewinding the Film
 |
1. When the film is at its end, the advance lever no longer operates smoothly, check the frame counter (4) display. If the frame counter shows that the all frames of the loaded film have been exposed, the film then needs to be rewound. |
 |
|
Note: If the film reaches the end of the roll during film advance, the film advance lever will lock. Rewind the entire roll, then complete the movement of the film advance lever and put it back into place.
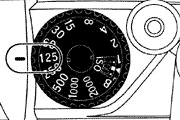
"B" (bulb)
Setting
1.
With the shutter speed dial (1) set at "B" position, the shutter will remain
open for as long as the shutter release button (2) is pressed.
|
|
2. This setting is useful when an exposure longer than one second is required, such as in landscape photography at night Or it can be used for the special effect photography by employing the flash test button together with very low light conditions. 3. Be sure to use a tripod and/or cable release when using this long time shuner speed setting. |
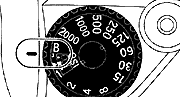
Note: It is recommend that you remove the Batteries from the camera at this setting to avoid wasting the baneries.
Self-Timer
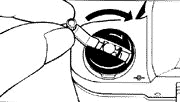
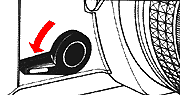
1. Wind the film advance lever (3) and fully turn down the self-timer lever
(7) counterclockwise. Now the self-timer is ready to use.
2. Press the shutter release button (2) and the self-timer operates to release
the shutter in approximately 10 seconds later.
 |
3. Once the self-timer becomes ready it is impossible to cancel it manually. So operate it only when needed. |
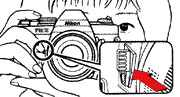
Flash Photography
1. Connect the flash unit in the Accessory-shoe (9).
2. Set the shutter speed dial (1) at 1/125 second or lower.
3. When using the automatic flash unit, set the aperture to the f-stop specified
in the instruction manual of the flash unit.
4. When using the manual flash unit, use the f-stop value obtained by the
formula shown below:
Guide Number divided by f-stop = Distance
 |
Note: Nikon claimed flash units not designed for use with Nikon cameras may provide incorrect exposure and/or equipment damage.When using any other flash other than a Nikon product and inserting it into the Accessory-shoe, please do not touch the contact. If you touch the contact, you may be subject to a shock. When using a bracket type flash and connecting it to the contact, please use it without removing the black plastic plate covering the Accessory-shoe. If you touch the Accessory-shoe without the plate, you may subject to a shock. |
Depth-of-Field Preview | More info on Depth of Field |
In the Viewfinder you can visually observe the depth-of-field provided by the selected F-stop.
1. Adjust the Lens Aperture to the desired F-stop. Press the Preview Button. 2. Observe the results of increased sharpness on the (darkened) image in the Viewfinder.
 |
* As it will cause the camera to malfunction, please refrain from pushing the shutter release button or winding the film while holding down the preview lever. |
Eyepiece Correction Lenses
The viewfinder
eyepiece has a built-in -1 correction (suitable for most normal vision). If your
vision requires correction and an eyepiece correction lens is fitted, you do not
have to wear eye-glasses when taking pictures. Slip the lens in the groove in the
finder eyepiece.
Eyepiece correction lenses are available in 9 types:
-5,
-4, -3, -2, 0, +0.5, +1, +2, +3 (Diopters) Note: Some forms of astigmatism
etc. may make dioptric eyepiece correction impossible. Please check with your vision
specialist for a recommendation based on your prescription.
(More info: Nikon SB-1
to SB-21
Speedlight/Flash Units)
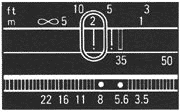
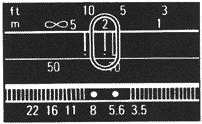
Infrared Photography
|
|
|
1. The dot marks printed in yellow and green are the infrared distance indicators. The green mark with a red line is for 35 mm (wide) and the yellow mark with a red line for 70 mm (telephoto). They are used for reading the distance scale in infrared photography using infrared film and filters. |
|
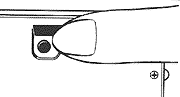
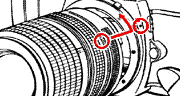
Mount the Lens onto the Camera
To attach: Position the lens in the camera's bayonet mount so that the mounting indexes on lens and camera body are aligned. Taking care not to press the lens release button (1), twist lens counterclockwise (2) until it locks into place.
To remove: Push the lens release button (1) and turn the lens mounting ring clockwise until the lens comes off.
Note: When changing lenses with film loaded in the camera, be careful not to expose the mirror box to direct sunlight. If the tripod has a large head, contact between the lens barrel and the head may make it impossible to turn the lens aperture ring. In this case, use the special tripod adapter supplied with the camera between the tripod head and the camera body.

General Tips
on Camera Care
Although the FM10 is a
tough and durable camera, bear in mind that is a precision optical instrument, and
that careless or rough handling may damage it. Observe the following tips, and the
FM10 will always work as perfectly as the day you bought it
Do not touch the shutter curtains.
Clean metallic
parts with a blower-type brush or with a dry, soft cloth.
Generally, the camera does not
need lubrication.
If the camera body is exposed
to rain or mist, wipe moisture gently with a soft cloth and dry the camera After
using the camera near salt water, take care that you wipe it with a cloth moistened
with pure water to remove possible traces of salt.
If the inside of the camera body
accidentally gets wet, its internal precision parts may get rusty. Take the camera
right away to the nearest authorized Nikon dealer for a checkup which may require
repair payment
When not using the camera for
a long time, tahe out the batteries and store the camera away from high temperature,
high humidity, naphthaline, or camphor.
Clean glass surfaces such as the
lens or the finder eyepiece with a blower-type brush; avoid using lens tissue as
much as possible. Gently wipe dirt smudges or fingerprints with soft cotton moistened
with a small amount of absolute alcohol, using a spiral motion from center to periphery.
Make sure you leave no wiping traces.
Caution: Please note that the use of a spray-gun
type blower to clean the lens may cause possible damage to the glass (especially
when ED glass is used for the front lens e/ement), by suddenly lowering the temperature
on the lens sufface. To avoid damage, hold the blower upright, keep its nozzle more
than 30 cm away from the lens surface and move the nozzle around so that the stream
of air is not concentrated in one spot
Before using the camera, it is
a good practice to check it thoroughly first
In a humid environment, it is
best to store the camera in a vinyl bag with a desiccant to keep away dust, moisture
and salt
Note that storing leatherette
cases in a vinyl bag may cause the leather to deteriorate, so exercise due care.
| Previous | Next | 3/3 Specification of Nikon FM10
Other Issues relate on FM-10.
| Back | Index Page of Nikon FM-10
| Back |
Main Index Page of Nikon FM Series Models
| Back | to Index Page of FM-10
| Back
| to Main Index
Page of FM Series Models
Nikon FM | Nikon FM2 | Nikon FM2n | Nikon FM2n/T | Nikon FM10 | FM2n Millennium 2000 | Nikon FM3a |
Variations
| Nikon FM series | Nikon FE series | Nikon FA |
| Back | to Pictorial History of Nikon Rangefinder/SLR/Digital cameras
| Message Board | for your favourite Nikon FM series models
| Message Board | for your Nikon Optics
in a shared environment
| Message Board | Specifically tor Dispose or Looking for Nikon Photographic
equipment
| Message Board | for
your favourite Nikon
FM Series SLR models
| Message
Board | for your Nikon
Optics in a shared environment
| Message Board | Specifically for Dispose or Looking for Nikon/Nikkor
Photographic Equipment
Standard
production Nikon FM Series models:-
Nikon FM | Nikon FM2 | Nikon FM2n | Nikon FM10 | Nikon FM3a |
Known
variants:-
Nikon
FM Gold
| Nikon
FM2/T
| Nikon
FM2N Tropical Set
| Nikon
FM2/T Limited Edition
| Nikon
FM2N LAPITA
|
Nion
FM2n Millennium 2000
Shared Resources: MD-11 | MD-12 | Focusing Screens | Titanium Shutter | Flash Units -SB-16 | SB-15 | SB-10 or other Options | Databack | Nikkor lens mount (related info)
Others:- Nikon AF-TTL Speedlights | SB-20 (1986) | SB-22 (1987) | SB-23 | SB-24 (1988) | SB-25 (1991/2) | SB-26 (1994) | SB-27(1997) | SB-28 (1997) | Nikon SB-29(s) (2000) | Nikon SB-30 (2003) | Nikon SB-600 (2004) | Nikon SB-800 (2003) Nikon AF-TTL Speedlight DX-Series: Nikon SB-28DX (1999) | SB-50DX (2001) | SB-80DX (2002)
Nikon
BC-flash Series |
Original
Nikon Speedlight
SB-2
| SB-3
| SB-4
| SB-5
| SB-6
| SB-7E
| SB-8E
| SB-9
| SB-E
| SB-10
SB-11
| SB-12 | SB-14 | SB-140 UV-IR| SB-15 | SB16A | SB-17 | SB-18, SB-19 | SB-21A (SB-29) Macro flash | Flash Accesories | SF-1
Pilot Lamp
Instruction
Manual: Nikon FM (HTML | PDF) | Nikon FM-10 (HTML) | Nikon FM2n's
User's Manual
available only in HTML format (6
parts) | Nikon
FM3A
(HTML)
Specifications: Nikon FM, FM-10, FM2, FM2n and FM3A / Main
Reference Map: (HTML) Nikon FM, FM2, FM-10, FM2n (Applicable
to FM2T, FM2 "Year of the Dog"; Millennium 2000") and Nikon FM3A
| Nikon F | Nikon F2 | Nikon F3 | Nikon F4 | Nikon F5 | Nikon F6 | Nikkormat / Nikomat | Nikon FM | Nikon FE/ FA | Nikon EM/FG/FG20 | Nikon Digital SLRs | Nikon - Other models |
Nikon Auto Focus Nikkor lenses:- Main
Index Page
Nikon Manual Focus Nikkor lenses:- Fisheye-Nikkor Lenses - Circular | Full Frame |
Ultrawides Lenses - 13mm15mm18mm20mm | Wideangle Lenses - 24mm28mm35mm | Standard Lenses - 45mm 50mm 58mm | Telephoto
Lenses - 85mm105mm135mm180mm & 200mm | Super-Telephoto Lenses - 300mm 400mm 500mm 600mm 800mm 1200mm |
 Index Page |
Special
Application lenses: Micro-Nikkor Lenses - 50mm~55mm -60mm 85mm -105mm 200mm Micro-Zoom 70-180mm Perspective Control (PC) - 28mm 35mm PC-Micro 85mm Dedicated Lenses for Nikon F3AF: AF 80mm f/2.8 | AF 200mm f/3.5 EDIF Depth of Field Control (DC): 105mm 135mm Medical Nikkor: 120mm 200mm Reflex-Nikkor Lenses - 500mm 1000mm 2000mm Others: Noct Nikkor | OP-Nikkor | UV Nikkor 55mm 105mm | Focusing Units | Bellows-Nikkor 105mm 135mm Nikon Series E Lenses: 28mm35mm50mm100mm135mm | E-Series Zoom lenses: 36~72mm75~150mm70~210mm |
MF Zoom-Nikkor Lenses: 25~50mm | 28~45mm | 28~50mm | 28~85mm | 35~70mm | 36~72mm E | 35~85mm | 35~105mm | 35~135mm | 35~200mm | 43~86mm | 50~135mm | 50~300mm | 70~210mm E | 75~150mm E | 80~200mm | 85~250mm | 100~300mm | 180~600mm | 200~400mm | 200~600mm | 360~1200mm | 1200~1700mm
Tele-Converters: TC-1 | TC-2 | TC-200 | TC-201 | TC-300 | TC-301 | TC-14 | TC-14A | TC-14B | TC-14C | TC-14E | TC-16 | TC-16A | TC-20E
Recommended links to understand more technical details
related to the Nikkor F-mount and production Serial Number:
http://rick_oleson.tripod.com/index-153.html by: my
friend, Rick Oleson
http://www.zi.ku.dk/personal/lhhansen/photo/fmount.htm by: Hansen,
Lars Holst
http://www.mir.com.my/rb/photography/hardwares/nikonfmount/lens2.htm
http://www.photosynthesis.co.nz/nikon/serialno.html
W A R N I N G: The New G-SERIES Nikkor lenses have no aperture ring on the lens, they CANNOT ADJUST APERTURES with any of these manual focus Nikon FE series SLR camera models; please ignore some portion of the content contained herein this site where it relates.
|
Back | Main Index Page of Nikkor Resources
|
Back | Main Index Page of Pictorial
History of Nikon SLRs
| Message Board | for your Nikkor optics ("shared" because I do wish some of you to expose to other's perspective as well. Isn't it a sad sate to see photography has to be segmented into different camps from the use of various labels)
about this photographic web site
Home - Photography in Malaysia |
![]()
Credit: To all the good people who has contributed their own experience, resources or those who are kind enough granting us permission to use their images appeared in this site. Mr. MCLau®, who has helped to rewrite some of the content appeared this site. Chuck Hester® who has been helping me all along with the development of all these Nikon websites;LarsHolst Hansen, 'Hawkeye' who shares the same passion I have; Ms Rissa, Sales manager from Nikon Corporation Malaysia for granting permission to use some of the official content; TedWengelaar,Holland who has helped to provide many useful input relating to older Nikkor lenses; Some of the references on production serial numbers used in this site were extracted from Roland Vink's website; HiuraShinsaku from Nikomat Club Japan. t is also a site to remember a long lost friend on the Net. Note:certain content and images appeared in this site were either scanned from official marketing leaflets, brochures, sales manuals or publications published by Nikon over the years and/or contribution from surfers who claimed originality of their work for educational purposes. The creator of the site will not be responsible for may discrepancies arise from such dispute except rectifying them after verification."Nikon", "Nikkormat", "Nippon Kokagu KK" & "Nikkor" are registered tradename of Nikon Corporation Inc., Japan. Site made with an Apple IMac.