The last remaining feature on top of the camera is the Multiple Exposure Lever. It is part of the film advance mechanism. While this lever is so conveniently placed and it allows you to activate this lever in a single handed operation.
Double Exposure Lever
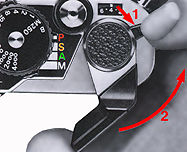 |
Prior to the Nikon FM of 1977, I wouldn't say double exposure operation in Nikon camera is enjoyable to used. Confidence level is another thing. As with most cameras during those period, Nikon cameras of that era were utilizing the rewind button to disengage the film advance mechanism The Nikkormats, doesn't even mentioned this in their spec sheet). The Nikon F2 improved a lot in terms of accuracy and registration. The FM, changed that by design and relocated a new dedicated lever on top of the body (Not at the familiar position near the film advance lever as with today's FM2 or FE series models, but just beside the pentaprism). The FE in 1978 changed the design to that position as it allows a photography to handle this task in a single hand operation - even work in conjunction with motor drive for rapid sequentcial shots in sucession. |
The FA and FE2 (FM2 series as well)
have retained this unique and very functional design. To operate, take the first
shot. Then, pull the multiple exposure lever with your index finder (1),
use your thumb to advance the film (2). Before you perform this task, ALWAY
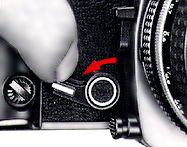
take a look
at the frame counter and register what is the current frame number first, you will notice that the frame counter
does not advance as you advance the film. Now the second exposure can be made on
the same fram. And should additional multiple exposures be needed, simply repeat
the above procedure (But keep an eye on the frame number to confirm if you had done
it in the right manner).
Note: Some compensation on exposure must be made
if you intend to use multiple exposure operations because the amount of light striking
the film more than once is additive but not as in mathematical sum 1+1 = 2. Because
the subsequent exposure is less than dominant, just compensate a little in addition
to normal exposure settings are probably adequate. While there is no definitive guide,
experimental calculations is essential to achieve more desirable results.
 |
There are some levers and controls in front of the camera which require some attention as well. The self timer is one - not just a lever for 'unmanned' photography, but also how it function and help you in certain situation. |
I don't know if you had noticed
that the FA has NOT provided with an exposure lock (AE Lock)
feature. The Self timer lever which acts as a self-timer/memory lock lever in the
FE/FE2 has been removed from the camera. It only serves as a self timer device in
the FA. To set the self-timer, push the self-timer lever down as far as it will go.
This can be done either before or after the film is advanced. After the self-timer
has been set, press the shutter release button. Immediately the reflex mirror will
rise and the self-timer will start to operate; the shutter is then released approx.
10 sec. later. If you want to cancel self timer operation after the lever has been
set, move it back to its original position. You can then take pictures in the normal
way. However, returning the selftimer lever to its original position after self-timer
operation has begun will immediately trip the shutter. The self-timer can be used
at any shutter speed dial setting except in the B setting.
Is that all ? No. First,
since the reflex mirror will go up immediately after you have pressed the shutter
release button; although the Nikon FA has one of the best shock absorber for the
mirror movement among other Nikon bodies compared, but since in self timer, there
is virtually NO vibration at all caused by the reflex mirror action, you may use
this to take high resolution or mangification work. Secondly, by turning the self-timer
lever when it is already in operation will result in the shutter being released the
moment the lever is back in its original position. Thus, you can use this as a trick
- should you need the timer to trip faster than 10 seconds, push it back to where
it should be and you can timed for yourself.
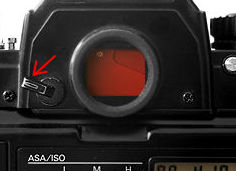 |
Since there are two metering photodiodes (another at the mirror box to handle flash exposure) that locate so near to the eyepiece and it may affect some exposure reading especially if there is a strong light source behind the camera (Like shooting at the ground, while the back is facing the sun etc..) The FA, like the F3, has an eyepiece blind ! If you are in the self timer mode, you can use this lever to avoid strong external light source that may affect accuracy of the meter reading. |
Additional Info on Depth of
Field Preview
Lever In the earlier
section when we mentioned about the Stopped-Down exposure measurement. But we haven't
mentioned more about its actual function other than the area it helps in the Stopped-Down
metering. When a lens with an automatic diaphragm is used, the image in the viewfinder
is vewed with the lens at maximum aperture. However, when the depth-of-field preview
lever's is pushed down, the lens will be stopped down to the aperture set, enabling
you to examine depth of field before shooting The image in the viewfinder darkens
according to the selected f-number, the smaller the aperture, the darker the image.
Portions of the picture that appear in focus when the lever is pushed down-will be
in the zone of sharp focus. Note that the lever should be depressed all the way.
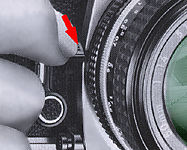 |
This lever is also used for stop-down exposure measurement. |
The next section will outline some less important features in the FA. Like film plane indicator, how to detach and attach the hand grip etc.
| Back | to Main Index Page of Nikon FA
Other Technical
Issues
Relating to Nikon FA
Camera Instruction
Manual - HTML | PDF
(1.4 MB)
Main Reference
Map for Body -
HTML | PDF
(731k)
Specifications - HTML
| PDF (245k)
The AI-S Nikkors (related info | TTL OTF Flash Metering | Interchangeable Focusing Screens. The MD-15/MD12/MD11 Motor Drives | 3rd party Power Winder (new) | Flash Units - | SB-15 | SB-10 | SB-16B & Other Options | Databacks | Titanium Shutter | Variation : Mr Y K Wong from Singapore contributing 11 images of his Nikon FA GOLD
| Nikon FM series |
Nikon FE series |
Nikon
FA |
W A R N I N G: The New G-SERIES Nikkor lenses have no aperture ring on the lens, they CANNOT ADJUST APERTURES with any of these manual focus Nikon FE series SLR camera models; please ignore some portion of the content contained herein this site where it relates.
| Message Board | for your favourite Nikon FA camera
| Message Board | for your Nikon Optics in a shared environment
| Message Board | Specifically for Dispose or Looking for Nikon / Nikkor Photographic Equipment
Shared Resources: MD-11 | MD-12 | 3rd Party Power Winder Only for FM2(n)/FE2/FA | Focusing Screens | Titanium Shutter | Flash Units - | SB-15 | SB-10 | SB-16B & Other Options | Databack | Nikkor lens mount (related info)
Others:- Nikon AF-TTL Speedlights | SB-20 (1986) | SB-22 (1987) | SB-23 | SB-24 (1988) | SB-25 (1991/2) | SB-26 (1994) | SB-27(1997) | SB-28 (1997) | Nikon SB-29(s) (2000) | Nikon SB-30 (2003) | Nikon SB-600 (2004) | Nikon SB-800 (2003) Nikon AF-TTL Speedlight DX-Series: Nikon SB-28DX (1999) | SB-50DX (2001) | SB-80DX (2002)
Nikon
BC-flash Series |
Original
Nikon Speedlight
SB-2
| SB-3 | SB-4
| SB-5
| SB-6 | SB-7E
| SB-8E
| SB-9 | SB-E
| SB-10
SB-11
| SB-12 | SB-14 | SB-140 UV-IR| SB-15 | SB16A | SB-17 | SB-18, SB-19 | SB-21A (SB-29) Macro flash | Flash Accesories | SF-1
Pilot Lamp
| Nikon F | Nikon F2 | Nikon F3 | Nikon F4 | Nikon F5 | Nikon F6 | Nikkormat / Nikomat | Nikon FM | Nikon FE/ FA | Nikon EM/FG/FG20 | Nikon Digital SLRs | Nikon - Other models |
Nikon Auto Focus Nikkor lenses:- Main
Index Page
Nikon Manual Focus Nikkor lenses:- Fisheye-Nikkor Lenses - Circular | Full Frame |
Ultrawides Lenses - 13mm15mm18mm20mm | Wideangle Lenses - 24mm28mm35mm | Standard Lenses - 45mm 50mm 58mm | Telephoto
Lenses - 85mm105mm135mm180mm & 200mm | Super-Telephoto Lenses - 300mm 400mm 500mm 600mm 800mm 1200mm |
 Index Page |
Special
Application lenses: Micro-Nikkor Lenses - 50mm~55mm -60mm 85mm -105mm 200mm Micro-Zoom 70-180mm Perspective Control (PC) - 28mm 35mm PC-Micro 85mm Dedicated Lenses for Nikon F3AF: AF 80mm f/2.8 | AF 200mm f/3.5 EDIF Depth of Field Control (DC): 105mm 135mm Medical Nikkor: 120mm 200mm Reflex-Nikkor Lenses - 500mm 1000mm 2000mm Others: Noct Nikkor | OP-Nikkor | UV Nikkor 55mm 105mm | Focusing Units | Bellows-Nikkor 105mm 135mm Nikon Series E Lenses: 28mm35mm50mm100mm135mm | E-Series Zoom lenses: 36~72mm75~150mm70~210mm |
MF Zoom-Nikkor Lenses: 25~50mm | 28~45mm | 28~50mm | 28~85mm | 35~70mm | 36~72mm E | 35~85mm | 35~105mm | 35~135mm | 35~200mm | 43~86mm | 50~135mm | 50~300mm | 70~210mm E | 75~150mm E | 80~200mm | 85~250mm | 100~300mm | 180~600mm | 200~400mm | 200~600mm | 360~1200mm | 1200~1700mm
Tele-Converters: TC-1 | TC-2 | TC-200 | TC-201 | TC-300 | TC-301 | TC-14 | TC-14A | TC-14B | TC-14C | TC-14E | TC-16 | TC-16A | TC-20E
Recommended links to understand more technical details
related to the Nikkor F-mount and production Serial Number:
http://rick_oleson.tripod.com/index-153.html by: my
friend, Rick Oleson
http://www.zi.ku.dk/personal/lhhansen/photo/fmount.htm by: Hansen,
Lars Holst
http://www.mir.com.my/rb/photography/hardwares/nikonfmount/lens2.htm
http://www.photosynthesis.co.nz/nikon/serialno.html
|
Back | Main Index Page of Nikkor Resources
|
Back | Main Index Page of Pictorial
History of Nikon SLRs
| Message Board | for your Nikkor optics ("shared" because I do wish some of you to expose to other's perspective as well. Isn't it a sad sate to see photography has to be segmented into different camps from the use of various labels)
about this photographic web site
Home - Photography in Malaysia |
![]()
A contributing effort to Michael C Liu's Classic Nikon Site.
Credit: Chuck Hester for some of his beautiful images used in this site; Ted Wengelaar®, Holland for his continuous flow of input; Lars Holst Hansen, Danish 'Hawkeye' who shares the same passion; Mr Poon from Poon photo for their input; Ms Miss Rissa (Sales Manager) & members of the Technical Service dept. of Shriro Malaysia, local distributor of Nikon cameras in Malaysia & Singapore, in providing so many useful input to make this site possible. Special thanks to Mr MC Lau, who has helped with his images of the MF-12 databack. Michael Tan, Pertama Photo (603-2926505) for lending his original Titanium Shutter Display Unit. Dave Hoyt who has prepared the introductory page and offer some images of his FE2 in this site.. Hiura Shinsaku, Nikomat ML, Japan for his contribution on all the various images; A contributing site to a long lost friend on the Net. Note: Certain content and images appeared in this site were either scanned from official marketing leaflets, brochures published by Nikon and/or contribution from surfers who claimed originality of their own work to publish in this site based on educational merits. The creator of this site will not be responsible for any discrepancies that may arise from such possible dispute except rectifying them after verification."Nikon", "Nikkormat", "Nippon Kokagu KK" & "Nikkor" are registered tradename of Nikon Corporation Inc., Japan. Made witha PowerMac.