IF you are reading this Instruction manual, I can safely conclude that you are either new to SLR photography; possibly could have been just invested into a Nikon camera for the first time, or just wanting a reorientation after found with a discarded hardware lying somewhere all these years... Don't worry. I will try to explain in sections that followed in this site in a simplest manner with a aim that in time to come, you could optimize the full potential and strength of this fine camera. Trust me, with a little care and attention paid to maintenance, this rugged mechanical body is all you will ever need for the next twenty or thirty years to come. Unlike today's modern auto-everything SLRs, you may have to go through a little extra process of handling and even setting up the camera, but if you were to think positively - you can also enjoy with more fun in an image making process rather than letting a microchip dictates what will appear in a photograph for you...
Again, just a reminder: Open a new window for a Main Reference Map &.... Use the Glossary for Photographic Terms.
BASIC Camera Setup & Operations Earlier section mentioned that ALL models belong to Nikon FM series are mechanical camera. In this case, battery is required ONLY for the camera's metering function. The camera will, operate regardless of whether there is a battery inside or if it is completely depleted OR in some extreme cases, fails to function normal in extreme temperature. If you are going for an important assignment and if you think the camera built-in metering aid is helpful, always bring a pair of spare cell. In cold climate, you can consider getting a off-camera Anti-Cold battery pack, DB-2 to power your camera's metering circuit. IF metering is not essential, the camera will still function and operate normally except there will be no exposure guide inside the viewfinder for your reference.
 |
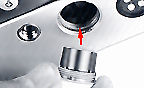
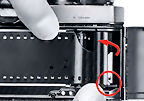
1. Remove the battery chamber lid |
2. Install the battery. Wipe the battery terminals clean and insert the batteries, making sure that the + signs are up. Usable batteries are:
 |
3V lithium battery (1 unit) |
Caution: Keep batteries away from infants and small children. In case a battery Is accidentally swallowed, call a doctor immediately as the material inside the batteries can cause serious problems.
After correct installation, insert the holder back into the battery chamber using a coin to screw it securely into place and your camera will be ready to function. If it doesn't, open and check the polarity marks on the cells.
 |
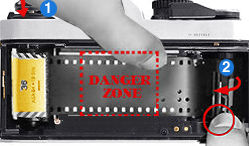
Make sure the battery contacts (+ or - surfaces) are clean. As most problem arised from automatic cameras were battery related. Sometimes, even an invisible film left behind by your oily fingers can prevent proper contact. |
Generally,
as a guideline in normal camera maintenance and care, never hold any cells in the
center, only at the side. You may use a clean cloth to clean off a light layer of
oxidation, or a pencil eraser from your children pencil box to remove heavier deposits
that may deposited at the cells' polarity marks front and back or at the contact
points (battery clip) inside the camera battery compartment. Should the battery be
left in the battery chamber for a long period, insufficient contact may occur due
to battery leakage. Thus, it is good practice to periodically clean the battery (Or
consider remove the cells from the camera) and the contact section in the battery
chamber with a soft cloth. If the battery chamber is contaminated by a leaking battery,
remove the battery at once and clean the chamber. Before doing so, try to clean and
removed any deposits remains inside, esp. the clips housed inside the compartment
and do a few test shots. If the metering circuit still inactive, I would strongly
suggest you to send for examination of the damage done.
 |
 |
3. Put the battery chamber Iid back in its place. Slip the battery clip back into the camera body base plate and screw it clockwise tightly into place. |
4. Pull out the film advance lever to unlock the shutter release button The film advance lever doubles as a shutter release button lock. This means if the film advance lever is flushed against the camera body, you will not able to trip the camera shutter release button. You can unlock the shutter release button by simply pulling out the film advance lever slightly from the flush to the standoff position.
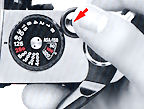 |
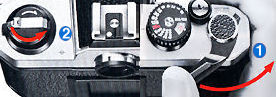
5. Press the shutter release button lightly to switch the exposure meter on. Unlike older Nikon bodies, the FM2 incorporates more functional design with meter-ON/OFF switching. |
The shutter release button activates the exposure meter when lightly pressed. The camera also has a energy saving feature of enabling the meter itself stays on for approx. 30 sec. after you have taken your finger off the button and it will turn off automatically.
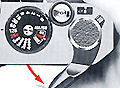
6. Check battery power. Switch the exposure meter on while looking through the viewfinder. If one or two of the red LED exposure indicator lamps inside lights up, this would mean normal condition and you have set up your FM2 correctly with metering. If it doesn't, don't get panic see the section next.
 |
Trouble Shooting: When the shutter speed dial is on "B" (bulb) position, NONE of the exposure indicator lamps will light up but it is normal. Be sure to set the dial at another position. If none of the exposure indicator lamps light up, either the battery is improperly installed - in which case you should Install it properly and have the polarity of each cell(s) checked or battery could be depleted, in which case you should try change a new set of battery(ies). |
7. Mounting/Removal
of a lens onto the camera. If you have bought a camera used or new from the shop,
chances are equally high that the camera came with a lens attached to the body; So, the first step
is to learn how to change a lens.
One of the main feature of a SLR (Single Lens Reflex) system over the rangefinder
camera is: you view and focus through the same lens used to cast an image onto film.
Its ability to faithfully render an image through the viewfinder and exposure calculation
via the lens type used provide a level of convenience and accuracy hard to duplicate.
Thus, the strength of SLR system plays a lot of emphasize on its system integrity
to use interchangeable lenses. Any established SLR camera system will provide a minimum
provision 40 + lens type and Nikkor lens group is by far the most extensive among
all manufacturers. There are more than 60 in total for its manual focus lenses and
the AF Nikkor lens group is growing rapidly as well. Thus, if you are owning a Nikon
FM2(n), just take advantage of the strength of what Nikon photographic system provides.
 |
 |
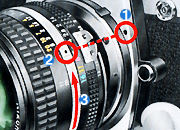
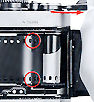
To mount a lens onto camera: lining up the aperture/focusing index (2) on the lens with the lens mounting index (1) on the camera body. |
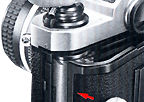
Then twist the lens mounting ring counterclockwise (3) until it clicks into place. Confirm that the aperture/focusing index is right on top. To remove a lens: Push the lens release button (A) and turn the lens mounting ring clockwise (B) until the lens comes off. Note: When changing lenses with film loaded in the camera, be careful not to expose the mirror box to direct sunlight. A convenient way is to use your body's shadow as a shield.
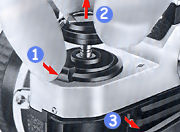 |
8. Open the camera back Obviously, other than mounting a lens onto your camera, you will also have to learn how to load or change a film roll. All Nikon FM2 models share similar mechanism. It is designed to have a two ways action to prevent accidental opening of the film back. First, you will have to push the camera back lock lever (1) counterclockwise with your index finger while lifting the film rewind knob (2). The camera back should pop open (3). |
|
|
If you have bought a new camera, there is usually a plastic insert inside the film back protecting the shutter curtain. Remove it and the shutter curtain will reveal undernealth.Caution: Never attempt to touch the shutter blades or else you will have to pay dearly for your curiosity ... |
9. Install the film cartridge. Position the film cartridge in the film cartridge chamber ~ with the film leader pointing towards the take-up spool, and push the rewind knob back down to secure it in place.
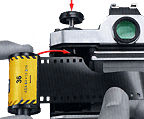 |
Note: Depend on your preference, you can use any of the 35mm film cartridges for slides or negative film available on the market. It is again advisable to handle film in the shade to avoid direct exposure to sunlight. Caution: After the back is open, you must be extremely careful NOT to touch the exposed shutter blades/curtain especially with the film running across and cover the curtain (Which you may forget the delicate shutter curtain is just right underneath the film), the curling film leader when first pull out from the film cat ridge also may easily scratch across the titanium shutter curtain. |
 |
I have seen too many careless handling resulting in damaged or deformed shutter curtain, this level of warning applies on any cameras. Although the auto DX coding make this process much easier and less daunting with modern AF SLRs, but Nikon FM (n) is not equipped with auto DX coding and you have to manual feed in the film to the film take-up spool. NEVER attempt to use force if you load the film unsuccesully.
 |
10. Insert the film leader in the take-up spool. Pull the leader across gently and insert it into one of the slots in the film take-up spool. Slowly rotate the take-up spool inwards with your thumb, making sure the latch in the slot engages the first or second perforation along the side of the film leader. |
 |
 |
11. Wind the film advance Lever to advance film onto the take-up spool. Wind the film advance lever and depress the shutter release button until the film sprockets engage the perforations on the edges of the film. Make sure you wind the lever fully until it comes to a stop. |
12. Close the camera back. Make sure that the perforations are perfectly meshed with the sprockets and that the film is set between the film guide rails, close the camera back until it snaps shut.
 |
13. Take up film slack. Fold out the film rewind crank and rotate it in the direction of the arrow on the film rewind knob until it stops. Then fold the crank back in. |
14. Make blank exposures until the frame counter reaches frame 1. Press the shutter release button and wind the film advance lever until the frame counter reaches frame 1.
 |
As you wind the lever, confirm that the film rewind knob rotates counterclockwise. This indicates the film has been loaded and is being advanced correctly. If the knob fails to rotate, reload the film cartridge. |
* Caution: Unlike modern SLR that has auto loading and film speed indexing. None of the FM series models has such feature. You may not have the luxury of depending the camera automated feature to handle these tasks for you. There is no positive way either to guarantee the film has been properly taken up by the spool EXCEPT when you wind the film forward (1), just CHECK if the rewind knob is moving in opposite direction (2).
15. Set the ASA/ISO film speed. Lift the ASA/ISO film speed ring and rotate it in either direction until the red ASA/ISO film speed indicator is opposite the ASA/ISO film speed indication in use. The two-action (Lift and Turn) minimize chances of accidental shifting of the film speed value.
 |
|
Warning: Unless the film speed is set correctly on your camera with t he film type in use, you CANNOT obtain correct exposure. |
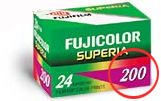
Note: Film Speed is indicated by a number such as ISO 100 or ISO 400 etc. you can identify them on the film box. The sensitivity of a given film to light. The higher the number, the more sensitive or faster (and more grainer) the film. If you have a slow speed lens (Typical drawback of zoom lenses), use a film with higher speed such as ASA 400, 880. If you want the finest grain possible for big blow ups ? Use slower but fine grain film (But at the expense of slower shutter speed as well). Most common film speed used is ASA/ISO 100 & 200. 'ISO' stands for International Standards Organization.
| Previous | Next | Basic
Setup & Operations Part II
| Back | Index
Page of Nikon FM2(n) Instruction Manual
| Back | Main Index
Page of Nikon FM series Bodies
| Back | to Pictorial History of Nikon Rangefinder/SLR/Digital cameras
| Message Board | for
your favourite Nikon
FM Series SLR models
| Message
Board | for your Nikon
Optics in a shared environment
| Message Board | Specifically for Dispose or Looking for Nikon/Nikkor
Photographic Equipment
Standard
production Nikon FM Series models:-
Nikon FM | Nikon FM2 | Nikon FM2n | Nikon FM10 | Nikon FM3a |
Known
variants:-
Nikon
FM Gold
| Nikon
FM2/T
| Nikon
FM2N Tropical Set
| Nikon
FM2/T Limited Edition
| Nikon
FM2N LAPITA
|
Nion
FM2n Millennium 2000
Shared Resources: MD-11 | MD-12 | Focusing Screens | Titanium Shutter | Flash Units -SB-16 | SB-15 | SB-10 or other Options | Databack | Nikkor lens mount (related info)
Others:- Nikon AF-TTL Speedlights | SB-20 (1986) | SB-22 (1987) | SB-23 | SB-24 (1988) | SB-25 (1991/2) | SB-26 (1994) | SB-27(1997) | SB-28 (1997) | Nikon SB-29(s) (2000) | Nikon SB-30 (2003) | Nikon SB-600 (2004) | Nikon SB-800 (2003) Nikon AF-TTL Speedlight DX-Series: Nikon SB-28DX (1999) | SB-50DX (2001) | SB-80DX (2002)
Nikon
BC-flash Series |
Original
Nikon Speedlight
SB-2
| SB-3
| SB-4
| SB-5
| SB-6
| SB-7E
| SB-8E
| SB-9
| SB-E
| SB-10
SB-11
| SB-12 | SB-14 | SB-140 UV-IR| SB-15 | SB16A | SB-17 | SB-18, SB-19 | SB-21A (SB-29) Macro flash | Flash Accesories | SF-1
Pilot Lamp
Instruction
Manual: Nikon FM (HTML | PDF) | Nikon FM-10 (HTML) | Nikon FM2n's
User's Manual
available only in HTML format (6
parts) | Nikon
FM3A
(HTML)
Specifications: Nikon FM, FM-10, FM2, FM2n and FM3A / Main
Reference Map: (HTML) Nikon FM, FM2, FM-10, FM2n (Applicable
to FM2T, FM2 "Year of the Dog"; Millennium 2000") and Nikon FM3A
| Nikon F | Nikon F2 | Nikon F3 | Nikon F4 | Nikon F5 | Nikon F6 | Nikkormat / Nikomat | Nikon FM | Nikon FE/ FA | Nikon EM/FG/FG20 | Nikon Digital SLRs | Nikon - Other models |
Nikon Auto Focus Nikkor lenses:- Main
Index Page
Nikon Manual Focus Nikkor lenses:- Fisheye-Nikkor Lenses - Circular | Full Frame |
Ultrawides Lenses - 13mm15mm18mm20mm | Wideangle Lenses - 24mm28mm35mm | Standard Lenses - 45mm 50mm 58mm | Telephoto
Lenses - 85mm105mm135mm180mm & 200mm | Super-Telephoto Lenses - 300mm 400mm 500mm 600mm 800mm 1200mm |
 Index Page |
Special
Application lenses: Micro-Nikkor Lenses - 50mm~55mm -60mm 85mm -105mm 200mm Micro-Zoom 70-180mm Perspective Control (PC) - 28mm 35mm PC-Micro 85mm Dedicated Lenses for Nikon F3AF: AF 80mm f/2.8 | AF 200mm f/3.5 EDIF Depth of Field Control (DC): 105mm 135mm Medical Nikkor: 120mm 200mm Reflex-Nikkor Lenses - 500mm 1000mm 2000mm Others: Noct Nikkor | OP-Nikkor | UV Nikkor 55mm 105mm | Focusing Units | Bellows-Nikkor 105mm 135mm Nikon Series E Lenses: 28mm35mm50mm100mm135mm | E-Series Zoom lenses: 36~72mm75~150mm70~210mm |
MF Zoom-Nikkor Lenses: 25~50mm | 28~45mm | 28~50mm | 28~85mm | 35~70mm | 36~72mm E | 35~85mm | 35~105mm | 35~135mm | 35~200mm | 43~86mm | 50~135mm | 50~300mm | 70~210mm E | 75~150mm E | 80~200mm | 85~250mm | 100~300mm | 180~600mm | 200~400mm | 200~600mm | 360~1200mm | 1200~1700mm
Tele-Converters: TC-1 | TC-2 | TC-200 | TC-201 | TC-300 | TC-301 | TC-14 | TC-14A | TC-14B | TC-14C | TC-14E | TC-16 | TC-16A | TC-20E
Recommended links to understand more technical details
related to the Nikkor F-mount and production Serial Number:
http://rick_oleson.tripod.com/index-153.html by: my
friend, Rick Oleson
http://www.zi.ku.dk/personal/lhhansen/photo/fmount.htm by: Hansen,
Lars Holst
http://www.mir.com.my/rb/photography/hardwares/nikonfmount/lens2.htm
http://www.photosynthesis.co.nz/nikon/serialno.html
W A R N I N G: The New G-SERIES Nikkor lenses have no aperture ring on the lens, they CANNOT ADJUST APERTURES with any of these manual focus Nikon FE series SLR camera models; please ignore some portion of the content contained herein this site where it relates.
|
Back | Main Index Page of Nikkor Resources
|
Back | Main Index Page of Pictorial
History of Nikon SLRs
| Message Board | for your Nikkor optics ("shared" because I do wish some of you to expose to other's perspective as well. Isn't it a sad sate to see photography has to be segmented into different camps from the use of various labels)
about this photographic web site
Home - Photography in Malaysia |
![]()
Credit: To all the good people who has contributed their own experience, resources or those who are kind enough granting us permission to use their images appeared in this site. Mr. MCLau®, who has helped to rewrite some of the content appeared this site. Chuck Hester® who has been helping me all along with the development of all these Nikon websites;LarsHolst Hansen, 'Hawkeye' who shares the same passion I have; Ms Rissa, Sales manager from Nikon Corporation Malaysia for granting permission to use some of the official content; TedWengelaar,Holland who has helped to provide many useful input relating to older Nikkor lenses; Some of the references on production serial numbers used in this site were extracted from Roland Vink's website; HiuraShinsaku from Nikomat Club Japan. t is also a site to remember a long lost friend on the Net. Note:certain content and images appeared in this site were either scanned from official marketing leaflets, brochures, sales manuals or publications published by Nikon over the years and/or contribution from surfers who claimed originality of their work for educational purposes. The creator of the site will not be responsible for may discrepancies arise from such dispute except rectifying them after verification."Nikon", "Nikkormat", "Nippon Kokagu KK" & "Nikkor" are registered tradename of Nikon Corporation Inc., Japan. Site made with an Apple IMac.