16. Hold the camera and point it at the subject Although it is not always true to claim a blur images in photography is not good, MOST good photographs have sharp images. One of the many factors that may affect sharpness is how steady the camera is being hold when you trip the shutter release button.
|
|
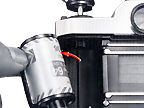
Basic holding posture: Use your left hand to cradle the camera, with your fingers wrapped around the lens and the elbow propped against your body for support, as you look through the viewfinder. |
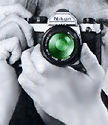
Use your right
hand's index finger to depress the shutter release button and your thumb to wind
the film advance lever. Wrap the other fingers of your right hand around the camera
body. You can adapt this basic posture to both horizontal and vertical format shooting.
To hold the camera steady, it is advisable to lean on or against something strong
and stable (e.g.,a wall).
 |
Tips: Don't challenge slow shutter speed. IF light level falls too slow for a comfortable hold, use a tripod or anything that can help to stabilize the camera. If you foresee a photo session in poorly lit situations, consider using faster film like ASA/ISO 400 or 880 to gain shutter speed, bring along a mono pod or tripod. The last alternative is to use artificial illumination such as flash. Important: Intermediate settings of lens aperture are usable, but NOT intermediate shutter speed. |
17. Set
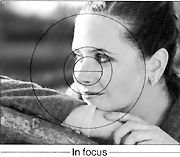
the correct exposure. First position your main subject at the center (i.e., the
12mm-diameter circle) of the field of view inside the viewfinder. Then turn the shutter
speed dial and/or lens aperture ring until the LED lamp or the symbol for correct
exposure lights up.
|
|
|
Exposure = Aperture + Shutter Speed. Depends very much on the effect of what you envisage in a photograph to be. You can either adjust shutter speed (Camera Side) or aperture (Lens Section) to achieve the desired effect. |
( Learn MORE Basic on Photography )
Tips: First, you ought to understand there is NO clear definition of a 'Correct' Exposure. It is all a matter of personal preference of whether you like a photograph to be lighter or darker (In most cases, automation decides for you right from the camera metering to give you the exposure guide, to the 1-hour photo lab print technician). IF you are new to photography (Just as I did many years back...and thus I understand where the confusing part is), you will be wondering how a "Correct Exposure" was determined ? All modern cameras have a light sensitive metering cell inside the body. The metering cell will 'measure' light intensity for a given scene and based on a 18% gray reading to provide a value for 'correct' exposure. First, why 18% gray ? Becoz' the cell(s) does not sees light as color and put the scene it renders a scene as black and white. Next, in a world of black and white sees by a metering cell, 18% gray represents most common scene that fills with 'common scenes' such as a lot of greens etc... IF a picture is filled with subjects close to 'common scenes' of 18% gray, along with film speed of film in use, if you followed the exposure guide provide by the camera and take the exposure, the photograph should exhibits brilliantly in color and contrast that faithfully reproduced the scene that you took, we usually termed that as 'correct' exposure. But since NOT all scene are 'common' such as in front of a brightly lit white wall or dark background, such scenes could easily fool the camera metering circuit to render it as 18% gray and thus either OVER or UNDER exposure in a photograph could form.
Note: Center-weighted Metering System (A 60/40 Ratio) is employed in all FM series bodies. The meter reads the light over the entire focusing screen but has a distinct bias on the central 12mm-diameter area. If you aim the center 12mm circle to the most important element in your photograph, the 60% heavy reading should provide you a reasonably good exposure reading.
 |
18. Focus on the subject by rotating the lens focusing Ring |
 |
 |
A typical Type K standard screen is a multi purpose screen. There are two other types of focusing screens which you can select to suit your needs. There is a separate section focuses on the Interchangeable Focusing Screen which you can use it as a buying reference guide. |
Note: Generally, most 'entry' (means cheap) zoom lenses has small maximum aperture. This may cause the split-image rangefinder darken at one half and making focusing extremely uncomfortable to use. Use outer fields of the screen for focusing instead or change to a plain screen like Type E.
 |
9. Depress the shutter release button. Look through the viewfinder, and depress the shutter release button. In depressing the shutter release button, apply light but steady pressure with the ball of your index finger to avoid camera shake that might result in image blur. |
 |
20. Advance the film. Wind the film advance lever as far as it will go to transport the film to the next frame and ready the camera for the next shot. Do not apply excessive pressure in winding the lever. You cannot wind the lever when the film is at an end of film roll - double check this with the frame counter and you should then rewind the film. |
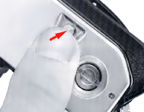 |
21. Press the film rewind button After the last exposure has been made, turn the camera upside down and press the film rewind button, so that the exposed film can be rewound back into its cartridge. All you need is just to press the button once. You need not have to depress the button all the way while you rewinding the film. |
 |
 |
22. Rewind the film. Lift the film rewind crank and turn it in the direction of the arrow. At the end of film rewind, you will feel a slight resistance. Continue winding one or two more turns until the crank feels lighter and less resistance; this will indicate that the film leader is now fully rewound into the cartridge. |
23. Remove
the film cartridge. Push the camera back lock lever in the direction of the arrow
as you lift the film rewind crank to open the camera back. Take out the film cartridge.
Avoid unloading film in direct sunlight.
 |
24. Put the film advance lever back into place. Close the camera back and push the film advance lever into place. When you're not using the camera, you should set the film advance lever to this position which locks the shutter release button and keeps the exposure indicator lamps inside the viewfinder switched off even if the shutter release button is accidentally pressed. |
Note: There is a energy
saving circuit designed in the FM2 models and above. Even if the exposure indicator
lamp is lit, it will automatically be switched off in approx. 30 sec., and the exposure
measuring circuit will simultaneously be cut off.
Controls in Detail
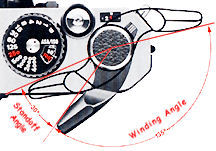 |
Film advance lever The film advance lever also functions as a lock for the shutter release button. The shutter release button is unlocked when the lever is pulled out to the standoff position. To advance the film, wind the lever to the right all the way until it stops. It automatically returns to the standoff position the moment you take your thumb off it. A single, completed stroke of the lever advances the film by a single frame and simultaneously cocks the shutter. |
Frame counter The additive type frame counter is graduated from S 1 2 4 .. up to 36 in even numbers with odd numbers indicated by white dots in between the even numbers. Even if there's no film in the camera, the frame counter is operative, advancing by a single frame every time the film advance lever is fully wound.
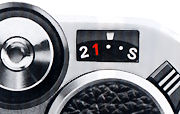 |
After frame 36 of a 36-exposure roll of film, the counter will not operate even if you repeatedly press the shutter release button and wind the film advance lever, film will be advanced, however, until the actual end of the film roll. The counter is automatically reset to S when the camera back is opened. |
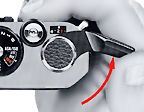
Shutter release button The shutter release button also serves to activate the FM2's built-in exposure meter. When the film advance lever is in the flush position, the shutter release button is locked and will not operate. To release the button from its locked position, pull out the film advance lever to the standoff position.
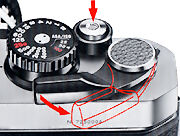 |
Slight pressure on the shutter release button will then switch on both the exposure meter and the LED exposure information display inside the viewfinder. The meter and the display remain on for approx. 30 sec. after the finger is removed from the button, after which they are automatically switched off to conserve battery power. Pressing the shutter release button all the way down releases the shutter. When you depress the button, touch the finger guard with the tip of your index finger and depress it lightly with smooth, even pressure. |
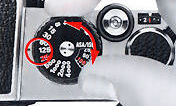
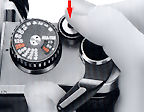
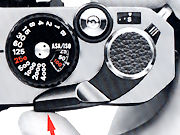
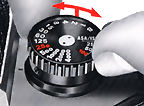
This makes shutter release operation smooth and stable. With a shutter speed of 1/30 sec. or slower, it is advisable to attach the camera to a tripod and use a cable release to release the shutter, this will prevent camera shake which results in blurred photographs. The cable connector can be screwed into the hole at the center of the shutter release button. If the tripod has a large head, contact between the lens barrel and the head may make it impossible to turn the lens aperture ring. In this case, use the special tripod adapter supplied with the camera between the tripod head and the camera body. The ASA/ISO scale on the dial has numbered settings for speeds from ASA/ISO 12 to 6400. The dots between each pair of ASA/ISO numbers stand for intermediate settings, such as 64, 80, etc. The illustration above gives the speeds for all intermediate settings. ASA/ISO 100 and 400 are indicated in red as they are used quite often. ASA/ISO is a numerical rating of the film's sensitivity to a given amount of light.
 |
||
|
ASA/ISO
film
speed dial |
TThe higher the number, the greater the sensitivity, and vice versa. The ASA/ISO of your film is indicated on the cartridge itself. It is also printed on the film carton and on the data sheet packed inside.Note: Unlike auto-exposure SLR that has a few other handy features like exposure compensation button or dial to fine tune exposure reading; many seasoned photographers often used the film speed settings on a mechanical SLR camera to act as a exposure compensation device to override exposure measurement by camera. It is perfectly all right to use such method as long as you understand how it works because it is also part of photographic skill BUT just remember to reset the film speed to actual setting after use. |
|
Shutter speed Dial/Exposure Determination
 |
As stated earlier: Exposure is determined by a combination of Aperture Value (On the lens) and Shutter Speed (Camera). Each of these two main components will yield differing effects. |
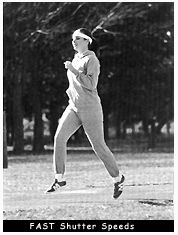
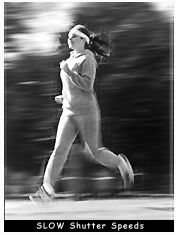
Generally, fast speed freezes an action, while slow speed portrays movement (For a casual use of camera, it interpret as "Fast speed" = sharp picture, slow speed causes blur photographs.). The aperture value on the lens are just numerals that indicates how large or small the lens diaphragm is opened up to let in the amount of light to the film via shutter timing of the curtain opening during an exposure process. Generally, aperture affects another important element in photography, i.e. "Depth of Field" (DOF). Depth of field is a subjective quantity and an explanation to the zone of sharpness in front and behind a subject that you have put it in focus via a lens. MORE info about "Depth of Field" in this Instruction Manual. Large aperture (smaller number such as f2, f1.4, f1.8 etc.) engraved on the aperture ring on your lens means less DOF; while small aperture (f11, f16, f22 etc..) generates broader range of sharpness. The MOST confusing part for someone new to photography is the opposite number indicating corresponding aperture values where "small" means bigger number such as f22; while on the other hand, "large" mean smaller number such as f2.0. Tips: Once you have mastered the differences and relations between these few elements, it will help you open up a new horizon to enjoy photography from here, just get a pen and a piece of paper, go through that few sites.
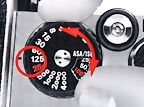 |
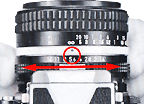
Setting the shutter speed Since shutter speed and aperture can affect so much in photography, let us go through one by one and guide you how to change those settings on the scales. |
To set the shutter speed, turn the shutter speed dial to the right or left until the desired shutter speed number click-stops and is aligned with the shutter speed index. The dial has indications for "B" (bulb) and for shutter speeds from 1 to 1/4000 sec. The 250 engraved in Red indicates that is the fastest sync speed at 1/250 sec. when you intend to use with an electronic flash unit. On "B" (Bulb), the shutter curtains remain open for as long as the shutter release button is kept depressed*.
 |
 |
The numeral "1" is for indicating one second, "2" for 1/2 sec., "60" for 1/60 sec. and so on. One of the two adjoining numbers, excluding "B" is two times or 1/2 as much as the exposure amount of the other number.* For excessive long time exposure, it is impossible to keep the shutter release button depress without generating movement or vibration. It is recommended to use a cable release with a Cable Release Lock feature. ** You can use mid-setting of the aperture. |
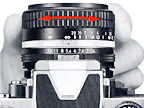
Setting the aperture The lens aperture determines the amount of light reaching the film plane. Generally, when you turn the aperture ring one graduation in the direction of the larger numbers, the amount is reduced by 1/2. (This is what stopping down by one graduation means.) On the other hand, when the aperture ring is turned one graduation in the direction of smaller numbers, the amount of light is doubled. (This is known as opening the aperture by 1 stop.) The lens aperture ring clicks at the position of the numbers engraved although intermediate lens apertures are usable continuously. Lens aperture greatly affects depth of field. With the exception of a few special lenses, any Nikkor lens with a minimum spec of AI (AI-modified included) and Nikon Series E lenses enable full-aperture light measurement even when the aperture ring is moved. These lenses, which are said to have an automatic diaphragm, stop down to the set aperture only at the instant the shutter release button is depressed.
 |
 |
By stopping your lens down (e.g. from F2.8 to f/16) or getting farther away from your subject this zone of acceptable sharpness can be increased. Another factor in determining depth of field is the focal length of your lens. As a rule the shorter the focal length, the greater the zone of acceptable sharpness. |
Exposure determination The amount of light reaching the film plane is determined by a combination of the shutter speed and the lens aperture. A shutter speed of 1/500 sec. lets in twice as much light as a setting of 1/1000 sec., and only half as much light as 1/250 sec. An aperture setting of f/11 lets in twice as much light as f/16, half as much as f/8. Thus, if the correct exposure for a particular picture-taking situation is 1/500 at f/11, then 1/250 at f/16 or 1/1000 at f/8 will give the same exposure. It is very convenient to know this interrelation when considering depth of field. The following table illustrates the interrelation between shutter speed and aperture.
| Shutter speed (sec.) |
1/4000 |
1/2000 |
1/1000 |
1/500 |
1/250 |
1/125 |
| Aperture (f/number) |
2.8 |
4 |
5.6 |
8 |
11 |
16 |
| Previous | Next | Fundamentals
of Photography
| Back | Index
Page of Nikon FM2(n) Instruction Manual
| Back | Main Index
Page of Nikon FM series Bodies
| Back | to Pictorial History of Nikon Rangefinder/SLR/Digital cameras
| Message Board | for
your favourite Nikon
FM Series SLR models
| Message
Board | for your Nikon
Optics in a shared environment
| Message Board | Specifically for Dispose or Looking for Nikon/Nikkor
Photographic Equipment
Standard
production Nikon FM Series models:-
Nikon FM | Nikon FM2 | Nikon FM2n | Nikon FM10 | Nikon FM3a |
Known
variants:-
Nikon
FM Gold
| Nikon
FM2/T
| Nikon
FM2N Tropical Set
| Nikon
FM2/T Limited Edition
| Nikon
FM2N LAPITA
|
Nion
FM2n Millennium 2000
Shared Resources: MD-11 | MD-12 | Focusing Screens | Titanium Shutter | Flash Units -SB-16 | SB-15 | SB-10 or other Options | Databack | Nikkor lens mount (related info)
Others:- Nikon AF-TTL Speedlights | SB-20 (1986) | SB-22 (1987) | SB-23 | SB-24 (1988) | SB-25 (1991/2) | SB-26 (1994) | SB-27(1997) | SB-28 (1997) | Nikon SB-29(s) (2000) | Nikon SB-30 (2003) | Nikon SB-600 (2004) | Nikon SB-800 (2003) Nikon AF-TTL Speedlight DX-Series: Nikon SB-28DX (1999) | SB-50DX (2001) | SB-80DX (2002)
Nikon
BC-flash Series |
Original
Nikon Speedlight
SB-2
| SB-3
| SB-4
| SB-5
| SB-6
| SB-7E
| SB-8E
| SB-9
| SB-E
| SB-10
SB-11
| SB-12 | SB-14 | SB-140 UV-IR| SB-15 | SB16A | SB-17 | SB-18, SB-19 | SB-21A (SB-29) Macro flash | Flash Accesories | SF-1
Pilot Lamp
Instruction
Manual: Nikon FM (HTML | PDF) | Nikon FM-10 (HTML) | Nikon FM2n's
User's Manual
available only in HTML format (6
parts) | Nikon
FM3A
(HTML)
Specifications: Nikon FM, FM-10, FM2, FM2n and FM3A / Main
Reference Map: (HTML) Nikon FM, FM2, FM-10, FM2n (Applicable
to FM2T, FM2 "Year of the Dog"; Millennium 2000") and Nikon FM3A
| Nikon F | Nikon F2 | Nikon F3 | Nikon F4 | Nikon F5 | Nikon F6 | Nikkormat / Nikomat | Nikon FM | Nikon FE/ FA | Nikon EM/FG/FG20 | Nikon Digital SLRs | Nikon - Other models |
Nikon Auto Focus Nikkor lenses:- Main
Index Page
Nikon Manual Focus Nikkor lenses:- Fisheye-Nikkor Lenses - Circular | Full Frame |
Ultrawides Lenses - 13mm15mm18mm20mm | Wideangle Lenses - 24mm28mm35mm | Standard Lenses - 45mm 50mm 58mm | Telephoto
Lenses - 85mm105mm135mm180mm & 200mm | Super-Telephoto Lenses - 300mm 400mm 500mm 600mm 800mm 1200mm |
 Index Page |
Special
Application lenses: Micro-Nikkor Lenses - 50mm~55mm -60mm 85mm -105mm 200mm Micro-Zoom 70-180mm Perspective Control (PC) - 28mm 35mm PC-Micro 85mm Dedicated Lenses for Nikon F3AF: AF 80mm f/2.8 | AF 200mm f/3.5 EDIF Depth of Field Control (DC): 105mm 135mm Medical Nikkor: 120mm 200mm Reflex-Nikkor Lenses - 500mm 1000mm 2000mm Others: Noct Nikkor | OP-Nikkor | UV Nikkor 55mm 105mm | Focusing Units | Bellows-Nikkor 105mm 135mm Nikon Series E Lenses: 28mm35mm50mm100mm135mm | E-Series Zoom lenses: 36~72mm75~150mm70~210mm |
MF Zoom-Nikkor Lenses: 25~50mm | 28~45mm | 28~50mm | 28~85mm | 35~70mm | 36~72mm E | 35~85mm | 35~105mm | 35~135mm | 35~200mm | 43~86mm | 50~135mm | 50~300mm | 70~210mm E | 75~150mm E | 80~200mm | 85~250mm | 100~300mm | 180~600mm | 200~400mm | 200~600mm | 360~1200mm | 1200~1700mm
Tele-Converters: TC-1 | TC-2 | TC-200 | TC-201 | TC-300 | TC-301 | TC-14 | TC-14A | TC-14B | TC-14C | TC-14E | TC-16 | TC-16A | TC-20E
Recommended links to understand more technical details
related to the Nikkor F-mount and production Serial Number:
http://rick_oleson.tripod.com/index-153.html by: my
friend, Rick Oleson
http://www.zi.ku.dk/personal/lhhansen/photo/fmount.htm by: Hansen,
Lars Holst
http://www.mir.com.my/rb/photography/hardwares/nikonfmount/lens2.htm
http://www.photosynthesis.co.nz/nikon/serialno.html
W A R N I N G: The New G-SERIES Nikkor lenses have no aperture ring on the lens, they CANNOT ADJUST APERTURES with any of these manual focus Nikon FE series SLR camera models; please ignore some portion of the content contained herein this site where it relates.
|
Back | Main Index Page of Nikkor Resources
|
Back | Main Index Page of Pictorial
History of Nikon SLRs
| Message Board | for your Nikkor optics ("shared" because I do wish some of you to expose to other's perspective as well. Isn't it a sad sate to see photography has to be segmented into different camps from the use of various labels)
about this photographic web site
Home - Photography in Malaysia |
![]()
Credit: To all the good people who has contributed their own experience, resources or those who are kind enough granting us permission to use their images appeared in this site. Mr. MCLau®, who has helped to rewrite some of the content appeared this site. Chuck Hester® who has been helping me all along with the development of all these Nikon websites;LarsHolst Hansen, 'Hawkeye' who shares the same passion I have; Ms Rissa, Sales manager from Nikon Corporation Malaysia for granting permission to use some of the official content; TedWengelaar,Holland who has helped to provide many useful input relating to older Nikkor lenses; Some of the references on production serial numbers used in this site were extracted from Roland Vink's website; HiuraShinsaku from Nikomat Club Japan. t is also a site to remember a long lost friend on the Net. Note:certain content and images appeared in this site were either scanned from official marketing leaflets, brochures, sales manuals or publications published by Nikon over the years and/or contribution from surfers who claimed originality of their work for educational purposes. The creator of the site will not be responsible for may discrepancies arise from such dispute except rectifying them after verification."Nikon", "Nikkormat", "Nippon Kokagu KK" & "Nikkor" are registered tradename of Nikon Corporation Inc., Japan. Site made with an Apple IMac.