A
little Fundamental
in Exposure:
Before continue with other sections, please bear in mind as I mentioned earlier that
there is no such thing called perfect exposure. Because this can be very subjective
and such values are mainly a personal preference. Theoretically, a good exposure
is defined as one (corresponding to the film in use) that visually yields the most
brilliance of colors But that sounds more like pleasing the film manufacturers (
in providing a tight exposure latitude films all these years) and also to satisfy
a viewer's desire rather than appreciating the creator's vision of how to use over
or under exposure to emphasize a subject matter. Worst still, unless you are using
unforgiving tight exposure latitude slide films, an inexperienced printer in a color
lab can have a higher chance of damaging your prints with auto adjustment.
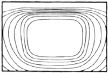
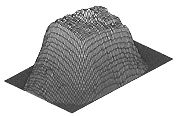
The FM2n uses a photocell to measure the scene with a 18% gray as standard value
(correspond with most scenery like green color) within the picture frame to arrive
at a proper or ideal exposure that can be obtain with certain combination of aperture
and shutter speed setting. That is what generally referred as 'metering'.
 |
 |
The metering system
employs in the FM2n uses a 'safe' way of center weighted average metering method
with center portion given higher priority for exposure calculation (Since that is
where focusing is done) than the rest of other area combine.
|
In Center-weighted
average metering, light coming through the lens is refocused by an aspherical metering
element and prism onto a highly sensitive SPC located near the eyepiece. The distribution
ratio Nikon fond of providing is 60:40, later it was using 75:25 and in some cases,
it even offers 80:20.
The two basic camera
exposure control settings are lens opening (Aperture) and shutter speed. The
size of the aperture determines the amount or volume of light reaching the film from
a given subject and lighting. The Shutter Speed determines the length of
time this light acts upon the film. Apertures are expressed in f-numbers, which are
larger for small openings and vice versa (e.g., f/16 represents a small opening,
f/2 is referred as "large" one). Shutter speeds are expressed in seconds
or fractions thereof, which are generally the reciprocals of the numbers shown on
shutter-speed scales (e.g. 60 = 1/60 sec., and 2 = 1/2 sec.). At usual apertures,
each f-number setting (e.g., f/8) lets in twice as much light as the next numerically
larger one (f/11) and half as much as the next smaller (f/5.6). Similarly, each shutter
speed (e.g., 1/60 sec.) allows light to strike the film twice as long as the next
higher speed (1/125) and half as long as the next lower one (1/30). The interval
between two standard f-numbers (say, f/4 and f/5.6) or shutter speeds (say, 1/15
and 1/30) is one "stop."
Total exposure
on the film is determined by the combination of aperture and speed. Other things
being equal, using the next smaller f-number (i.e., giving one stop more exposure)
will balance using the next higher shutter speed (i.e., giving one stop less exposure),
and so on. A
great range of combinations (e.g., f/5.6 at 1/30, f/4 at 1/60,f/2.8at 1/125, f/2
at 1/250, etc.) will thus
yield the SAME
EXPOSURE.
The specific combination
you choose under given lighting conditions will depend upon the degree to which you
want the greater depth of field associated with smaller apertures or greater movement-blur
preventing ability of faster speeds .
|

|
Note: The smaller the f-number
(e.g. f1.4, f2.0, f2.8 etc.), the larger it is the aperture. Thus, allowing more
light reaching the film to compensate for the duration of the shutter curtain traveling
time. The larger the number (e.g. f11, f16, f22 etc.) is referred as smaller aperture,
and less light will reach the film.
Tips: Once you mastered such
theory, the fun begins. Assuming when your camera recommends a reading of 1/125 sec
at f/8 for a given scene and you are engaged in portraiture outdoor with clustering
backdrops behind your subject of interest, you may think depth of field of f/8 may
not be too pleasant for a head and shoulder shot with the disturbing background and
decided to throw everything behind out of focus to lead viewer's attention more on
the model. In this case, for an example, an aperture of f2.0 is selected; to open
the aperture from f/8.0 to f/2.0 would cause over exposure by 4 stops unless compensation
is done. You can therefore, move shutter speed faster to compensate for the excess
light cause by opening the lens diaphragm by getting the shutter curtain moving faster
from the original setting of 1/125 sec to 1/2000 sec. Now, a theoretical good exposure
will still be achieved from the original 1/125 sec f/8.0 to the 'new' setting of
1/2000 sec at f2.0 but with your objective gaining shallow depth of field achieved
!
Since the FM2n
is neither an automatic SLR camera nor a very complicated one to learn and operate,
all you need to digest is how to make the full use of what the camera can provide
you. Although it lacks many other useful gadgets like those found in many auto everything
SLRs, But just remember - ALL photographs are made of three elements - namely the
shutter speed, aperture and lastly, a subjective vision behind the eyes.
 |
<<-- Copyright
©-Free images collection, 2000
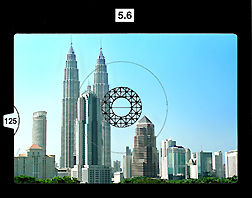
leofoo® Petronas
Twin Towers, Kuala Lumpur. Current
World's tallest
Building as
at 1st May 2000. (A little personal, it is just a few hundred yards always from my
office window...).
|
These may sound
very boring to someone new to photography. But it is an essential route for everyone
to understand the absolute basic. Since the FM2n is a simple bare bone mechanical
camera and thus I thought it is very essential to make something out of the nothing.
After all, regardless how complicated or sophisticated a metering system is being
designed or how many types of exposure control have been installed or programmed,
all are originated from the core basic of shutter speed + aperture value to form
an exposure. So if you own a FM2n or any of the entry model, don't feel disheartened
by the fact that this is most basic and 'down to earth' camera model among the many
fine Nikons, instead, you should threat it as s photographic challenge to equipped
yourself up with good solid foundation for photography and later maximizes its full
potential out of the nothing as compared with any other better spec SLR model.
Exposure
Display
 |
The
LED exposure indicator lamps can be seen on the right side of the view field frame
within the viewfinder. All essential data relates to an suggested exposure like shutter
speed number and f/number in use are also visible. The LED exposure display indicates
exposure five ways, as shown in the table, in accordance with the conditions of each
exposure.
|
As 'correct
exposure' is approached, the LED exposure display inside the viewfinder is liable
to change rapidly and easily within the very narrow range, so it is important to
turn the lens aperture ring and shutter speed dial carefully. Although intermediate shutter
speeds cannot be used, intermediate lens apertures can - just turn the aperture ring for
fine adjustment.
Note: When the shutter
speed dial is set at B (bulb), the LED exposure display inside the viewfinder is
turned off. It is designed in such a way to conserve battery power, since in "B"
(Bulb) mode, you may set for extra-long exposure time.
Metering
range
of exposure meter When there is a proper combination of lens aperture and shutter
speed, "O" lights up, indicating
correct exposure. This sign will not light up when the aperture and shutter speed
combination is not suitable for correct exposure. Also, if the combination of aperture
and shutter speed is improper for the brightness of the subject, the exposure meter
will not give an indication for correct exposure even if you vary the neighboring
settings within a very narrow range. You should try altogether different combinations
of aperture and shutter speed. If you still fail to obtain an indication for correct
exposure, then subject brightness is probably beyond the metering range of the exposure
meter. It is necessary to illuminate the subject or to use an ND (neutral density)
filter to adjust brightness. Note: in full-aperture
measurement, the range of brightness that can be measured by the meter varies with
the maximum f/number of the lens in use, as follows: With a 50mm f/1.4 lens (1 sec.
at f/1.4 and 1/4000 sec. at f/8) and ASA/ISO 100 film, the EV range is from EV 1
to EV 18. With a 135mm f/2.8 lens (1 sec. at f/2.8 and 1/4000 sec. at f/16) and ASA/ISO
100 film, the EV range is from EV3 to EV20
Stop-down
exposure
measurement Warning: Theoretically, stopped
down metering is more accurate than full aperture metering as the lens is stopped
down to picture taking aperture to meter a given scene. While full aperture metering
is somehow like a simulation since the metering circuit will meter based on the lens'
maximum aperture and NOT the picture talking aperture. For an example, if you have
change your aperture from f/2.8 to f16, metering still runs for over or under exposure
indication inside the viewfinder but the finder remains at its brightest state, in
actual state of changing the aperture of the lens from f2.8 to f16 should dim the
finder which would make focusing and composing very difficult. But open aperture
has a big advantage as changes to aperture values will still enable the camera to
generate brightest image inside the viewfinder for the comfort in focusing and composing.
However, since ALL Nikon bodies since 1977 are designed to perform with an AI spec
lens for automatic open aperture metering, you
SHOULD NOT attempt to use this method for normal exposure measurement IF you are
using a AI-spec lens with an AI-spec body such as the FM2(n) featured here as exposure error may result). This exposure measurement
method is used when the diaphragm on the lens does not link with the meter coupling
lever on the camera body, such as when a Non-AI-spec lens or an extension
ring is mounted on the camera. The procedure is as follows: 1 ) Set the ASA/ISO
number. 2) Compose your picture and secure subject focus. 3) Press
the shutter release button lightly to turn the meter on. 4) Perform exposure
measurement, depending on the type of lens used:
Lens with automatic
diaphragm Determine the correct exposure while pressing the depth-of-field (DOF)
preview lever, then take your finger off the lever and depress the shutter release
button.
Lens without automatic
diaphragm (e.g. PC-Nikkor lens)
First, determine the correct exposure by adjusting the shutter speed and aperture.
Then, focus at full aperture. Shift the lens so that you get the desired composition.
Return the aperture setting to the preset position and shoot.
Lens with fixed
aperture (e.g. Reflex-Nikkor lens)
Exposure cannot be changed according to the aperture because in this type of lens,
the aperture is fixed. Determine the correct exposure by turning the shutter speed
dial. If correct exposure is unobtainable, use an ND (neutral density) filter or
change the illumination to adjust the exposure.
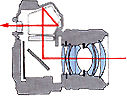
Exposure measurement in special
cases
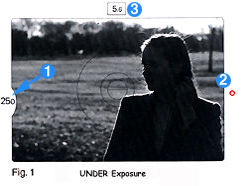
As explained earlier, exposure meter of the Nikon FM2 adopts the counterweighted
exposure measurement system in which approximately 60% of the total amount of light
is measured by the 12 mm-diameter circle at the center of the focusing screen. When
the background of the main subject is too bright and the main subject is not
centered within the frame, the camera meter may be fooled by the light where result
may be underexposed (see Fig. 1). On the other hand, when the background is too dark
and the main subject is too bright with the same framing as above, the result is
overexposure.
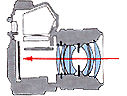
To compensate:
1) Focus on the main subject with the composition you have in mind.2) Move the camera
to center the main subject in the viewfinder (see Fig. 2) and perform exposure measurement.
3) Move the camera back to the position described in 1) with the exposure
setting described in 2) and depress the shutter release button. This way,
you will be able to obtain correct exposure.
 |
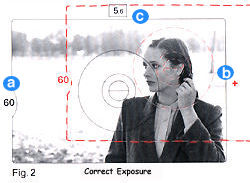 |
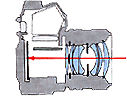
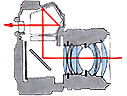
Note: Changes
before (1) & (2) and after
(a) & (c) exposure
compensation (1/250 sec to 1/60 sec. - 2 stops) while aperture remains unchanged.
The exposure LED indicates the new composition of the scene as (+) (b) which indicates overexposure.
Naturally, you can compensate through the use of aperture instead of slower shutter
speed; in this case, 2 stops compensation means 1/250 sec at f2.8 which will still
retain same exposure but the difference is the depth of field as f2.8 is shallower
than f5.6.
|
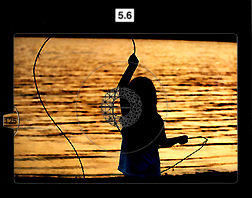 |
Not all images should
be compensated and it depends very much of how you envision an image should be. Backlight
? Why NOT ? Silhouette effect can add some dramatic effect to an ordinary image.
Some would think a fill in flash would have a better effect.. . Anyway, as long as
it is your image and an original interpretation of your idea, you should dictate
how your own image should look like, rather than pleasing anyone.
<<-- Copyright
©-Free images Collection,
2000 leofoo® My
kid at play....
|
However, when
you are more involved into photography, such exposure compensation method may not
be the ideal solution. Because in most cases, if you can maintain exposure and detail
in the shadow, the background detail will be heavily wash out. On the other hand,
if a darkly lit or spot lit subject such as stage photography, compensate the main
subject also means the background detail be be totally black out. Thus, what is the
ideal way of maintaining a good balance ? Fill flash should do the trick. In day
light, we call that technique as synchro-sunlight flash photography while for the
dark background, it is just called fill flash. Nikon has a very 'up market' term
for such popular automated technique used in their AF cameras Matrix Balance Fill
Flash.. where all begins from such concept of manual fill flash photography.
Duplication work and photomicrography A camera
can do all sorts of things. Other than popular usage like family events, outing,
travel, news, reportage or portraiture etc.. Some even used it for industrial
or scientific research application such as duplication work or photomicrography.
Very similar to problems for normal exposure measurement, the tiny built-in photocells
will still read scenes as 18% gray, and thus it demand similar care in exposure compensation
because you cannot obtain correct exposure by simply referring to the FM2's exposure
meter display because these types of photography represent unusual contrast situations.
Exposure compensation is also required. Table below outlines the relationship between
specific photo types and proper exposure. Since this is meant to be a guide, in practice
you should make further compensation by experimentation until you achieve the proper
results.
The exposure compensation
values listed below are reference data obtained when general-purpose film was used.
With color reversal film or microfilm for duplication work, it is advisable to take
additional shots with + one-stop exposure compensation as these films have very small
exposure latitude.
To avoid vibration,
you can make the exposure by turning the illumination on and off.
It is advisable to
use a cable release to avoid camera vibration.
|
|
Subject
|
Method
of exposure measurement
|
Exposure
compensation
|
Required
accessories
|
Remarks
|
|
Copy
work
|
Photographs
and pictures with continuous gradation
|
Full-aperture
or stop-down
|
Compensation
not necessary
|
Micro-Nikkor
or AF Micro-Nikkor lens * Cable release
|
For
high-contrast subjects, use of an 18% reflectance gray card in determining exposure
is recommended. With the card, no exposure compensation is required regardless of
whether the background is black or white.
|
|
Documents
and drawings of high contrast
|
Approx.
+1 to +2 stops for black letters on white background; approx. -1/2 to -1 stop for
white letters on black background.
|
|
Slide
duplication
|
Genera
film with continuous gradation
|
stop-down
|
Approx.
+1 to +2 stops
|
Micro-Nikkor
or AF Micro-Nikkor lens*. Nikon Slide Copying Adapter PS-6, Nikon Bellows Focusing
Attachment PB-6, Cable release
|
When
using Nikon Slide Copying Adapter PS-6, set the flood lamp 30cm away from its opal
plate.
|
|
Approx.
+1-1/2to + 2-1/2 stops for black letters on white background
|
|
Film
of documents and drawings photographed
|
0
to approx. -1/2 stop for white letters on black background
|
|
Photomicrography
|
Prepared
Specimen
|
stop-down
|
Approx.
+ 1 stop
|
Microflex
PFX
|
Generally,
results come out better with more exposure in photomicrography. The compensation
value on the left is only a guide; determine the compensation value by test shooting.
|
* Set the lens'
A-M ring to "M."
| Previous | Next | Viewfinder
Display, Focusing, depth of field Preview, Memo Holder, Infrarred Index, Flash Photography
| Back | Index
Page of Nikon FM2(n) Instruction Manual
| Back | Main Index
Page of Nikon FM series Bodies
|
Back | to Pictorial
History of Nikon Rangefinder/SLR/Digital cameras
| Message Board | for
your favourite Nikon
FM Series SLR models
| Message
Board | for your Nikon
Optics in a shared environment
| Message Board | Specifically for Dispose or Looking for Nikon/Nikkor
Photographic Equipment
Standard
production Nikon FM Series models:-
Nikon FM | Nikon FM2 | Nikon FM2n | Nikon FM10 | Nikon FM3a |
Known
variants:-
Nikon
FM Gold
| Nikon
FM2/T
| Nikon
FM2N Tropical Set
| Nikon
FM2/T Limited Edition
| Nikon
FM2N LAPITA
|
Nion
FM2n Millennium 2000
Shared
Resources: MD-11 | MD-12 | Focusing
Screens
| Titanium
Shutter
| Flash Units -SB-16 | SB-15 | SB-10 or other Options | Databack | Nikkor lens mount (related info)
Others:- Nikon AF-TTL Speedlights
| SB-20 (1986)
|
SB-22
(1987)
| SB-23 | SB-24 (1988) |
SB-25 (1991/2) |
SB-26 (1994)
| SB-27(1997)
| SB-28 (1997) |
Nikon
SB-29(s)
(2000) |
Nikon
SB-30
(2003) |
Nikon
SB-600
(2004) |
Nikon
SB-800 (2003)
Nikon AF-TTL Speedlight DX-Series: Nikon SB-28DX (1999)
| SB-50DX (2001) |
SB-80DX
(2002)
Nikon
BC-flash Series |
Original
Nikon Speedlight
SB-2
| SB-3
| SB-4
| SB-5
| SB-6
| SB-7E
| SB-8E
| SB-9
| SB-E
| SB-10
SB-11
| SB-12 | SB-14 | SB-140 UV-IR| SB-15 | SB16A | SB-17 | SB-18, SB-19 | SB-21A (SB-29) Macro flash | Flash Accesories | SF-1
Pilot Lamp
Instruction
Manual: Nikon FM (HTML | PDF) | Nikon FM-10 (HTML) | Nikon FM2n's
User's Manual
available only in HTML format (6
parts) | Nikon
FM3A
(HTML)
Specifications: Nikon FM, FM-10, FM2, FM2n and FM3A / Main
Reference Map: (HTML) Nikon FM, FM2, FM-10, FM2n (Applicable
to FM2T, FM2 "Year of the Dog"; Millennium 2000") and Nikon FM3A
Nikon Auto Focus Nikkor lenses:- Main
Index Page
Nikon Manual Focus Nikkor lenses:- Fisheye-Nikkor Lenses - Circular | Full Frame |
Ultrawides Lenses - 13mm15mm18mm20mm | Wideangle Lenses - 24mm28mm35mm | Standard Lenses - 45mm 50mm 58mm | Telephoto
Lenses - 85mm105mm135mm180mm & 200mm | Super-Telephoto Lenses - 300mm 400mm 500mm 600mm 800mm 1200mm |
MF Zoom-Nikkor Lenses: 25~50mm | 28~45mm | 28~50mm | 28~85mm | 35~70mm | 36~72mm E | 35~85mm | 35~105mm | 35~135mm | 35~200mm | 43~86mm | 50~135mm | 50~300mm | 70~210mm E | 75~150mm E | 80~200mm | 85~250mm | 100~300mm | 180~600mm | 200~400mm | 200~600mm | 360~1200mm | 1200~1700mm
Tele-Converters: TC-1 | TC-2 | TC-200 | TC-201 | TC-300 | TC-301 | TC-14 | TC-14A | TC-14B | TC-14C | TC-14E | TC-16 | TC-16A | TC-20E
Recommended links to understand more technical details
related to the Nikkor F-mount and production Serial Number:
http://rick_oleson.tripod.com/index-153.html by: my
friend, Rick Oleson
http://www.zi.ku.dk/personal/lhhansen/photo/fmount.htm by: Hansen,
Lars Holst
http://www.mir.com.my/rb/photography/hardwares/nikonfmount/lens2.htm
http://www.photosynthesis.co.nz/nikon/serialno.html
W A R N I N
G: The
New G-SERIES Nikkor lenses have no
aperture ring on the lens, they CANNOT ADJUST APERTURES
with any of these manual focus Nikon
FE series SLR camera models; please ignore some portion of the content contained
herein this site where it relates.
|
Back | Main Index Page of Nikkor Resources
|
Back | Main Index Page of Pictorial
History of Nikon SLRs
| Message Board |
for your Nikkor
optics ("shared"
because I do wish some of you to expose to other's perspective as well. Isn't it
a sad sate to see photography has to be segmented into different camps from the use
of various labels)
about this photographic web site
 |
Home - Photography in Malaysia
|

Credit: To all the good
people who has contributed their own experience, resources or those who are kind
enough granting us permission to use their images appeared in this site. Mr. MCLau®, who has helped to rewrite
some of the content appeared this site. Chuck Hester® who has been helping
me all along with the development of all these Nikon websites;LarsHolst Hansen, 'Hawkeye' who
shares the same passion I have; Ms Rissa, Sales manager from Nikon
Corporation Malaysia for granting permission to use some of the official content;
TedWengelaar,Holland who has helped
to provide many useful input relating to older Nikkor lenses; Some of the references
on production serial numbers used in this site were extracted from Roland Vink's website; HiuraShinsaku from Nikomat Club
Japan. t
is also a site to remember a long lost friend on the Net. Note:certain content
and images appeared in this site were either scanned from official marketing leaflets,
brochures, sales manuals or publications published by Nikon over the years and/or
contribution from surfers who claimed originality of their work for educational purposes.
The creator of the site will not be responsible for may discrepancies arise from
such dispute except rectifying them after verification."Nikon", "Nikkormat", "Nippon Kokagu KK" & "Nikkor" are registered
tradename of Nikon Corporation Inc., Japan. Site made with an Apple IMac.