Attaching/Detaching
a Lens If you are new to the Nikon photography, most likely a newly bought FM3A
will be sold without a lens attached and require you to purchase a lens separately,
you may have to pick up a little bit of basic skill in handling the process of mounting
or detaching a lens onto/from the camera body. It is a very easy process and in time
to come, you may have to do this hundreds or even thousand of times because the sheer
convenience, faithful reproduction of visual and accuracy of direct reflex viewing
though the viewfinder (TTL) and ability to change different types and form of lenses
in single lens reflex (SLR) photography is the strongest asset in any SLR camera.
Nikon has designed the lens changing process so simple that you can actually do it
single-handedly. Follow the process and learn to master it:
1. Attaching a lens onto the Nikon FM3A
 |
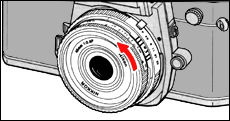 |
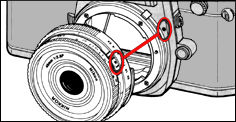
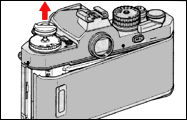
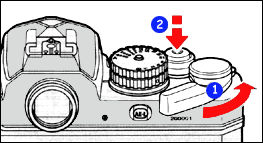
a. Align the mounting indexes (black dot(s) on the lens and camera body. Turn the lens in the direction of the arrow slowly until it clicks into place. |
Caution: When attaching a lens, take care not to press the lens release button.
2. Detaching
the lens from the camera and/or changing a new lens
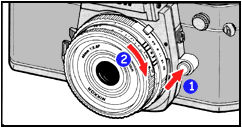 |
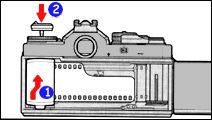
Just press with the side of your index finger and while holding the lens-release button (1) and turn (2) the lens clockwise (direction of the arrow indicated in the illustration) to detach. It is just that simple. |
Note: When you leave the camera unattended without a lens attached, be sure to attach the supplied body cap (white) to protect the nternal mechanism of the camera.
Important: For the best compatibility to use with the Nikon FM3A, always use an Ai-type lens with this camera. Although it is not in the interest of Nikon commercially to indicate there are many other types of, not just the current autofocus Nikkor lenses* but older manual focus Nikkor lenses that can be used with the FM3A. But since Nikon has, over the years produced more than a few hundred types of lenses for their SLR cameras that carried essentially the same proprietary F-mount which was introduced heading back to 1959, we need to address the compatibility issues of lens/camera in a | Separate Section |.
* There are some non-Ai-type
tenses that can be used with this camera.
* AT all cost AVOID the G-series AF Nikkor lenses, as these new series of AF lenses
are ONLY designed to be sued with Nikon AF cameras. You can still mount the camera
onto the manual focus FM3A EXCEPT these lenses have
no aperture ring for you to adjust apertures on the lens.
 |
 |
As long as the camera has the battery correctly installed; pull the film advance lever to standoff position and light touching the shutter release button will activate the meter. When you look through the viewfinder, it looks something like this: |
Understand Key Features/Indication/Functions inside the Viewfinder:
 |
|
![]() :
Flash ready light. When used with compatible Nikon or other third party flash
unit, the flash ready light will lit after full charge and also provide exposure
confirmation in TTL/OTF flash operation.
:
Flash ready light. When used with compatible Nikon or other third party flash
unit, the flash ready light will lit after full charge and also provide exposure
confirmation in TTL/OTF flash operation.
![]() :
Used with AUTO mode. Lit if you do exposure compensation to fine adjustment of
exposure reading the camera provides. Keep in mind to return the exposure-compensation
dial to "0" after doing exposure-compensation shooting.
:
Used with AUTO mode. Lit if you do exposure compensation to fine adjustment of
exposure reading the camera provides. Keep in mind to return the exposure-compensation
dial to "0" after doing exposure-compensation shooting.
![]() :
The exposure meter of this camera employs a center-weighed metering system. Other
than tricky lighting situation, you should be obtaining proper exposure by metering
the light with the main portion of your subject located within the center 12-mm-diameter
circle in the viewfinder. There are few other ways in later chapters to get more
accurate exposure reading along with the center-weighted metering system employs
in the FM3A.
:
The exposure meter of this camera employs a center-weighed metering system. Other
than tricky lighting situation, you should be obtaining proper exposure by metering
the light with the main portion of your subject located within the center 12-mm-diameter
circle in the viewfinder. There are few other ways in later chapters to get more
accurate exposure reading along with the center-weighted metering system employs
in the FM3A.
Basic
Operations
for Shooting: There are TWO operation modes available with the Nikon FM3A. Either
you can select to shoot AUTO mode or revert to Manual shooting. In aperture-priority
auto exposure shooting, select on aperture appropriate to your desired result while
the camera built-in electronic circuit will find the appropriate shutter speed to
enable proper exposure for you automatically. While in manual shooting, you have
to select BOTH shutter speed (camera section) and aperture on the lens side while
using the camera's exposure indicator as reference for proper exposure to get the
desire results. You can freeze a moving subject with a high shutter speed or illustrate
the flow of water with a low shutter speed, using shutter speed and aperture skillfully
to achieve the desired effects.
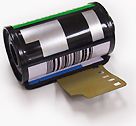 |
One major improvement made to the Nikon FM3A over the previous Nikon FM series model(s) is the incorporation of the automatic DX film recognition. As most modern films are generally DX-coded, this has eliminated chances of setting the wrong ASA/ISO film speed on the camera which will result in erroneous exposures which sometimes may even spoilt all the handwork especially when dealing assigned or taking important assignments such as wedding, major sports events, reportage or other once in a life time shoot etc. |
When you use DX-coded film (Learn More how DX-coding works), the FM3A automatically detects the film speed makes the appropriate setting. Basically, the bar code on a cartridge of 35-mm film. The bar code contains information on the type of film, sensitivity, and number of frames. A camera that can read DX code is automatically adjusted by reading the information.
 |
 |
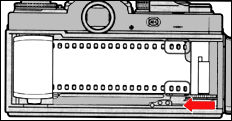
1. Open the camera back. |
 |
3. Insert the film leader into one of the slots of the film-takeup spool. 4. Fit the film sprocket holes of the film onto the spool's sprockets. Slowly rotate the film-takeup spool inward with your thumb, making sure the latch is in the slot such that the film sprocket holes of the film are meshed with the sprockets. |
 |
Caution: The shutter curtains are very thin. Be careful NOT to touch the shutter curtains with your fingers or the film leader. As most new users might not aware there is a shutter curtain BEHIND the film, over the years, I have seen many deformed shutter curtains of MF cameras caused by inexperienced users during film loading. JUST BE CAREFUL. |
 |
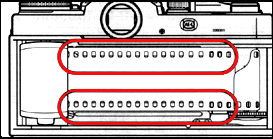 |
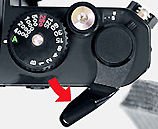
5. Advance the film on the film take-up spool. To advance the film on the film-takeup spool, pull out the film-advance lever to the standoff position and wind it slowly
6. Check the position of the film. Make sure that the film sprocket holes are perfectly meshed with the film sprockets and that the film is correctly set between the film guide rails.
 |
 |
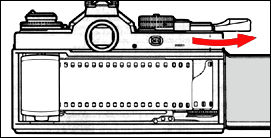
7. Close the camera back and take up the film slack. |
(b) Pull out the film-rewind crank and rotate it in the direction of the arrow until it stops to take up the slack inside the film cartridge.
8. Make a few blank exposures. Blank exposure is referring to a camera with manual film winding, initial film advancing is required by repeatedly releasing the shutter and winding the film until the film counter indicates the first frame. With the FM3A, just wind the film-advance lever and press the shutter-release button until the frame counter indicates frame. Adjust the shutter-speed dial to a high speed other than "A."
* Caution: Unlike modern automatic
SLR that has auto film loading and auto film advance to frame one feature. The FM3A
will still require the user to handle this task manually while there film check window
will serve only to confirm whether there is film roll inside the camera and provide
visual check for the film speed of film in use (However, in such case, both the flash
icon and exposure compensation indicator will keep flashing to remind you that no
film is inside the camera).
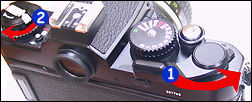 |
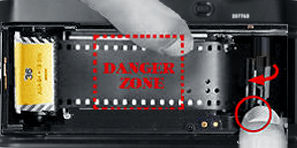
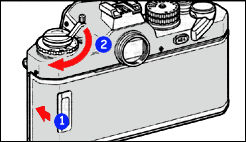
There is no positive way either to guarantee the film has been properly taken up by the spool EXCEPT when you wind the film forward (1), just CHECK if the rewind knob is moving in opposite direction (2). |
CAUTION: If the film rewind know knob fails to rotate, it simply interprets the film has NOT been loaded correctly or the film leader has not been properly inserted and taken up by the spool, OPEN the film back, reload the film cartridge tightened the film by rotating the rewind knob and when you feel there is some resistance, repeat making blank exposures until the frame counter indicates frame 1.
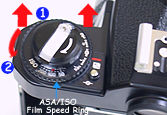
15. Set the ASA/ISO film speed. Lift the ASA/ISO film speed ring and rotate it in either direction until the red ASA/ISO film speed indicator is opposite the ASA/ISO film speed indication in use. The two-action (Lift and Turn) minimize chances of accidental shifting of the film speed value.
NOTE: ISO film speed is an unit
to indicate the film sensitivity, defined by the ISO (International Organization
for Standardization).
Setting the Film Speed (Applied to
DX-coded Film)
 |
When using DX-coded film, set the film-speed index to |
1. Pull up the film-speed setting ring.
2. Set the film speed to
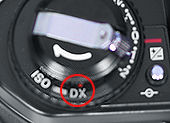 |
Note: If you load non-DX-coded film with the film-speed index set to |
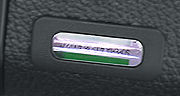 |
Film Confirmation Window You can check the type, the number of frames, and the ISO film speed through the film confirmation window as this considerate feature has been very well position to show the film data when put in place (when the film is properly stretched to the film take up spool. |
Previous | NEXT | 3/8 Handling the FM3A correctly, gettting the metering on, focusing, setting up to shoot in Aperture Priority AE and Manual Mode
| Back | Index Page of Instruction Manual Section of Nikon FM3A
| Other Issues relate to Nikon
FM3A |< Index
Page >
| Instruction Manual for Nikon FM3A |
| Technical Specification | Main
Reference Map
|
Standard
production Nikon FM Series models:-
Nikon FM | Nikon FM2 | Nikon FM2n | Nikon FM10 | Nikon FM3a |
Known
variants:-
Nikon
FM Gold
| Nikon
FM2/T
| Nikon
FM2N Tropical Set
| Nikon
FM2/T Limited Edition
| Nikon
FM2N LAPITA
|
Nion
FM2n Millennium 2000
| Message Board | for
your favourite Nikon
FM Series SLR models
| Message
Board | for your Nikon
Optics in a shared environment
| Message Board | Specifically for Dispose or Looking for Nikon/Nikkor
Photographic Equipment
| Back | Main Index Page of Nikon FM series Bodies
Shared Resources: MD-11 | MD-12 | Focusing Screens | Titanium Shutter | ORIGINAL dedicated Flash Units -SB-16 | SB-15 | SB-10 or other Options | Databack | Nikkor lens mount (related info)
Others:- Nikon AF-TTL Speedlights
| SB-20 (1986)
|
SB-22
(1987)
| SB-23 | SB-24 (1988) |
SB-25 (1991/2) |
SB-26 (1994)
| SB-27(1997)
| SB-28 (1997) |
Nikon
SB-29(s)
(2000) |
Nikon
SB-30
(2003) |
Nikon
SB-600
(2004) |
Nikon
SB-800 (2003)
(updated)
Nikon AF-TTL Speedlight DX-Series: Nikon SB-28DX (1999)
| SB-50DX (2001) |
SB-80DX
(2002)
(updated)
Nikon
BC-flash Series |
Original Nikon Speedlight
SB-2
| SB-3
| SB-4
| SB-5
| SB-6
| SB-7E
| SB-8E
| SB-9
| SB-E
| SB-10
SB-11
| SB-12 | SB-14 | SB-140 UV-IR| SB-15 | SB16A | SB-17 | SB-18, SB-19 | SB-21A (SB-29) Macro flash | Flash Accesories | SF-1
Pilot Lamp
Instruction
Manual: Nikon FM (HTML | PDF) | Nikon FM-10 (HTML) | Nikon FM2n's
User's Manual
available only in HTML format (6
parts) | Nikon FM3A (HTML)
Specifications: Nikon FM, FM-10, FM2, FM2n and FM3A
Main Reference Map: (HTML) Nikon FM, FM2, FM-10, FM2n (Applicable
to FM2T, FM2 "Year of the Dog"; Millennium 2000") and FM3A
| Nikon F | Nikon F2 | Nikon F3 | Nikon F4 | Nikon F5 | Nikon F6 | Nikkormat / Nikomat | Nikon FM | Nikon FE/ FA | Nikon EM/FG/FG20 | Nikon Digital SLRs | Nikon - Other models |
Nikon Auto Focus Nikkor lenses:- Main Index Page
Nikon Manual Focus Nikkor lenses:- Fisheye-Nikkor Lenses - Circular | Full Frame |
Ultrawides Lenses - 13mm15mm18mm20mm | Wideangle Lenses - 24mm28mm35mm | Standard Lenses - 45mm 50mm 58mm | Telephoto
Lenses - 85mm105mm135mm180mm & 200mm | Super-Telephoto Lenses - 300mm 400mm 500mm 600mm 800mm 1200mm |
 Index Page |
Special
Application lenses: Micro-Nikkor Lenses - 50mm~55mm -60mm 85mm -105mm 200mm Micro-Zoom 70-180mm Perspective Control (PC) - 28mm 35mm PC-Micro 85mm Dedicated Lenses for Nikon F3AF: AF 80mm f/2.8 | AF 200mm f/3.5 EDIF Depth of Field Control (DC): 105mm 135mm Medical Nikkor: 120mm 200mm Reflex-Nikkor Lenses - 500mm 1000mm 2000mm Others: Noct Nikkor | OP-Nikkor | UV Nikkor 55mm 105mm | Focusing Units | Bellows-Nikkor 105mm 135mm Nikon Series E Lenses: 28mm35mm50mm100mm135mm | E-Series Zoom lenses: 36~72mm75~150mm70~210mm |
MF Zoom-Nikkor Lenses: 25~50mm | 28~45mm | 28~50mm | 28~85mm | 35~70mm | 36~72mm E | 35~85mm | 35~105mm | 35~135mm | 35~200mm | 43~86mm | 50~135mm | 50~300mm | 70~210mm E | 75~150mm E | 80~200mm | 85~250mm | 100~300mm | 180~600mm | 200~400mm | 200~600mm | 360~1200mm | 1200~1700mm
Tele-Converters: TC-1 | TC-2 | TC-200 | TC-201 | TC-300 | TC-301 | TC-14 | TC-14A | TC-14B | TC-14C | TC-14E | TC-16 | TC-16A | TC-20E
Recommended links to understand more technical details
related to the Nikkor F-mount and production Serial Number:
http://rick_oleson.tripod.com/index-153.html by: my
friend, Rick Oleson
http://www.zi.ku.dk/personal/lhhansen/photo/fmount.htm by: Hansen,
Lars Holst
http://www.mir.com.my/rb/photography/hardwares/nikonfmount/lens2.htm
http://www.photosynthesis.co.nz/nikon/serialno.html
W A R N I N G: The New G-SERIES Nikkor lenses have no aperture ring on the lens, they CANNOT ADJUST APERTURES with any of these manual focus Nikon FE series SLR camera models; please ignore some portion of the content contained herein this site where it relates.
|
Back | Main Index Page of Nikkor Resources
|
Back | Main Index Page of Pictorial
History of Nikon SLRs
| Message Board | for your Nikkor optics ("shared" because I do wish some of you to expose to other's perspective as well. Isn't it a sad sate to see photography has to be segmented into different camps from the use of various labels)
about this photographic web site
Home - Photography in Malaysia |
![]()
Credit: To all the good people who has contributed their own experience, resources or those who are kind enough granting us permission to use their images appeared in this site. Mr. MCLau®, who has helped to rewrite some of the content appeared this site. Chuck Hester® who has been helping me all along with the development of all these Nikon websites;LarsHolst Hansen, 'Hawkeye' who shares the same passion I have; Ms Rissa, Sales manager from Nikon Corporation Malaysia for granting permission to use some of the official content; TedWengelaar,Holland who has helped to provide many useful input relating to older Nikkor lenses; Some of the references on production serial numbers used in this site were extracted from Roland Vink's website; HiuraShinsaku from Nikomat Club Japan. t is also a site to remember a long lost friend on the Net. Note:certain content and images appeared in this site were either scanned from official marketing leaflets, brochures, sales manuals or publications published by Nikon over the years and/or contribution from surfers who claimed originality of their work for educational purposes. The creator of the site will not be responsible for may discrepancies arise from such dispute except rectifying them after verification."Nikon", "Nikkormat", "Nippon Kokagu KK" & "Nikkor" are registered tradename of Nikon Corporation Inc., Japan. Site made with an Apple IMac.