Holding
the Camera (how to press the shutter-release button)
 |
Proper way to hold and use the SLR camera |
How
to press the shutter-release button
As one of the main factor contributing to blur images is unsteady tripping of shutter
release button during an exposure in particular operating in slower shutter speeds
and it is always good to develop some awareness how to trip the shutter release button
in a correct manner. The shutter-release button of this camera has been designed
with a 2-steps
mechanism.
 |
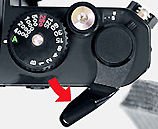
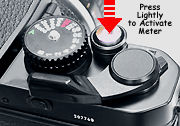
Pull out the film-advance lever to the standby position and press the shutter-release button lightly and stop it halfway. This operation is called a "Light pressure." The shutter is released when you completely press the shutter-release button from the Lightly-press position. |
 |
With a "Light pressure," the exposure meter turns on, and the meter-on timer is activated. The timer operates for approx. 16 seconds from the time you remove your finger from the lightly-pressed shutter-release button, and it also operates for approx. 16 seconds after the shutter is released. |
Moving the
camera while pressing the shutter-release button may result in "camera shake
photo' which will be blurred. Choose a high shutter speed of faster than 1/focal-length-of
-lens second for handheld shooting. Use a tripod and the AR-3 cable release as it
is threaded to accept cable release to eliminate camera shake. Cable release
is a shutter release device designed to eliminate vibration caused by slight movement
of the camera from pressing the shutter button with the camera on a tripod.
Do not press the shutter-release button sharply. Do a "Light pressure"
with the ball of your index finger, then squeeze to press the button slowly to the
end to release the shutter. Pressing sharply causes camera shake.
When the shutter-speed dial is set to "B" the exposure meter is not activated.
Focusing
 |
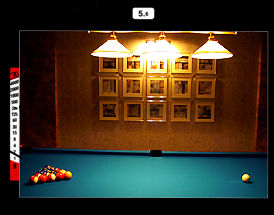
Look through the viewfinder and put the subject in focus by rotating the focusing ring of the lens. When focusing using the split prism-image rangefinder, turn the focusing ring of the lens until the upper and lower images coincide perfectly to form a single unbroken image. |
| Example: In focus | Example: Out of focus |
When focusing using the microprism grid or matte, turn the focusing ring so that the fuzzy image becomes sharp. In either case, get your main subject in focus. Generally, if you want to photograph a flower, focus on a stamen or pistil, and for an animal or person, focus on the eyes. |
 |
 |
Shooting Aperture-Priority Auto Mode
Aperture-Priority auto exposure
defines as an automatic mechanism to obtain the proper exposure by automatically
controlling the shutter speed depending on the aperture specified by the operator.
This mechanism provides flexible photographing, such as focusing on the foreground
subject and having an out-of-focus background with a wide aperture opening, or to
keep the overall picture in clear focus with a small aperture opening.
The aperture setting in the FM3A lets you adjust the exposure and control the depth
of field. If you want to sharpen the subject which extends far back, choose a small
aperture setting. It you want an out of focus background or foreground, select a
wide aperture i. e. f/2.8. If you shoot a flat subject, choose an intermediate aperture
setting.
 |
 |
In Aperture-Priority Auto mode, you can make the aperture setting as desired, and the camera controls the shutter speed automatically. |
1 Set the shutter-speed dial to "A.". In the "A" position, the shutter-speed dial is locked.
2. Pull out the film-advance lever to activate the meter and unlock the shutter release button.
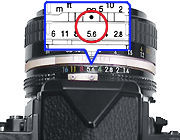 |
3. Make your lens aperture setting. |
 |
|
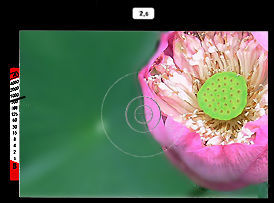
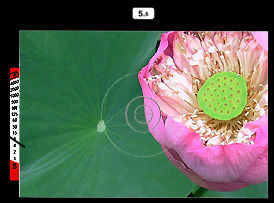
5. Lightly press the shutter-release button. Check the shutter speed, observing the exposure-meter indication in the viewfinder. |
| Example: Aperture of f/2.8 (Large aperture) | Example: Aperture of f/16 (Small aperture) |
Aperture Priority AE lets you control depth of field. A common visual way to interpret expression via sharpness and out of focus blur. Depth of field control is, good in handling many situations such as portraiture and scenic photography. See differences in both extreme of aperture value can affect an differing impression in a picture. |
 |
 |
<<<< - Copyright-free images collection © 2001
Shooting
in Manual
Mode
Press the centered button of the shutter speed ring while turning the dial will unlock
your from the "A" position to other shutter speed(s). When you switch over
to manual mode (make sure the film advance lever is at standoff position, light press
the shutter release button to activate the meter first), the black meter needle inside
the viewfinder will moves up and down corresponding to the camera recommended metering
accordingly to the aperture you have selected on the lens/shutter speed selected
on the shutter speed ring. It serves to tell you the camera's indicated matched shutter
speed for a proper exposure. You just match the blue bar to the needle to the black
meter needle. Positioning the blue bar above or below the black meter needle will
caused over or under exposure, regardless it is done intentionally or not.
a) In this
mode, you may select both the shutter speed and the aperture setting as desired.
b) By changing the combination of shutter speed and aperture setting, you can change
the photo style without changing the exposure.
c) You can create various effects, like controlling the depth of field by varying
the aperture setting or freezing the motion of a fast moving subject with high shutter
speed.
 |
d) When the battery is (batteries are) completely exhausted or does (do) not work in a cold place, all the electronic displays are disabled, but major mechanical systems, such as the shutter and aperture control, remains functional, enabling you to continue shooting. |
 |
 |
To Operate: |
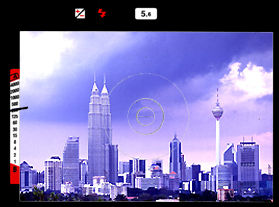
3). Compose your picture and focus. Place the main subject inside the 12-mm-diameter circle in the center of the screen, 4). Lightly press the shutter-release button. This activates the metering system and the metered needle will moves.
 Copyright-free images collection © 2001 |
 |
5). Align the shutter indicator and the exposure meter indicator. |
To align the two indicators, adjust the shutter -speed dial or the aperture setting.
 |
<<<< --- This will caused under exposure |  |
<<<< --- This will caused overexposure |
6). Slowly press the shutter-release button all the way. |
Reference
for shutter speed selection:
Exposing the film to light
with a combination of the aperture and shutter speed settings. The aperture is used
to adjust the amount of light that reaches the film, and the shutter speed is used
to adjust the length of time the film is exposed, thus providing the correct exposure.
a) If you
want to freeze the motion of a fast-moving subject, choose over 1/500. b) If you
want intentional camera shake, choose a shutter speed of under 1/60. c) If you want
to illustrate the flow of the water, choose a shutter speed of under 1/15. d) If
you want to shoot the fireworks or the track of lights in night scene, choose "B"
(Preferably work with a cable release).
 |
Example: Shutter speed of 1/15 sec with aperture of f/16 |
 |
Example: Shutter speed of 1/500 sec. with aperture of f/2.8 |
Center-weighted metering Light is measured in ther FM3A with priority given to the center of the image, gradually decreasing the metering level towards the edges. This is the standard metering system used in most Nikon MF cameras and often believed to provide higher chances of "proper exposure" although exposure setting that reproduces exactly the lighting condition for the subject from its highlighted to shadowed portions on the film, or can provide an image that matches the intention of the photographer. While the best combination of shutter speed and aperture value for the sensitivity of film in use may normally provide the correct exposure, this may not be true for the specific result you are looking for, as the difference in brightness an a subject is not always the same.
OFF TOPIC SUPPLEMENT: In this chapter, you may find many
terms such as "overexposure"
which simply reffered as a state in which the total exposure is too great when compared
with standard exposure.While on the other hand, "underexposure" means a
state in which the total exposure is insufficent when compared with standard exposure.
Before continue
with other sections, please bear in mind as I mentioned earlier that there is no
such thing called perfect exposure. Because this can be very subjective and such
values are mainly a personal preference. Theoretically, a good exposure is defined
as one (corresponding to the film in use) that visually yields the most brilliance
of colors But that sounds more like pleasing the film manufacturers ( in providing
a tight exposure latitude films all these years) and also to satisfy a viewer's desire
rather than appreciating the creator's vision of how to use over or under exposure
to emphasize a subject matter. Worst still, unless you are using unforgiving tight
exposure latitude slide films, an inexperienced printer in a color lab can have a
higher chance of damaging your prints with auto adjustment.
The FM2n uses a photocell to measure the scene with a 18% gray as standard value
(correspond with most scenery like green color) within the picture frame to arrive
at a proper or ideal exposure that can be obtain with certain combination of aperture
and shutter speed setting. That is what generally referred as 'metering'.
 |
 |
The metering system employs in the FM2n uses a 'safe' way of center weighted average metering method with center portion given higher priority for exposure calculation (Since that is where focusing is done) than the rest of other area combine. |
In Center-weighted average metering, light coming through the lens is refocused by an aspherical metering element and prism onto a highly sensitive SPC located near the eyepiece. The distribution ratio Nikon fond of providing is 60:40 which is used in the FM3A, later some models were given a ratio 75:25 and in some cases, it even offers 80:20.
Previous | NEXT | 4/8 Rewinding the Film, Control and features in details: Shutter-Speed Dial, Film-Advance Lever, Manual Film Speed Settings, Power ON/OFF, Exposure-Compensation Indicator
| Back | Index Page of Instruction Manual Section of Nikon FM3A
| Other Issues relate to Nikon
FM3A |< Index
Page >
| Instruction Manual for Nikon FM3A |
| Technical Specification | Main
Reference Map
|
Standard
production Nikon FM Series models:-
Nikon FM | Nikon FM2 | Nikon FM2n | Nikon FM10 | Nikon FM3a |
Known
variants:-
Nikon
FM Gold
| Nikon
FM2/T
| Nikon
FM2N Tropical Set
| Nikon
FM2/T Limited Edition
| Nikon
FM2N LAPITA
|
Nion
FM2n Millennium 2000
| Message Board | for
your favourite Nikon
FM Series SLR models
| Message
Board | for your Nikon
Optics in a shared environment
| Message Board | Specifically for Dispose or Looking for Nikon/Nikkor
Photographic Equipment
| Back | Main Index Page of Nikon FM series Bodies
Shared Resources: MD-11 | MD-12 | Focusing Screens | Titanium Shutter | ORIGINAL dedicated Flash Units -SB-16 | SB-15 | SB-10 or other Options | Databack | Nikkor lens mount (related info)
Others:- Nikon AF-TTL Speedlights
| SB-20 (1986)
|
SB-22
(1987)
| SB-23 | SB-24 (1988) |
SB-25 (1991/2) |
SB-26 (1994)
| SB-27(1997)
| SB-28 (1997) |
Nikon
SB-29(s)
(2000) |
Nikon
SB-30
(2003) |
Nikon
SB-600
(2004) |
Nikon
SB-800 (2003)
(updated)
Nikon AF-TTL Speedlight DX-Series: Nikon SB-28DX (1999)
| SB-50DX (2001) |
SB-80DX
(2002)
(updated)
Nikon
BC-flash Series |
Original Nikon Speedlight
SB-2
| SB-3
| SB-4
| SB-5
| SB-6
| SB-7E
| SB-8E
| SB-9
| SB-E
| SB-10
SB-11
| SB-12 | SB-14 | SB-140 UV-IR| SB-15 | SB16A | SB-17 | SB-18, SB-19 | SB-21A (SB-29) Macro flash | Flash Accesories | SF-1
Pilot Lamp
Instruction
Manual: Nikon FM (HTML | PDF) | Nikon FM-10 (HTML) | Nikon FM2n's
User's Manual
available only in HTML format (6
parts) | Nikon FM3A (HTML)
Specifications: Nikon FM, FM-10, FM2, FM2n and FM3A
Main Reference Map: (HTML) Nikon FM, FM2, FM-10, FM2n (Applicable
to FM2T, FM2 "Year of the Dog"; Millennium 2000") and FM3A
| Nikon F | Nikon F2 | Nikon F3 | Nikon F4 | Nikon F5 | Nikon F6 | Nikkormat / Nikomat | Nikon FM | Nikon FE/ FA | Nikon EM/FG/FG20 | Nikon Digital SLRs | Nikon - Other models |
Nikon Auto Focus Nikkor lenses:- Main Index Page
Nikon Manual Focus Nikkor lenses:- Fisheye-Nikkor Lenses - Circular | Full Frame |
Ultrawides Lenses - 13mm15mm18mm20mm | Wideangle Lenses - 24mm28mm35mm | Standard Lenses - 45mm 50mm 58mm | Telephoto
Lenses - 85mm105mm135mm180mm & 200mm | Super-Telephoto Lenses - 300mm 400mm 500mm 600mm 800mm 1200mm |
 Index Page |
Special
Application lenses: Micro-Nikkor Lenses - 50mm~55mm -60mm 85mm -105mm 200mm Micro-Zoom 70-180mm Perspective Control (PC) - 28mm 35mm PC-Micro 85mm Dedicated Lenses for Nikon F3AF: AF 80mm f/2.8 | AF 200mm f/3.5 EDIF Depth of Field Control (DC): 105mm 135mm Medical Nikkor: 120mm 200mm Reflex-Nikkor Lenses - 500mm 1000mm 2000mm Others: Noct Nikkor | OP-Nikkor | UV Nikkor 55mm 105mm | Focusing Units | Bellows-Nikkor 105mm 135mm Nikon Series E Lenses: 28mm35mm50mm100mm135mm | E-Series Zoom lenses: 36~72mm75~150mm70~210mm |
MF Zoom-Nikkor Lenses: 25~50mm | 28~45mm | 28~50mm | 28~85mm | 35~70mm | 36~72mm E | 35~85mm | 35~105mm | 35~135mm | 35~200mm | 43~86mm | 50~135mm | 50~300mm | 70~210mm E | 75~150mm E | 80~200mm | 85~250mm | 100~300mm | 180~600mm | 200~400mm | 200~600mm | 360~1200mm | 1200~1700mm
Tele-Converters: TC-1 | TC-2 | TC-200 | TC-201 | TC-300 | TC-301 | TC-14 | TC-14A | TC-14B | TC-14C | TC-14E | TC-16 | TC-16A | TC-20E
Recommended links to understand more technical details
related to the Nikkor F-mount and production Serial Number:
http://rick_oleson.tripod.com/index-153.html by: my
friend, Rick Oleson
http://www.zi.ku.dk/personal/lhhansen/photo/fmount.htm by: Hansen,
Lars Holst
http://www.mir.com.my/rb/photography/hardwares/nikonfmount/lens2.htm
http://www.photosynthesis.co.nz/nikon/serialno.html
W A R N I N G: The New G-SERIES Nikkor lenses have no aperture ring on the lens, they CANNOT ADJUST APERTURES with any of these manual focus Nikon FE series SLR camera models; please ignore some portion of the content contained herein this site where it relates.
|
Back | Main Index Page of Nikkor Resources
|
Back | Main Index Page of Pictorial
History of Nikon SLRs
| Message Board | for your Nikkor optics ("shared" because I do wish some of you to expose to other's perspective as well. Isn't it a sad sate to see photography has to be segmented into different camps from the use of various labels)
about this photographic web site
Home - Photography in Malaysia |
![]()
Credit: To all the good people who has contributed their own experience, resources or those who are kind enough granting us permission to use their images appeared in this site. Mr. MCLau®, who has helped to rewrite some of the content appeared this site. Chuck Hester® who has been helping me all along with the development of all these Nikon websites;LarsHolst Hansen, 'Hawkeye' who shares the same passion I have; Ms Rissa, Sales manager from Nikon Corporation Malaysia for granting permission to use some of the official content; TedWengelaar,Holland who has helped to provide many useful input relating to older Nikkor lenses; Some of the references on production serial numbers used in this site were extracted from Roland Vink's website; HiuraShinsaku from Nikomat Club Japan. t is also a site to remember a long lost friend on the Net. Note:certain content and images appeared in this site were either scanned from official marketing leaflets, brochures, sales manuals or publications published by Nikon over the years and/or contribution from surfers who claimed originality of their work for educational purposes. The creator of the site will not be responsible for may discrepancies arise from such dispute except rectifying them after verification."Nikon", "Nikkormat", "Nippon Kokagu KK" & "Nikkor" are registered tradename of Nikon Corporation Inc., Japan. Site made with an Apple IMac.