Rewinding the Film
 |
 |
When the film reaches its end, the film-advance lever will not rotate further. That is the end of the roll, so rewind the film. |
 |
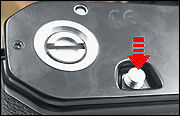
2). Press the film-rewind button. Just press the button once. You don't have to hold it pressed. 3). Rewind the film. Pull out the film-rewind crank and turn it in the direction of the arrow. Approaching the end of film rewind, you will feel a slight resistance in the crank. Continue turning and stop when resistance to the crank falls to zero. |
 |
 |
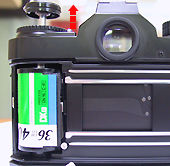
4). Open the camera back and remove the film cartridge. Pull up the film-rewind knob to open the camera back, and take out the film cartridge. |
Controls in Detail
The above procedures are pretty straight forward to setup the camera. To use the camera skillfully, you need to understand its mechanisms, functions and features. Chapters that follow will go into the details:
Shutter-Speed Dial
Film-Advance Lever
Manual Film-Speed Setting
Exposure-Compensation Indicator
Frame Counter
Depth-of-Field Preview Lever
Film-Plane Indicator
Accessory Shoe and Sync-Cord Terminal
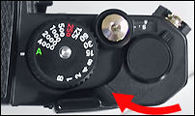
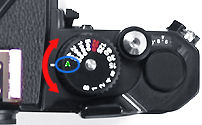
Shutter-Speed Dial
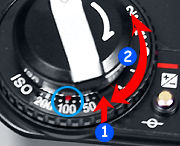
According to the situation or the intention of shooting, align the shutter-speed index with figures or marks on the shutter-speed dial. in the AUTO mode, the shutter speed is stepless. You may choose from among the following shooting modes:
 |
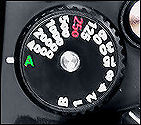 |
"A" (Aperture-Priority Auto mode) Once you make the aperture setting, the camera controls the shutter speed automatically. This is the simplest shooting mode with this camera. |
Locking and
releasing the shutter-speed dial: Once you set the shutter-speed dial to "A,"
the dial is locked to prevent inadvertent movement. To move the dial to another position,
rotate the dial while holding down the auto-lock release button at the center of
the dial.
 |
1 to 1/4000 second (Manual mode) In this mode, you may set both the shutter speed and aperture manually, producing various creative effects by adjusting means of the exposure. Please note that you cannot use intermediate positions between shutter-speed dial clicks. |
 |
B (Bulb mode) The shutter is kept open as long as the shutter-release button is depressed. Use this function when shooting nighttime scenes or stars, which requires extended exposure. Using an AR-3 cable release (sold separately) instead of holding the shutter-release button pressed with your finger, most cable release provide feature that you can lock the shutter-release button. |
Film-Advance
Lever
The film-advance lever also provides a lock function of the shutter-release button.
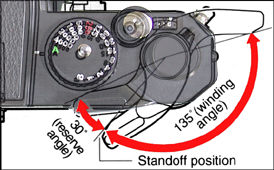 |
Power ON/OFF: When you pull the film-advance lever to the standoff position and lightly press the shutter-release button, the exposure meter turns on and the exposure indication appears in the viewfinder. The meters only stays on for approx. 16 sec. to conserve energy. |
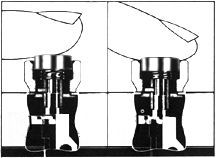 |
When you are
not using the camera, keep the film-advance lever set to its home position to prevent
the shutter from being inadvertently released. To advance the film, pull the film-advance
lever to the standoff position and further wind the lever until it stops. This operation
advances the film by a single frame, enabling a shutter release. The lever stops
during advancing when the film is used up. In this case, do not advance forcibly.
Rewind the film. In rare cases the film-advance lever meets strong resistance. It
so, the film may have been advanced unevenly. Do not advance it forcibly.
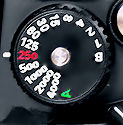
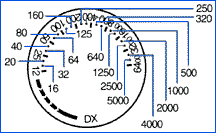
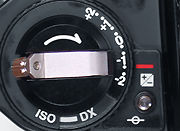
Manual
Film Speed
Settings: Set the film speed manually in the following cases:
1) To use non-DX-coded film.
2) To intentionally change the film sensitivity with DX-coded film and perform a
sensitizing/desensitizing treatment when developing.
3) The film speed can be set manually in the range of ISO 12 to 6400.
 |
|
Setting the film speed Pull and rotate the film-speed setting ring to set it to the film speed of the film in use. |
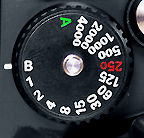
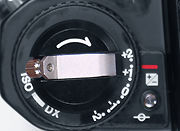
Exposure-Compensation Indicator When shooting in AUTO mode, if there is an extreme difference in shades between the main subject (person) and the background (such as subject standing in front with the back facing the window), it may be difficult to get the correct exposure. In such a case, or when you want to achieve a certain effect, exposure compensation is recommended. To change the standard exposure determined by an exposure meter. By intentionally changing the exposure setting, you may obtain a desired effect. Increasing the exposure is called positive compensation, and decreasing it is called negative compensation, Compensation may be efficient when a difference in exposure is generated, caused by the luminance, reflection, position, and size of the subject.
The camera's exposure meter reads based on a 18% neutral gray as reference to meter (the meter measures light level in grayscales, not in color), if you are shooting a small portion with a large background in white or in black, the meter may not faithfully reproduce the scene and could cause under (for White) or over exposure (for Black). The exposure compensation is also used to neutralize such unfavorable scenes so as to compensate for such meter error (see more info at the bottom).
| Example: Before compensation | Example: After compensation |
Without exposure compensation, the face is underexposed. |
 |
 |
 |
 |
A whitish subject of high reflectance may easily cause underexposure, and you need to adjust exposure compensation toward the + side. Compensate toward the side to shoot a dark subject of low reflectance that may cause overexposure. |
If it is hard to decide on the level of compensation, it is best to take the same shot several times with different exposures. Frankly, for an inexperienced user, I would rather advise to use the AE (Auto-Exposure Lock), just go near the subject, ensuring a big portion of the subject is within the 12mm metering reference circle inside the viewfinder, press and hold the AE lock to lock in the metered reading and shoot.
 |
 |
|
When exposure compensation is active, the exposure-compensation indicator |
||
 |
While holding down the exposure-compensation lock release button (1). rotate the film-speed setting ring. (2). Set the compensation index to the compensation value. Confirm the ring is firmly set down and locked in a clicked position. |
Previous | NEXT | 5/8 Fram Counter, Depth of Field Preview Lever, Film Plane Indicator, Accessory Shoe, Sync-Cord (PC)Terminal and Flash Photography with the Nikon FM3A
| Back | Index Page of Instruction Manual Section of Nikon FM3A
| Other Issues relate to Nikon
FM3A |< Index
Page >
| Instruction Manual for Nikon FM3A |
| Technical Specification | Main
Reference Map
|
Standard
production Nikon FM Series models:-
Nikon FM | Nikon FM2 | Nikon FM2n | Nikon FM10 | Nikon FM3a |
Known
variants:-
Nikon
FM Gold
| Nikon
FM2/T
| Nikon
FM2N Tropical Set
| Nikon
FM2/T Limited Edition
| Nikon
FM2N LAPITA
|
Nion
FM2n Millennium 2000
| Message Board | for
your favourite Nikon
FM Series SLR models
| Message
Board | for your Nikon
Optics in a shared environment
| Message Board | Specifically for Dispose or Looking for Nikon/Nikkor
Photographic Equipment
| Back | Main Index Page of Nikon FM series Bodies
Shared Resources: MD-11 | MD-12 | Focusing Screens | Titanium Shutter | ORIGINAL dedicated Flash Units -SB-16 | SB-15 | SB-10 or other Options | Databack | Nikkor lens mount (related info)
Others:- Nikon AF-TTL Speedlights
| SB-20 (1986)
|
SB-22
(1987)
| SB-23 | SB-24 (1988) |
SB-25 (1991/2) |
SB-26 (1994)
| SB-27(1997)
| SB-28 (1997) |
Nikon
SB-29(s)
(2000) |
Nikon
SB-30
(2003) |
Nikon
SB-600
(2004) |
Nikon
SB-800 (2003)
(updated)
Nikon AF-TTL Speedlight DX-Series: Nikon SB-28DX (1999)
| SB-50DX (2001) |
SB-80DX
(2002)
(updated)
Nikon
BC-flash Series |
Original Nikon Speedlight
SB-2
| SB-3
| SB-4
| SB-5
| SB-6
| SB-7E
| SB-8E
| SB-9
| SB-E
| SB-10
SB-11
| SB-12 | SB-14 | SB-140 UV-IR| SB-15 | SB16A | SB-17 | SB-18, SB-19 | SB-21A (SB-29) Macro flash | Flash Accesories | SF-1
Pilot Lamp
Instruction
Manual: Nikon FM (HTML | PDF) | Nikon FM-10 (HTML) | Nikon FM2n's
User's Manual
available only in HTML format (6
parts) | Nikon FM3A (HTML)
Specifications: Nikon FM, FM-10, FM2, FM2n and FM3A
Main Reference Map: (HTML) Nikon FM, FM2, FM-10, FM2n (Applicable
to FM2T, FM2 "Year of the Dog"; Millennium 2000") and FM3A
| Nikon F | Nikon F2 | Nikon F3 | Nikon F4 | Nikon F5 | Nikon F6 | Nikkormat / Nikomat | Nikon FM | Nikon FE/ FA | Nikon EM/FG/FG20 | Nikon Digital SLRs | Nikon - Other models |
Nikon Auto Focus Nikkor lenses:- Main Index Page
Nikon Manual Focus Nikkor lenses:- Fisheye-Nikkor Lenses - Circular | Full Frame |
Ultrawides Lenses - 13mm15mm18mm20mm | Wideangle Lenses - 24mm28mm35mm | Standard Lenses - 45mm 50mm 58mm | Telephoto
Lenses - 85mm105mm135mm180mm & 200mm | Super-Telephoto Lenses - 300mm 400mm 500mm 600mm 800mm 1200mm |
 Index Page |
Special
Application lenses: Micro-Nikkor Lenses - 50mm~55mm -60mm 85mm -105mm 200mm Micro-Zoom 70-180mm Perspective Control (PC) - 28mm 35mm PC-Micro 85mm Dedicated Lenses for Nikon F3AF: AF 80mm f/2.8 | AF 200mm f/3.5 EDIF Depth of Field Control (DC): 105mm 135mm Medical Nikkor: 120mm 200mm Reflex-Nikkor Lenses - 500mm 1000mm 2000mm Others: Noct Nikkor | OP-Nikkor | UV Nikkor 55mm 105mm | Focusing Units | Bellows-Nikkor 105mm 135mm Nikon Series E Lenses: 28mm35mm50mm100mm135mm | E-Series Zoom lenses: 36~72mm75~150mm70~210mm |
MF Zoom-Nikkor Lenses: 25~50mm | 28~45mm | 28~50mm | 28~85mm | 35~70mm | 36~72mm E | 35~85mm | 35~105mm | 35~135mm | 35~200mm | 43~86mm | 50~135mm | 50~300mm | 70~210mm E | 75~150mm E | 80~200mm | 85~250mm | 100~300mm | 180~600mm | 200~400mm | 200~600mm | 360~1200mm | 1200~1700mm
Tele-Converters: TC-1 | TC-2 | TC-200 | TC-201 | TC-300 | TC-301 | TC-14 | TC-14A | TC-14B | TC-14C | TC-14E | TC-16 | TC-16A | TC-20E
Recommended links to understand more technical details
related to the Nikkor F-mount and production Serial Number:
http://rick_oleson.tripod.com/index-153.html by: my
friend, Rick Oleson
http://www.zi.ku.dk/personal/lhhansen/photo/fmount.htm by: Hansen,
Lars Holst
http://www.mir.com.my/rb/photography/hardwares/nikonfmount/lens2.htm
http://www.photosynthesis.co.nz/nikon/serialno.html
W A R N I N G: The New G-SERIES Nikkor lenses have no aperture ring on the lens, they CANNOT ADJUST APERTURES with any of these manual focus Nikon FE series SLR camera models; please ignore some portion of the content contained herein this site where it relates.
|
Back | Main Index Page of Nikkor Resources
|
Back | Main Index Page of Pictorial
History of Nikon SLRs
| Message Board | for your Nikkor optics ("shared" because I do wish some of you to expose to other's perspective as well. Isn't it a sad sate to see photography has to be segmented into different camps from the use of various labels)
about this photographic web site
Home - Photography in Malaysia |
![]()
Credit: To all the good people who has contributed their own experience, resources or those who are kind enough granting us permission to use their images appeared in this site. Mr. MCLau®, who has helped to rewrite some of the content appeared this site. Chuck Hester® who has been helping me all along with the development of all these Nikon websites;LarsHolst Hansen, 'Hawkeye' who shares the same passion I have; Ms Rissa, Sales manager from Nikon Corporation Malaysia for granting permission to use some of the official content; TedWengelaar,Holland who has helped to provide many useful input relating to older Nikkor lenses; Some of the references on production serial numbers used in this site were extracted from Roland Vink's website; HiuraShinsaku from Nikomat Club Japan. t is also a site to remember a long lost friend on the Net. Note:certain content and images appeared in this site were either scanned from official marketing leaflets, brochures, sales manuals or publications published by Nikon over the years and/or contribution from surfers who claimed originality of their work for educational purposes. The creator of the site will not be responsible for may discrepancies arise from such dispute except rectifying them after verification."Nikon", "Nikkormat", "Nippon Kokagu KK" & "Nikkor" are registered tradename of Nikon Corporation Inc., Japan. Site made with an Apple IMac.